Anyone who’s had an IP address flagged knows the hassle isn’t just technical, it’s about losing access, getting blocked, or having endless login issues that slow down work and burn through time. The real headache comes when you’re hit with an abuse ip warning, and suddenly every site starts treating your device like trouble. This isn’t just about being on an IP blacklist; it’s about seeing normal accounts get restricted simply because someone else abused the same network range yesterday.
But the catch is, most users don’t realize how easy it is for their IP address to be lumped in with abusers. Sharing a public Wi-Fi, using the same proxy as hundreds of others, or running automation tools without proper setup, any of these can trigger an IP abuse check. What looks like a minor hiccup often means hours lost trying to prove you’re not responsible, or worse, finding out your login is now tied to an abused IP that keeps getting flagged.
So, the main question isn’t just how to fix a blocked IP, but how to stay off those lists in the first place. That means knowing how abuse ip incidents actually happen, which setups are more likely to get you flagged, and what changes make a real difference, especially as platforms keep tightening their checks. For anyone managing multiple accounts, running online operations, or just trying to avoid the next big restriction, it’s not enough to hope your IP stays clean. You need practical ways to reduce the risk and handle identity safely.
Here’s what actually triggers abuse ip problems, and what you can do to avoid them.
What Does 'Abuse IP' Actually Mean in 2026?
When people talk about an "abuse IP," they mean an internet address that's been flagged for risky or unwanted actions, like sending spam, running bot traffic, or hosting scams. If your connection shows up as one of these, you can lose access fast, even if you didn't cause the problem.
Common Types of IP Abuse
Most flagged IPs are linked to one or more of these:
- Spam or phishing attempts
- Fraud or payment abuse
- Automated bot traffic (like scraping or fake signups)
- Account farming for resale
- Malware hosting or distribution
How IP Abuse Is Detected and Reported
Platforms and security vendors track IP address abuse using reputation databases and blacklists. These lists are built from automated systems that watch for suspicious patterns, think thousands of logins in an hour, mass email blasts, or repeated failed logins from a single address. User complaints feed in, too: when someone reports spam or phishing, that IP can get tagged almost instantly.
But here’s where things get messy. Shared networks, public proxies, and even residential IPs from big providers can all end up blacklisted because of someone else’s actions. If your workflow depends on these, you might get hit with blocks, even when your accounts are clean. Once an IP is on a major list, email delivery drops, signups fail, or logins get locked out. Removing a false flag takes time, sometimes days or weeks, and there’s no single appeal process. A single abuse report can trigger a chain reaction that blocks everything tied to that address.
Why IP Abuse Matters for Individuals and Businesses
- Lost access: Blocked logins, restricted accounts, or failed signups become routine with a bad IP reputation.
- Email headaches: Messages from abused IPs often go straight to spam, or never arrive at all.
- Workflow risk: Multi-account setups or remote teams face sudden lockouts and bans if their IPs get flagged.
It only takes one abused IP to disrupt entire projects. Next, see how to check if your address is already on a blacklist before things spiral.
How to Check If Your IP Is Abused or Blacklisted
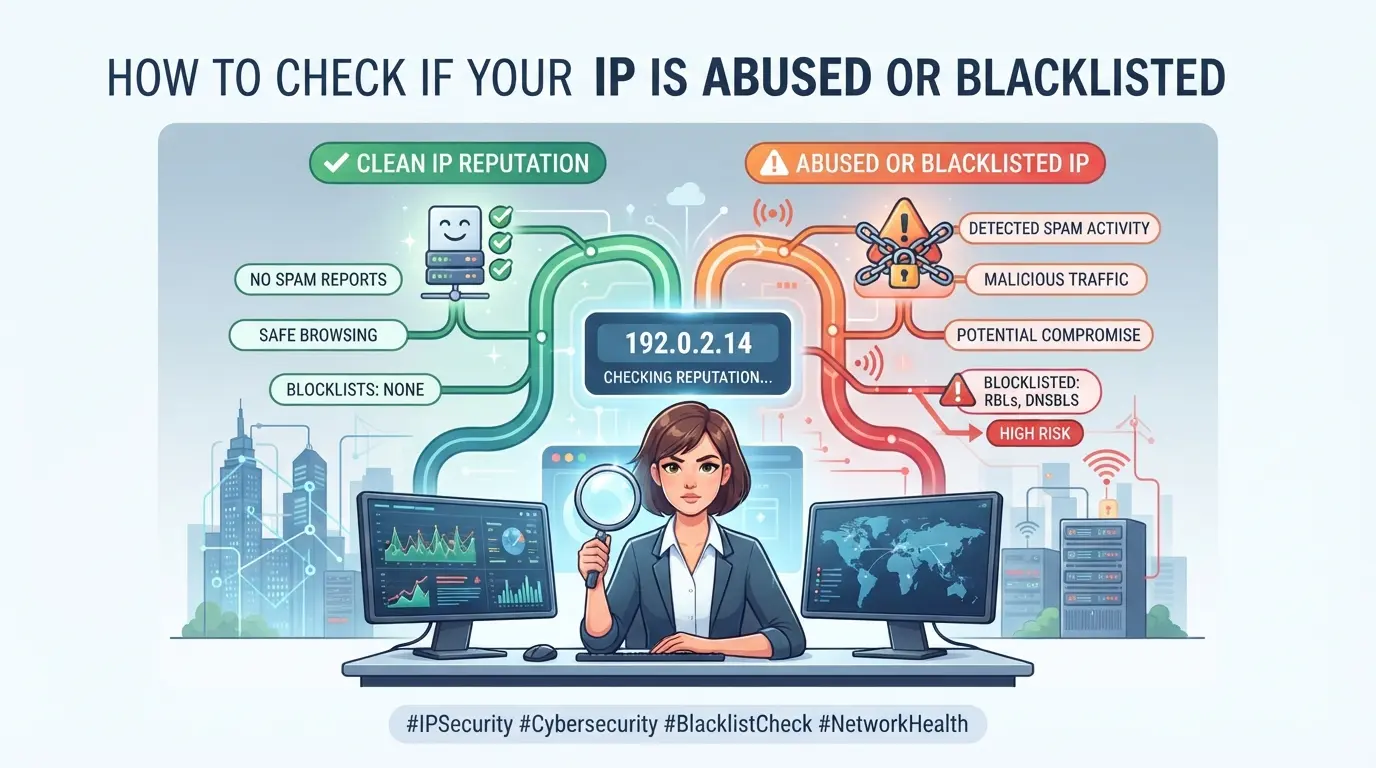
You don’t need a paid tool or deep technical skills to check if your IP is flagged. The real challenge is reading the results right, and knowing what to fix if you’re on a blacklist. Here’s how to check your IP status and catch problems before they spread.
Step 1: Identify Your Current IP Address
- Open WhatIsMyIP.com or a similar site, your public IP appears at the top.
- If you use a proxy, check local device settings. The IP shown in browser may differ from your actual network address.
- On mobile, switch between Wi-Fi and data and repeat step 1. This stops confusion if your network changes IPs often.
- Record your IP. You’ll need this for every abuse or blacklist check.
Step 2: Use IP Abuse and Blacklist Checking Tools
- Enter your IP in AbuseIPDB or Spamhaus.
- Review the results, look for “reported,” “blacklisted,” or “clean.”
- If you see multiple listings, check the dates. Recent flags are more likely to affect account login and workflow.
- A single old report may not be a concern, but multiple active blacklist entries mean your IP is likely to trigger restrictions.
Step 3: What to Do If Your IP Is Flagged
- Restart your router, this often assigns a new IP address if you’re using a dynamic connection.
- Switch to a trusted proxy or a mobile data connection. If the new IP is clean, you’re safe to continue.
- For fixed/static IPs, contact your ISP and request an IP change.
- If your IP is tied to ongoing abuse reports, document the issue and avoid using that address with important accounts, risk of restriction or login failure jumps.
Step 4: Common Mistakes When Checking IP Abuse
- Don’t panic if your IP shows up in one small database, many lists flag shared addresses without real abuse.
- Avoid tools that don’t update in real time. Outdated results can miss recent blacklist status.
- Misreading “reported” as “blacklisted” is a classic error. Only active blacklist entries matter for most platforms.
- Trust only official sources like AbuseIPDB, Spamhaus, or SORBS. Random web checks often mislabel IPs and create false alarms.
Done right, these steps let you catch problems before they cause account lockouts or workflow disruptions. The next section explains what actually causes abuse reports, and how responsibility is tracked.
Why IP Abuse Happens: Risks, Causes, and Who Is Responsible
Most people run into IP problems because the same network address gets linked to too much risky behavior, fast signups, bot actions, or traffic from banned regions. The real issue is who controls those risks and what setups make them worse.
Key Risk Factors for IP Abuse
The biggest triggers are shared proxies, large-scale account farming, obvious bot traffic, and malware-infected devices. Any one of these can push an IP onto blacklists within hours, even if you never touched the bad activity yourself.
Who Is Responsible for IP Abuse Prevention?
Responsibility is spread across several groups, but the weak link often decides who gets flagged. End users control their own device safety and proxy setup, but once you lease an address, your risk ties directly to everyone sharing that resource. Proxy providers promise unique or clean IPs, but if they oversell or recycle addresses, one client’s abuse can burn the whole pool. Platform operators set the rules, if they spot abuse from an IP range, they’ll block first and ask questions later. Business teams with many users or accounts must coordinate, since a single mistake on a “clean” address can get a whole set blacklisted. For example, a marketing agency using one proxy for 20 accounts might see all staff locked out if one operator starts spam automation or buys aged accounts with hidden history. Most IP reputation services can’t sort out which user caused the problem, they only see the source and pattern.
Common Misconceptions About IP Ownership and Abuse
- Leasing an IP does not mean you have full control, anyone else on that block can still get you flagged.
- B2B proxy and data center providers rarely guarantee long-term reputation; “clean today” can turn risky overnight.
- Using “private” or “dedicated” IPs is not a magic bullet, shared usage upstream or history you can’t see leaves you exposed.
How IP Reputation and Blacklists Affect Account Access and Workflow
Platforms now treat IP reputation as a core filter, if your login comes from a blacklisted or abused IP, you’re not just facing delays. You’re risking full account blocks and workflow breakdowns that can wipe out hours of work.
How Platforms Use IP Reputation to Restrict Access
Most platforms now auto-block logins from known bad IPs. You’ll see more CAPTCHA screens, forced email verifications, and sometimes silent shadowbans that are hard to spot until your actions stop working.
Impact on Email, Messaging, and Transaction Workflows
A single abused IP can drop your email deliverability to spam, trigger bans in chat apps, and freeze payment flows. For example, sending invoices from a blacklisted IP often means clients never get the email or see it buried in their junk folder. In ecommerce, platforms may flag your checkout session as “high risk,” leading to extra verification steps or outright account holds. Losing workflow reliability isn’t just an annoyance, it’s the fastest way to lose trust and revenue.
When Changing IPs or Proxies Is Not Enough
- If device fingerprinting matches an old session, switching IPs won’t clear the risk.
- Linked cookies or browser profiles can tie new logins to abused IPs, even after a proxy change.
- Workflow-level checks help: reset browser state, clear session data, and avoid reusing profiles across flagged networks.
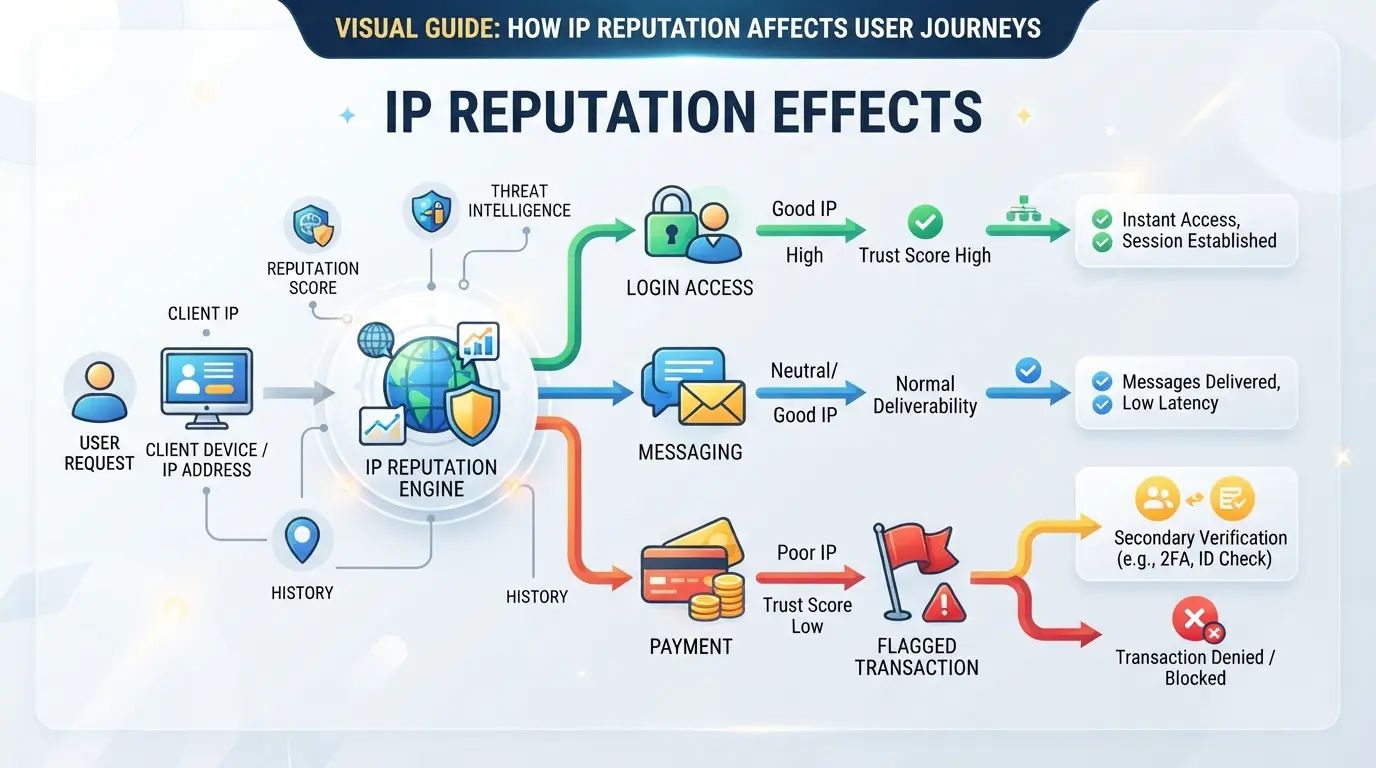
The real problem is that platforms now link every access event, so fixing one “abuse ip” issue doesn’t reset your reputation across all workflows. Next up: practical steps to lower your risk and keep accounts stable.
Safer Ways to Manage Multiple Accounts and Reduce IP Abuse Risk
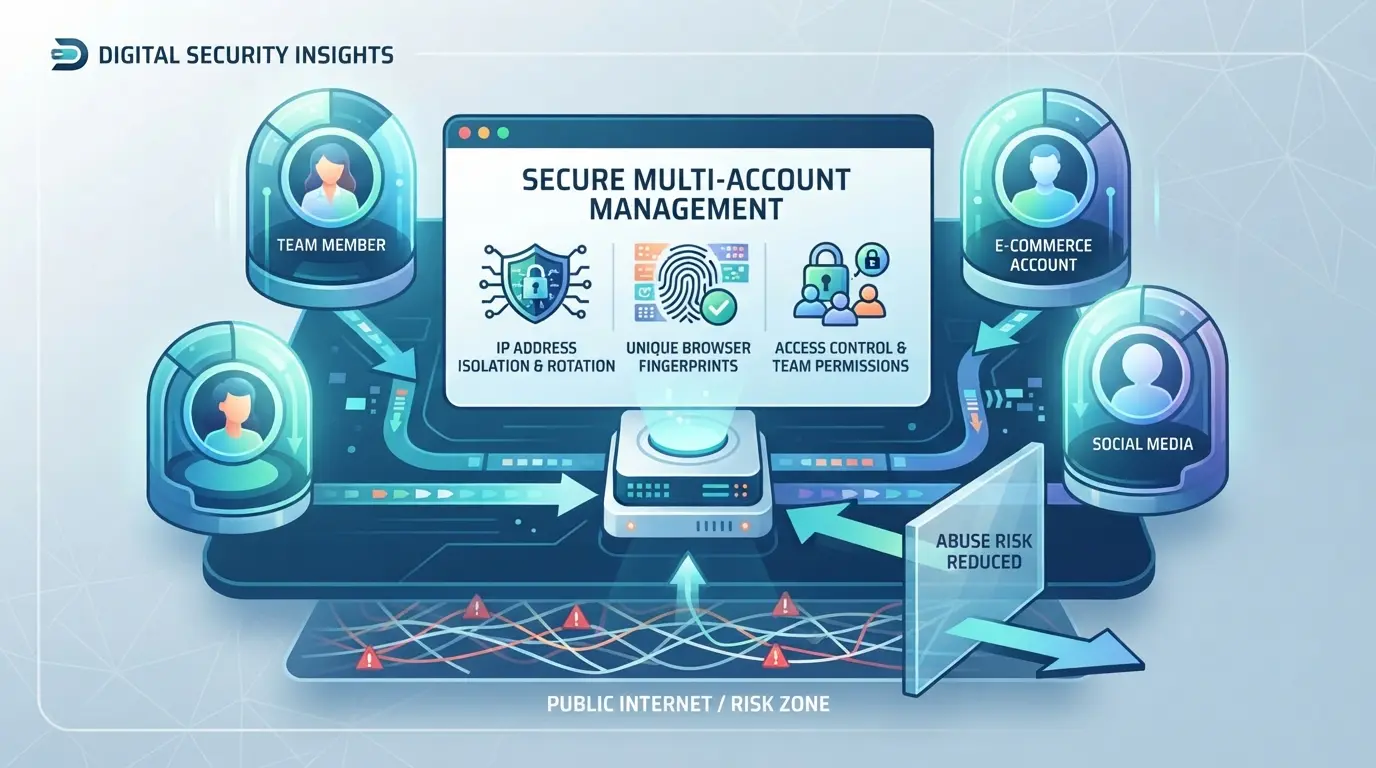
Handling multiple accounts gets risky when session data, fingerprints, and proxies overlap. The fastest way to trigger abuse ip flags is by mixing up account environments or recycling the same IP for different logins. Here’s a checklist for safer operations that keeps your workflow off the radar.
Separate Browser Profiles for Each Account
Using a dedicated browser profile for every account stops session bleed, which is the #1 cause of accidental cross-account contamination.
- Create a new profile for each account, never reuse profiles.
- Log out of all accounts before switching profiles.
- Delete cookies and local storage after each session.
- If you see unexpected popups or history from another account, restart the browser and check for leftover sessions.
Configure Unique Fingerprints and Device Signals
Platforms track user agent, OS, and screen resolution.
- Set a unique fingerprint per profile.
- Match geolocation and browser language to the proxy location.
- If login fails or triggers extra verification, check fingerprint consistency.
Assign Different Proxies to Each Profile
Sharing proxies between accounts almost always leads to IP reputation issues.
- Use one proxy per profile.
- Choose static proxies for stable workflow; dynamic proxies only if accounts are disposable.
- If login gets blocked, check if another account used the same proxy.
Monitor IP Reputation and Account Activity Regularly
Ignoring IP reputation is the fastest way to get stuck with restrictions.
- Run an IP abuse check before each login.
- Review account logs for unusual activity.
- If you see sudden rate limits, switch proxies and recheck account history.
Session and proxy isolation keep accounts from tripping platform risk systems, skipping this step almost always leads to restrictions.
How Operators Use DICloak to Separate Profiles and Configure Proxies for Safer Multi-Account Workflows
For operators handling multiple platform accounts, separating browser profiles and keeping network signals distinct is what actually keeps workflows cleaner, even before an abuse ip flag becomes a problem. It’s not just about changing the IP; the real work is in controlling which session data and network identity each account uses. DICloak fits here as a workflow tool, not a guarantee service. If you’re running more than one platform account, this is how a team sets up each account’s browser and network layer separately.
Create Separate Browser Profiles and Configure Fingerprints
Operators can create a new browser profile in DICloak for each platform account, making sure sessions don’t mix browser storage, cookies, or device signals. For each profile, fingerprint settings like OS, user agent, timezone, and geolocation can be adjusted to match the intended workflow. This means one account’s activity doesn’t leak device or session data into another’s environment. The scope is limited to browser-profile access; it does not change anything inside a connected SaaS tool or manage the accounts themselves. 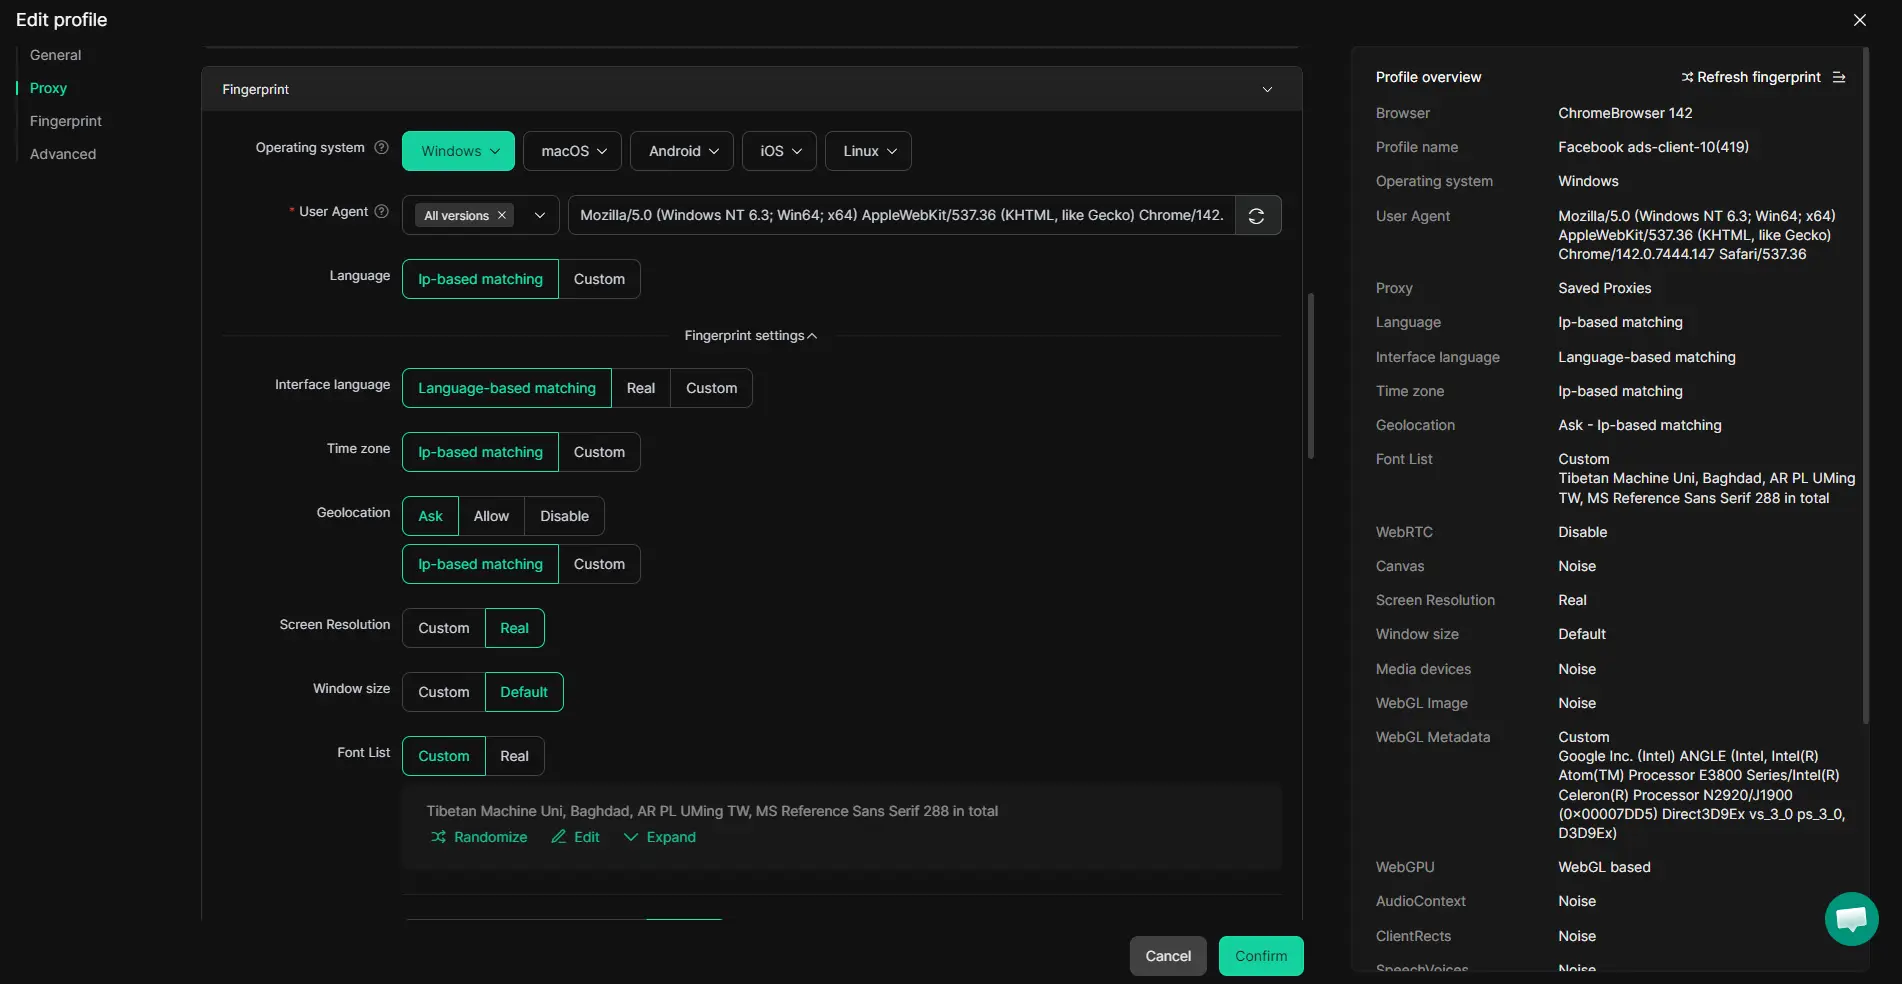
Assign User-Owned Proxies to Each Profile
Each browser profile can be set up with its own proxy, provided and controlled by the operator. Before starting a session, operators can add the proxy details, test the connection, and check the actual exit IP, country, and time zone in the DICloak interface. This step makes sure the network path for each profile is consistent with the assigned account, but proxy quality, rotation, and legal compliance are still the operator’s job. DICloak does not sell proxies or ensure they’re suitable for any platform. 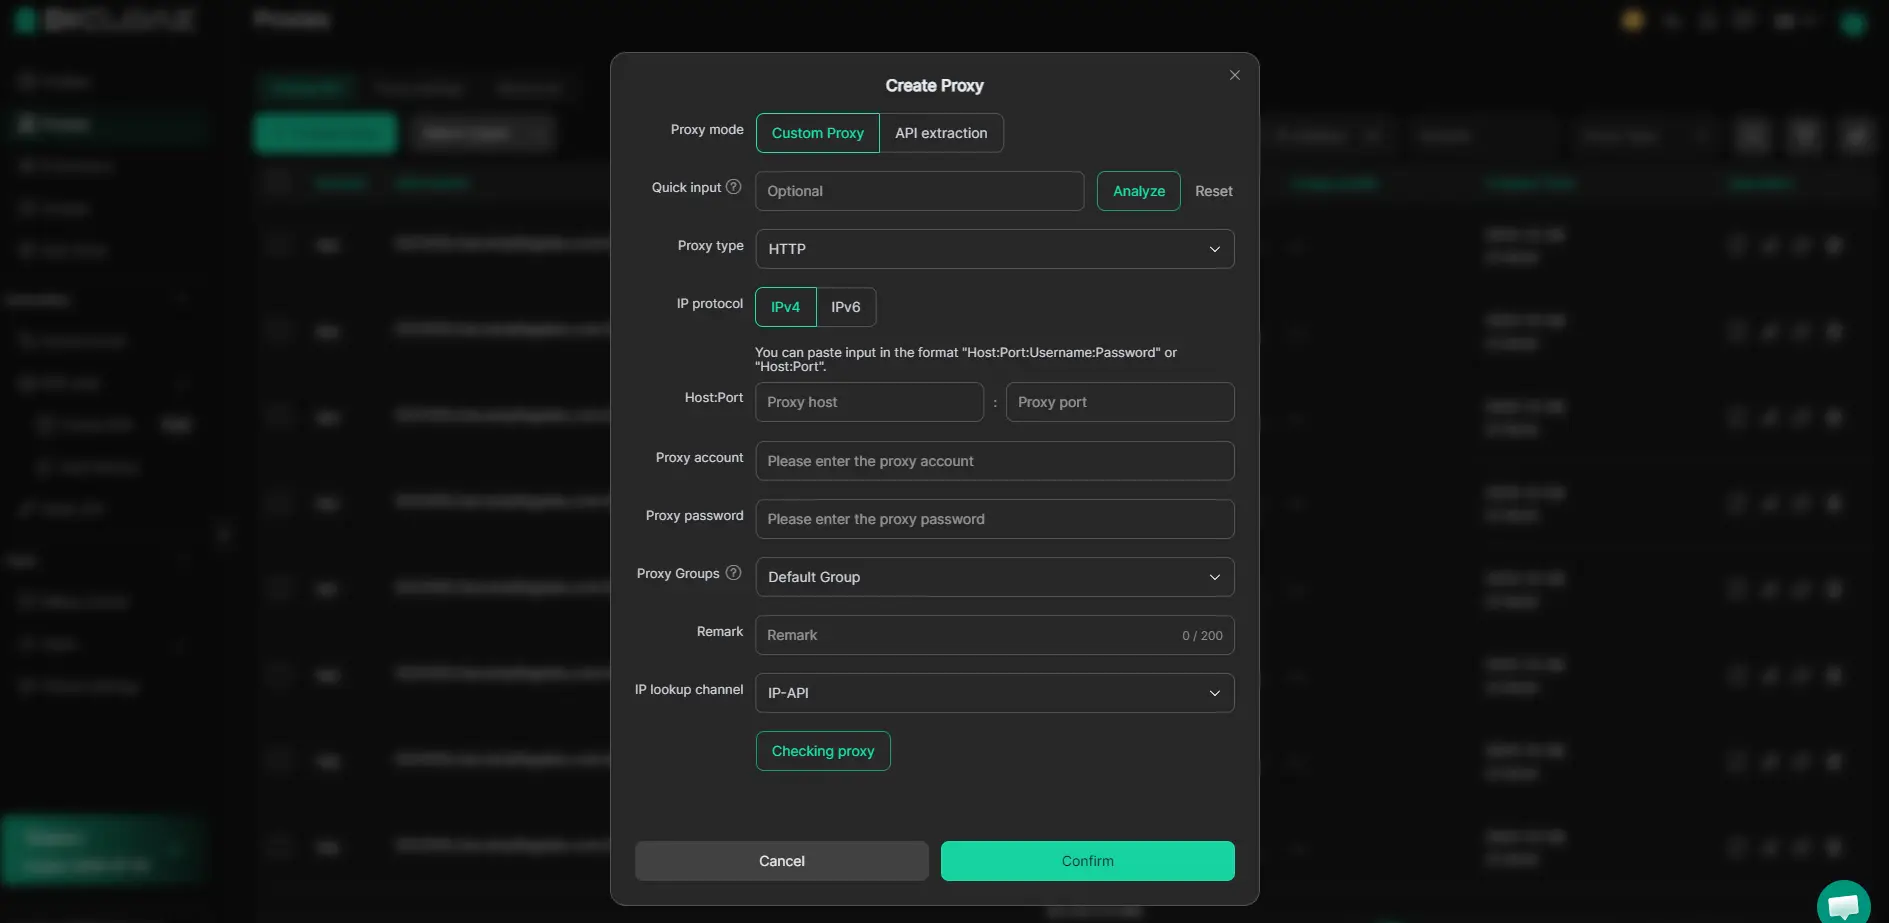
The next section covers common mistakes where even good profile and proxy setups still lead to account restrictions or IP reputation trouble.
Common Mistakes and Red Flags That Lead to IP Abuse or Account Restrictions
Small missteps can tie your accounts to an abused IP or get you restricted faster than most people realize. Spotting these risks early makes a bigger difference than any quick fix after the fact.
Using Shared or Public Proxies Without Checking Reputation
Relying on shared proxies is risky, these IPs are often recycled and carry someone else’s baggage. If you skip checking the proxy’s history, you inherit any blacklist or abuse reputation from previous users. Always run an IP reputation check before connecting, or you might find your accounts flagged for someone else’s mistakes.
Failing to Isolate Account Sessions
- Never log into different accounts from the same browser profile.
- Avoid reusing cookies or sessions between accounts.
- Clear browser data before switching accounts.
Ignoring Device and Fingerprint Consistency
Mismatch between device fingerprint and expected user pattern is a dead giveaway. If your login device changes too often or doesn’t line up with your claimed location, platforms flag you as suspicious and may restrict or lock access.
Overlooking IP Reputation Checks
Skipping regular IP status checks means you’ll miss blacklist alerts until it’s too late.
- Set up automated IP reputation monitoring.
- Act if an IP shows up on a known blacklist.
- Switch to a clean IP at the first warning sign.
When Changing IPs or Using Proxies Isn't Enough: Advanced Risk Factors in 2026
Even with a fresh IP or proxy, platforms can still flag accounts for abuse ip if advanced signals match risky behavior. Here’s where simple swaps fall short.
- canvas and WebGL fingerprints can link sessions across IP changes.
- WebRTC leaks real device info, even when using proxies.
- Time zone or language mismatches make multiple accounts stand out.
Behavioral Patterns and Automation Detection
Platforms track login times and the speed of actions. If an account logs in at odd hours or blasts through tasks faster than a human could, detection systems spot the pattern, changing IPs alone won’t hide these signals.
Frequently Asked Questions About abuse ip
What does 'abuse IP' mean in practical terms?
Abuse IP means an IP address has been used for harmful activities, like sending spam, hacking, or spreading malware. This can lead to your IP getting blocked or flagged by websites and email providers. It affects real-world tasks, making it harder to access services or send legitimate messages.
How can I check if my IP is abused or blacklisted?
You can use online tools like MXToolbox, Spamhaus, or AbuseIPDB to check your IP status. Enter your IP address, and these sites will show if it appears on any blacklist or has a negative reputation. Regular checks help you spot issues early and take steps to fix them.
Can using a proxy prevent IP abuse?
A proxy hides your real IP, but it doesn’t stop abuse if the proxy itself is misused. If many users abuse the proxy IP, it can get blacklisted. Also, some proxies are less secure and may leak data. Using a proxy lowers direct exposure, but it doesn’t remove all risks.
What are the consequences of having an abused IP?
An abused IP can disrupt your workflow. You may find emails blocked, accounts suspended, or websites denying access. Others might distrust messages from your IP. Fixing these issues often means contacting support, changing IPs, or improving security to restore your reputation.
Is it possible to fully avoid IP abuse risk when managing multiple accounts?
You can reduce risk by using dedicated IPs, strong passwords, and monitoring activity. However, total avoidance isn’t possible, as shared networks and unexpected threats can still cause trouble. Staying alert and following best practices helps keep your IP reputation safe.
Taking proactive steps to investigate suspicious IP addresses can help protect your network from a wide range of online threats. Consider leveraging specialized tools that simplify the process of identifying and blocking harmful traffic for a safer digital environment. Try DICloak For Free
 Web Proxy Tools
 Free Tools
 Cookie Plugin
 UA Generator
 MAC Address Generator
 IP Generator
 IP Address List
 2FA Code Generator
 World Clock
 Anonymous Check
 WebRTC Leak Test
 UUID Generator
 Free Web Proxy Site
 Proxy Checker
 FB Ad Checker
 AI Web Scraping
 Free SMM Tools
 Twitter Shadowban Checker
 Instagram Name Checker
 UTM Generator
 Username Generator
 AI Hashtag Generator
 LinkedIn Headline Generator
 Social Media Image Resizer