Trying to get a free edu email for cursor often looks like a shortcut to unlock the Cursor student plan without paying. But the steps aren’t always clear, some guides skip the part where fake or recycled edu accounts stop working after a few weeks. You might get access for a day, or you might find your account flagged the moment Cursor spots a mismatch.
The real headache starts when you try to claim Cursor with edu email and hit a dead end: the school domain isn’t recognized, or support asks for proof you don’t have. Some users turn to random “get free edu email for Cursor” generators, but those rarely last. Others try real but borrowed student emails, risking both their Cursor access and the original owner’s data.
If you’re thinking about using a free edu email, there’s more at stake than just getting the student discount. The biggest risks are account lockouts, payment trouble if you upgrade, and losing projects if the edu email is deactivated. A smarter approach is to know which edu domains work, how Cursor checks eligibility, and what to do if you want to move everything to your own email later.
Step-by-step, here’s how people are actually getting student access, and what to watch for before you start.
What to Know Before Using a Free EDU Email for Cursor in 2026
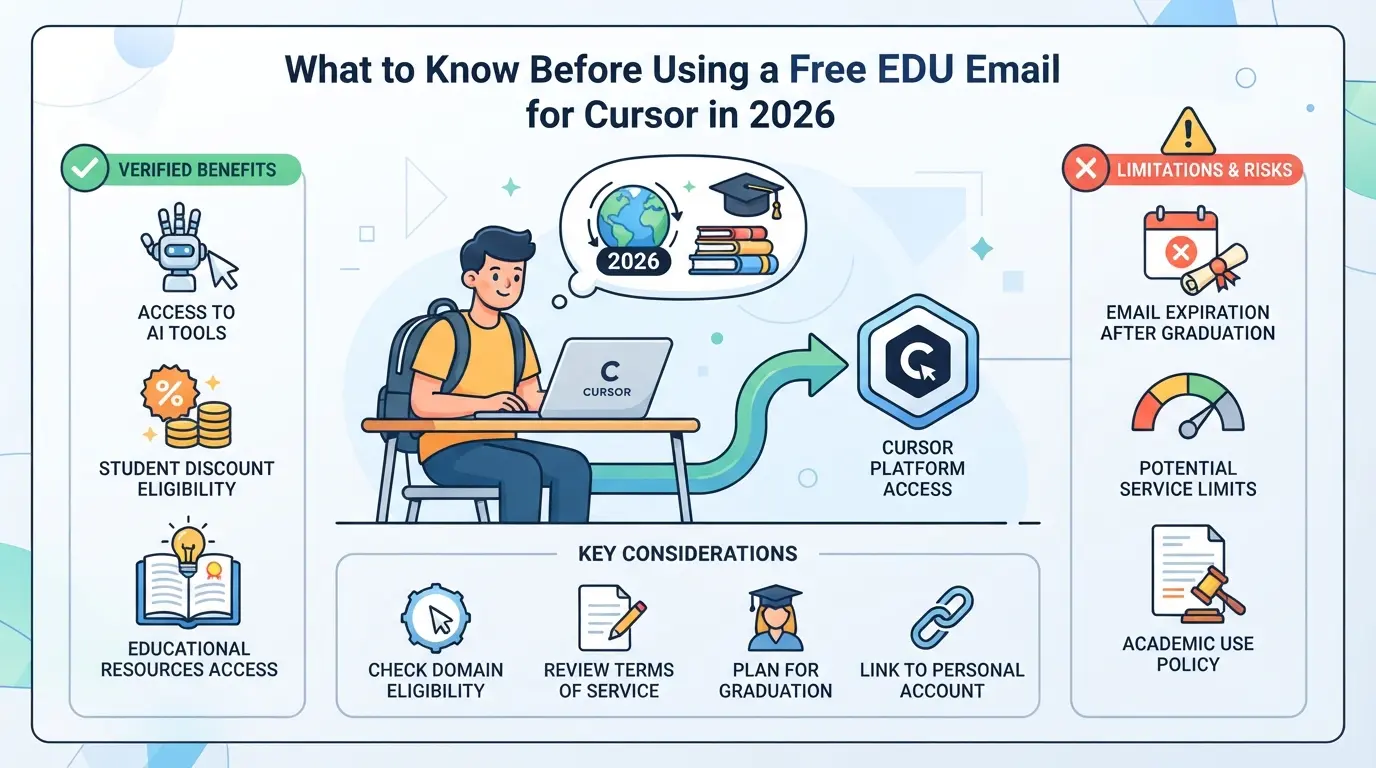
If you want to claim the Cursor student offer using a free edu email, the real question is whether your address will pass the check and if you’ll actually keep access long-term. Most people get stuck because their edu email isn’t recognized or their eligibility falls into a gray area right from the start.
What Counts as a Valid EDU Email in 2026?
Only certain school domains work: the classic “.edu” from US colleges nearly always passes, but international student emails or anything from a free generator get flagged or rejected. Domains ending in ".ac.uk" or ".edu.au" sometimes work, but random “school” lookalikes almost never do.
Who Can Apply: Students, Educators, and Edge Cases
Cursor’s student plan requires an address from a recognized school, but the process is stricter than just having any ".edu" email. Most US college students and faculty are fine, but international users run into more checks, especially if their domain isn’t widely used or isn’t listed in major education databases. For example, a user with “@stud.uni-berlin.de” might clear the first step, but get blocked at the verification screen when Cursor asks for extra proof like a student ID or active enrollment. If your school isn’t on the list or your status is complex (part-time, alumni, or open university), you may get stuck in a loop: either support requests official documentation or the system locks you out after a few tries. The chance of success drops if you use borrowed or commercialized edu emails, these are flagged by anti-abuse systems and often lead to account loss or denied access. If you’re not sure your status counts, try the normal signup with your edu address, but avoid risky workarounds that could get you banned or tied to someone else’s data.
Risks and Limitations of Using Free EDU Emails
- Losing access: School revokes the email after graduation, cutting off Cursor and any saved content.
- Flagged account: Cursor detects a suspicious edu domain or shared address and suspends your plan without warning.
- Upgrade trouble: Payment failures or verification issues if you ever want to switch to a paid plan.
Not every “get free edu email for Cursor” trick is worth the risk, skipping these checks often leads to a dead end, or worse, a locked account. Next, see why even legit-looking setups can fail and what to watch for if you’re considering this route.
Why Some Free EDU Email Setups for Cursor Fail or Get Flagged
Even if you manage to register Cursor with a student email, that’s no guarantee your account will last. Most failures and restrictions come down to one thing: the system checks more than just your email address. If you skip steps or try shortcuts, you risk getting locked out or flagged before you even start using Cursor’s student plan.
Frequent Verification Issues and How to Prevent Them
Most instant failures happen because the email doesn’t match a real student or the domain is on a blocklist. Cursor checks if your edu email is active, not just valid. If the email was generated by a public tool or is recycled from another user, the verification usually fails right away.
Account Linking, Device Fingerprints, and Suspicious Patterns
Cursor doesn’t just look at your email. The system tracks device fingerprints, browser profiles, and even the pattern of where you log in. If you try to sign up for more than one student plan from the same laptop, or you use a browser with leftover cookies from another Cursor account, your new account can get flagged as a duplicate. For example, someone signs up with a borrowed .edu email on a used laptop, Cursor spots an identical device ID linked to another account and disables both. Shared Wi-Fi, repeated use of the same browser, or logging in quickly after another user from the same device are all red flags. Even if you pass the initial email check, these patterns nearly always lead to account reviews or lockouts within days. The real risk isn’t just losing access, but having your main account flagged and your student plan revoked across all linked emails.
What Happens If You Lose EDU Email Access
- If your edu email expires or the school disables it, Cursor usually removes your student status, sometimes without warning.
- If you can’t get back into your edu inbox, you lose the ability to reset your password or verify future logins.
- To protect your work, export important projects and update your account to a personal email before the edu address is closed.
Staying ahead of these problems means thinking beyond just how to get free edu email for Cursor. The next step is knowing how to claim and use your student plan without getting tripped up by verification or device issues.
Step-by-Step: How to Claim and Use Cursor with a Free EDU Email
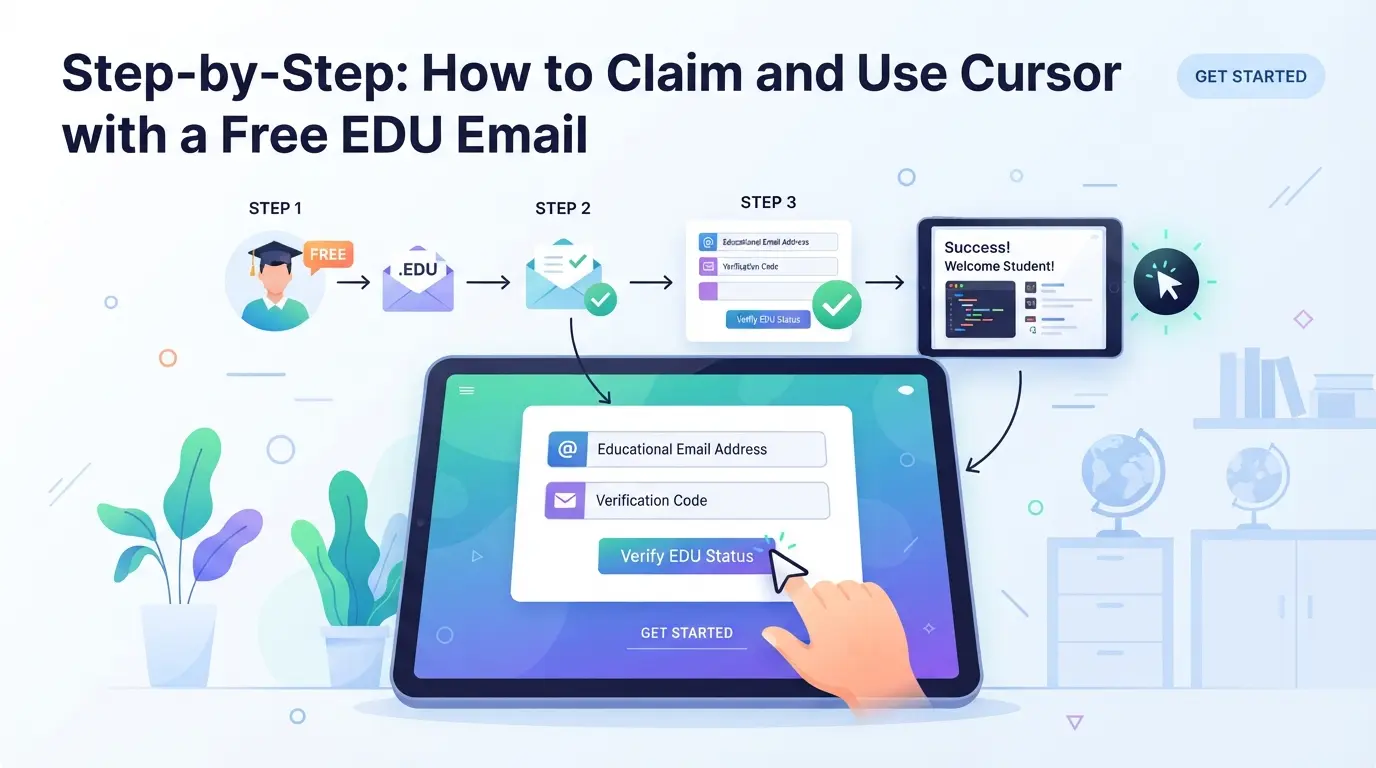
Getting Cursor student access with a free edu email isn’t just about entering a .edu address and hoping for a discount. The real difference comes down to checking eligibility, verifying the domain, and knowing what to do if things go sideways. Here’s what actually works in 2026.
Step 1: Prepare Your EDU Email and Required Information
- Check if your edu email domain matches the list Cursor accepts. Domains like “.edu” from US universities usually work; lesser-known or international domains often get rejected.
- Gather any proof you might need, sometimes Cursor asks for a student ID, enrollment letter, or screenshot showing your name and email.
- Log into your edu email inbox ahead of time. If you can’t access the inbox, you won’t be able to confirm the verification link.
If your domain isn’t recognized, don’t waste time applying, Cursor will block the request and you’ll have to start over with a new email.
Step 2: Create Your Cursor Account and Start Verification
- Go to the official Cursor sign-up page and enter your edu email.
- Watch for a verification email. If it doesn’t arrive in 10 minutes, check your spam folder.
- Click the link in the email, if it says “domain not supported,” you’ll need a different edu email.
- Fill any extra forms Cursor shows, sometimes you’ll need to upload proof or answer a quick eligibility quiz.
Step 3: Activate the Student Plan and Confirm Access
- Once logged in, look for the “Student Plan” badge or check the billing page. Activation should be instant if your edu email passes.
- If you see “pending” or “manual review,” expect delays up to 48 hours, Friday requests can stretch to 72 hours.
- If activation fails, Cursor usually sends a rejection email. Retry with a better domain or contact support.
Step 4: Initial Setup and Best Practices for New Users
- Configure your IDE plugin and set up your coding environment. Cursor works best with VS Code and JetBrains.
- Change your account password and enable two-factor authentication to protect access.
- Don’t share your edu email, if Cursor detects multiple users, your account can lose student perks.
Step 5: What to Do If You Hit a Roadblock
- If signup fails, double-check your domain and documents. Retry with a different edu email if needed.
- For persistent issues, use in-app chat support during weekday mornings, response times drop to under 2 hours.
- Avoid email support unless you have time; average replies take 7-11 days.
Next up: how to avoid common mistakes with free edu email accounts, so you don’t lose Cursor access midway through the semester.
How to Avoid Common Mistakes and Risks with Free EDU Email Accounts
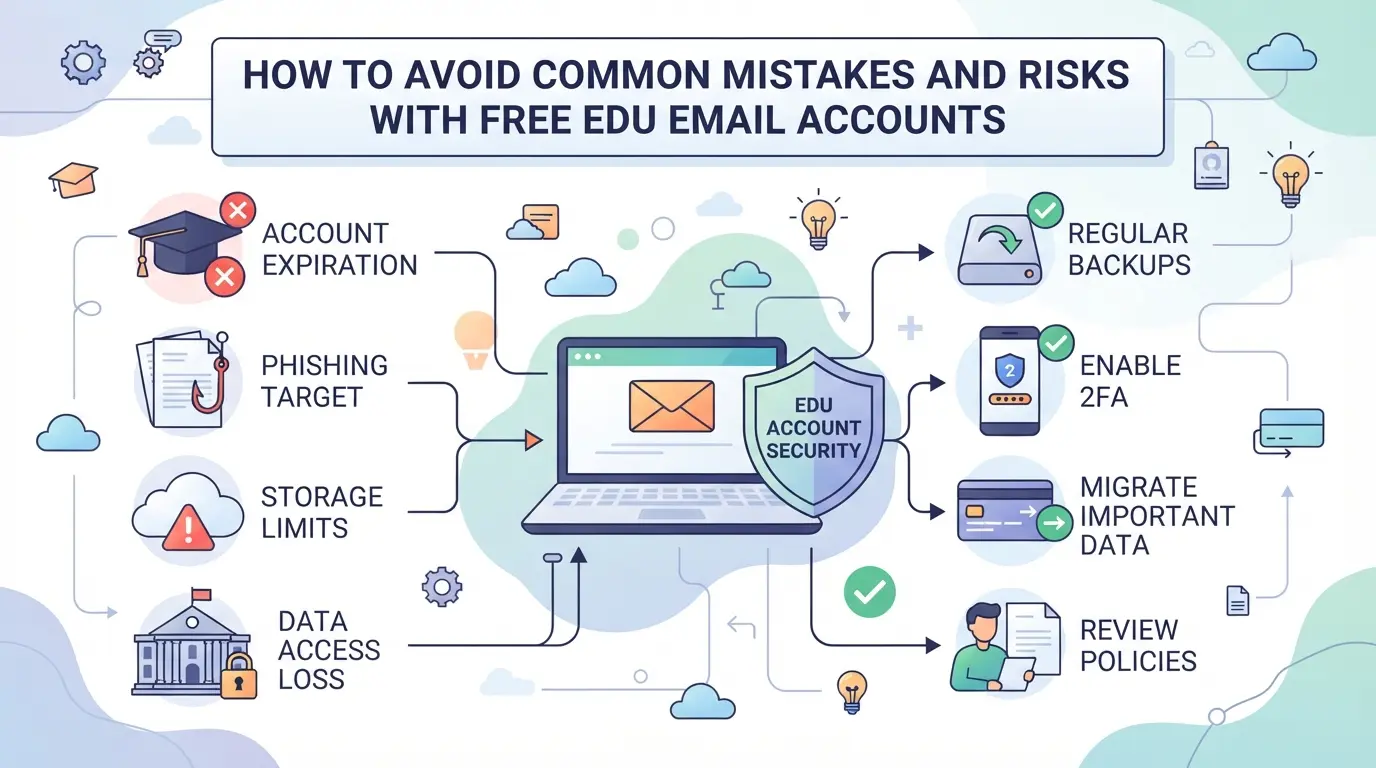
The biggest mistake people make with free edu email for Cursor is chasing a quick sign-up without thinking about lockouts, lost projects, or privacy gaps. Protecting your access means avoiding borrowed accounts, mixing sessions, and skipping backup steps.
Borrowed or Purchased EDU Emails: Why This Backfires
Borrowed or bought student emails seem easy, but platforms spot mismatched login locations and sudden device changes fast. Cursor often restricts accounts tied to reused edu domains or those flagged for suspicious activity , you risk losing access mid-semester, and any work tied to that account can vanish for good.
Mixing Personal and Student Accounts on One Device
- Clear browser cookies before switching between accounts.
- Use separate browser profiles for each account.
- Log out fully before starting a new session.
Forgetting to Back Up Important Data or Projects
If your edu account gets revoked, all linked Cursor projects can be wiped without warning. Always export your work or sync with a personal email before the school closes your account or resets passwords.
Ignoring Privacy and Security Settings
Leaving default settings is asking for trouble. Change recovery options and check sharing permissions right after activation.
- Set a new recovery email ASAP.
- Turn on two-factor authentication if available.
- Review all connected apps for unwanted access.
Next, see how smarter account separation actually prevents these risks for multi-account users.
When and Why You Need Smarter Account Separation: Multi-Account and Privacy Workflows
If you’re juggling more than one Cursor account or want to keep your free edu email for Cursor from being linked to your main profile, simple tricks won’t cut it. The real risk comes from platforms tying accounts together using browser data and device fingerprints, making it easy for Cursor to spot duplicate accounts, even if you switch browsers.
Why Simple Incognito or Browser Switches Often Fail
Incognito mode and swapping browsers sound convenient, but they rarely fool modern platforms. Cursor and similar tools use fingerprinting, tracking device, browser settings, fonts, and even hardware, to connect sessions. If you switch to a new browser but reuse the same device, your accounts often get flagged together.
When You Need Profile Isolation and Proxy Configuration
If you’re running student group projects, managing research logins, or handling side accounts for perks, isolated browser profiles and separate proxies are non-negotiable. Here’s where problems show up: a team member logs in from a shared device, and suddenly all project accounts face restrictions. Using isolated profiles means each account gets a unique browser fingerprint. Pairing that with a proxy, so the IP address is different, cuts the risk of platform-level linking. The tradeoff is more setup time and some extra cost for proxies, but this one step is what stops bulk bans and hard-to-fix lockouts.
Signs You Should Upgrade Your Workflow
- Your accounts keep getting kicked out, logged off, or hit with captchas.
- You manage two or more Cursor or platform logins for projects, sales, or access.
- You notice restrictions after team members share devices or networks.
If you see these signs, basic browser separation isn’t enough. Moving to profile isolation and proxy setups makes your workflow safer and keeps your edu perks from getting revoked. The next section covers how to build that system without stumbling over common mistakes.
How to Set Up Safer Multi-Account Workflows with DICloak: Profile Isolation, Proxy, and RPA
For readers who end up juggling more than one platform account, whether for Cursor, student perks, or other tools, basic browser separation quickly hits its limit. Once you need to keep sessions, cookies, and network connections distinct, manual browser setups fall short. This is where advanced antidetect-browser workflows matter. If you’re managing multiple platform accounts and need more control, operators can use DICloak to build out a workflow with real profile isolation, user-assigned proxies, and repeatable automation, all without mixing up sessions or leaking browser signals.
Create Separate Browser Profiles and Configure Fingerprints
Operators can create a new browser profile for each account workflow in DICloak, making sure that logins, cookies, cache, and browser settings don’t overlap. Each profile’s reported settings, like operating system, User Agent, timezone, and screen size, can be configured independently, which means a team or solo operator can simulate separate browser profiles without relying on a single device. This is a big step up from using Chrome’s built-in profiles, which still share some system-level signals. The key advantage is that you can assign and review fingerprint settings for each profile instead of hoping defaults are enough. The scope here is limited to browser profiles and signal configuration; it does not change account ownership or manage connected platforms. 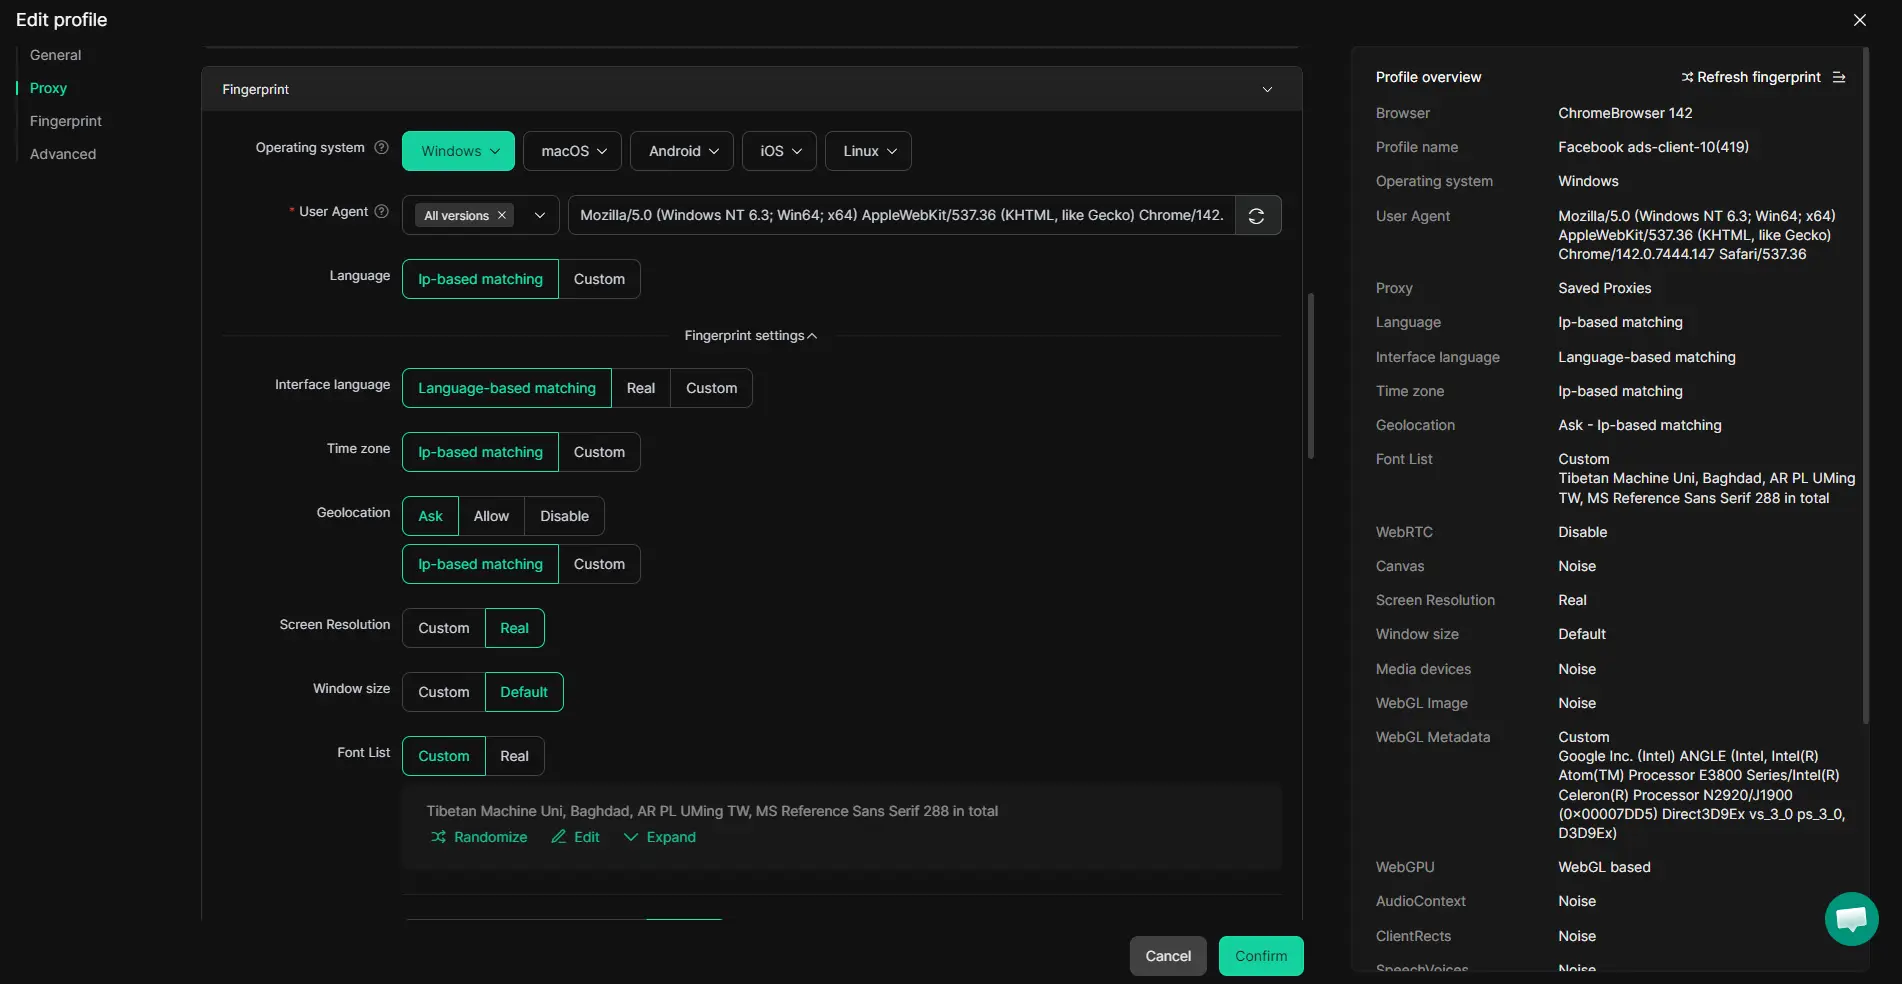
Assign User-Owned Proxies to Each Profile
When separate network routes matter, operators can assign their own proxies to each browser profile. DICloak supports manual proxy entry, saved proxy lists, and API-based proxy extraction for teams with dynamic pools. Before launching a session, it’s easy to test the selected proxy and confirm the detected exit IP and region, a step that avoids guessing if the network is really separated. Just remember, the proxy choice and any legal or compliance checks are up to the user. DICloak’s role is to store and apply your chosen proxy per profile; it does not supply proxies or enforce unique IPs per account. 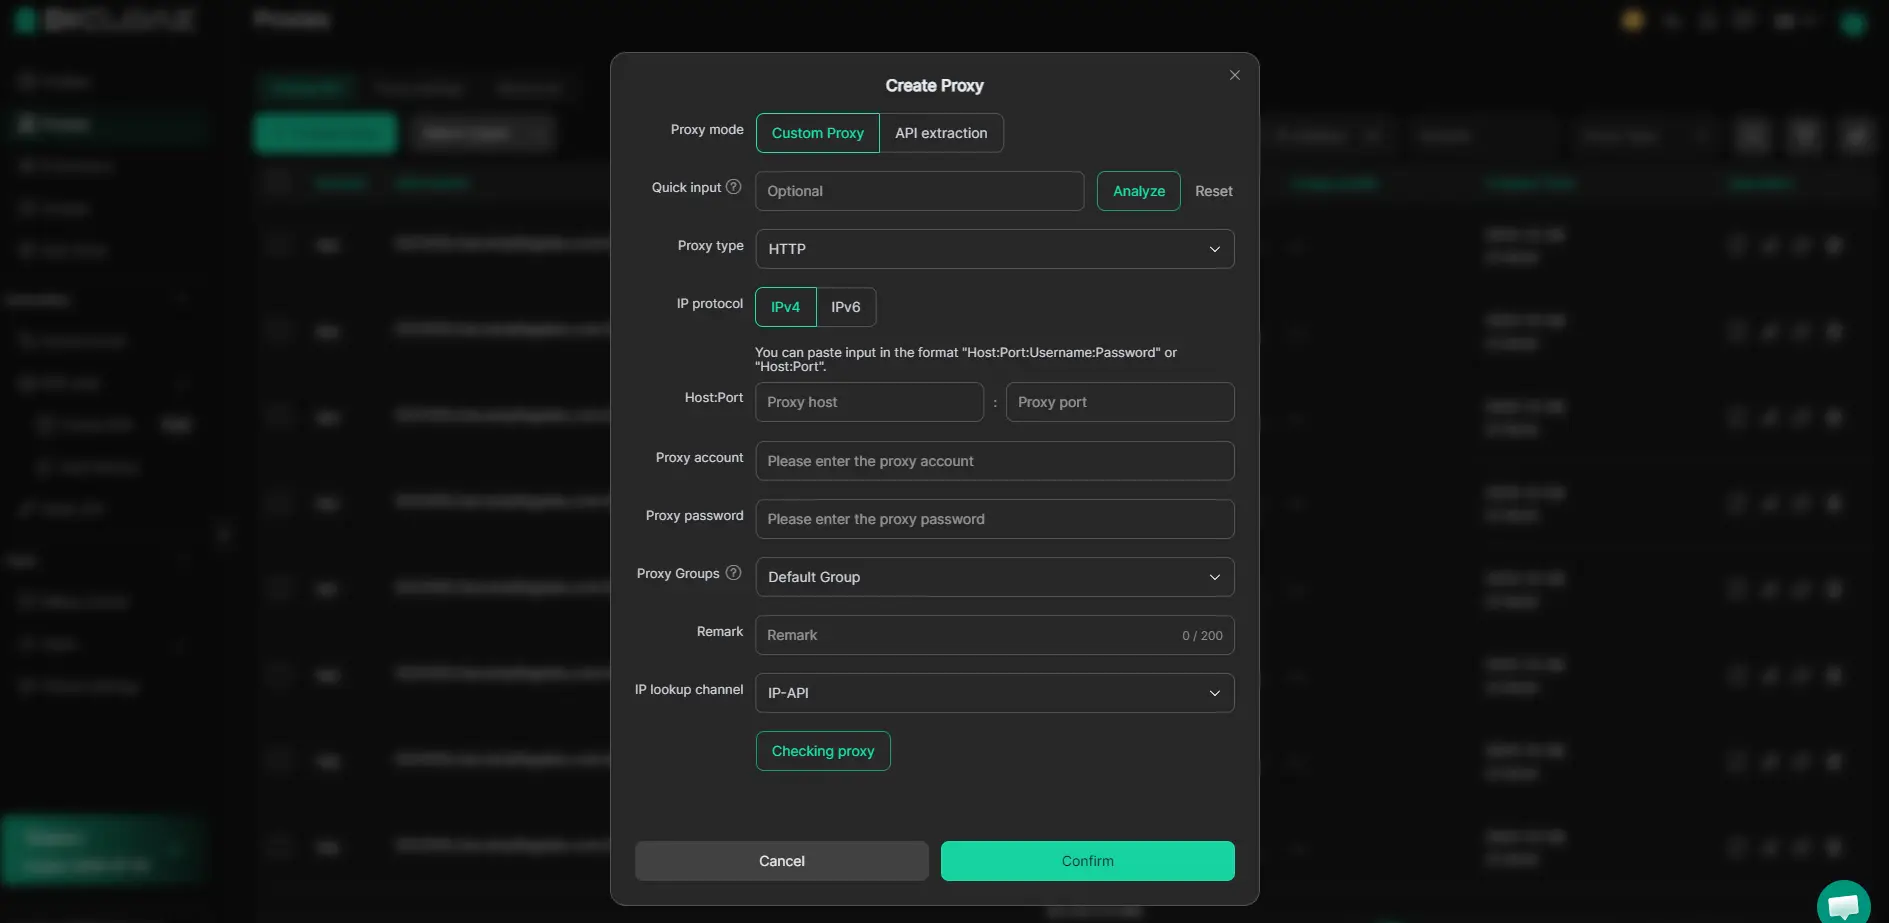
Automate Repetitive Tasks with RPA
Manual logins and setup steps across profiles eat up time and introduce mistakes. Operators can configure RPA tasks in DICloak to automate repeatable browser actions in selected profiles, like filling in the same onboarding info or running a login sequence. Each task’s run can be scheduled, monitored, and reviewed in per-profile execution logs, so errors are caught early instead of compounding across accounts. Teams stay responsible for task design and platform rules; RPA simply executes repeatable browser workflows and collects run results for review. 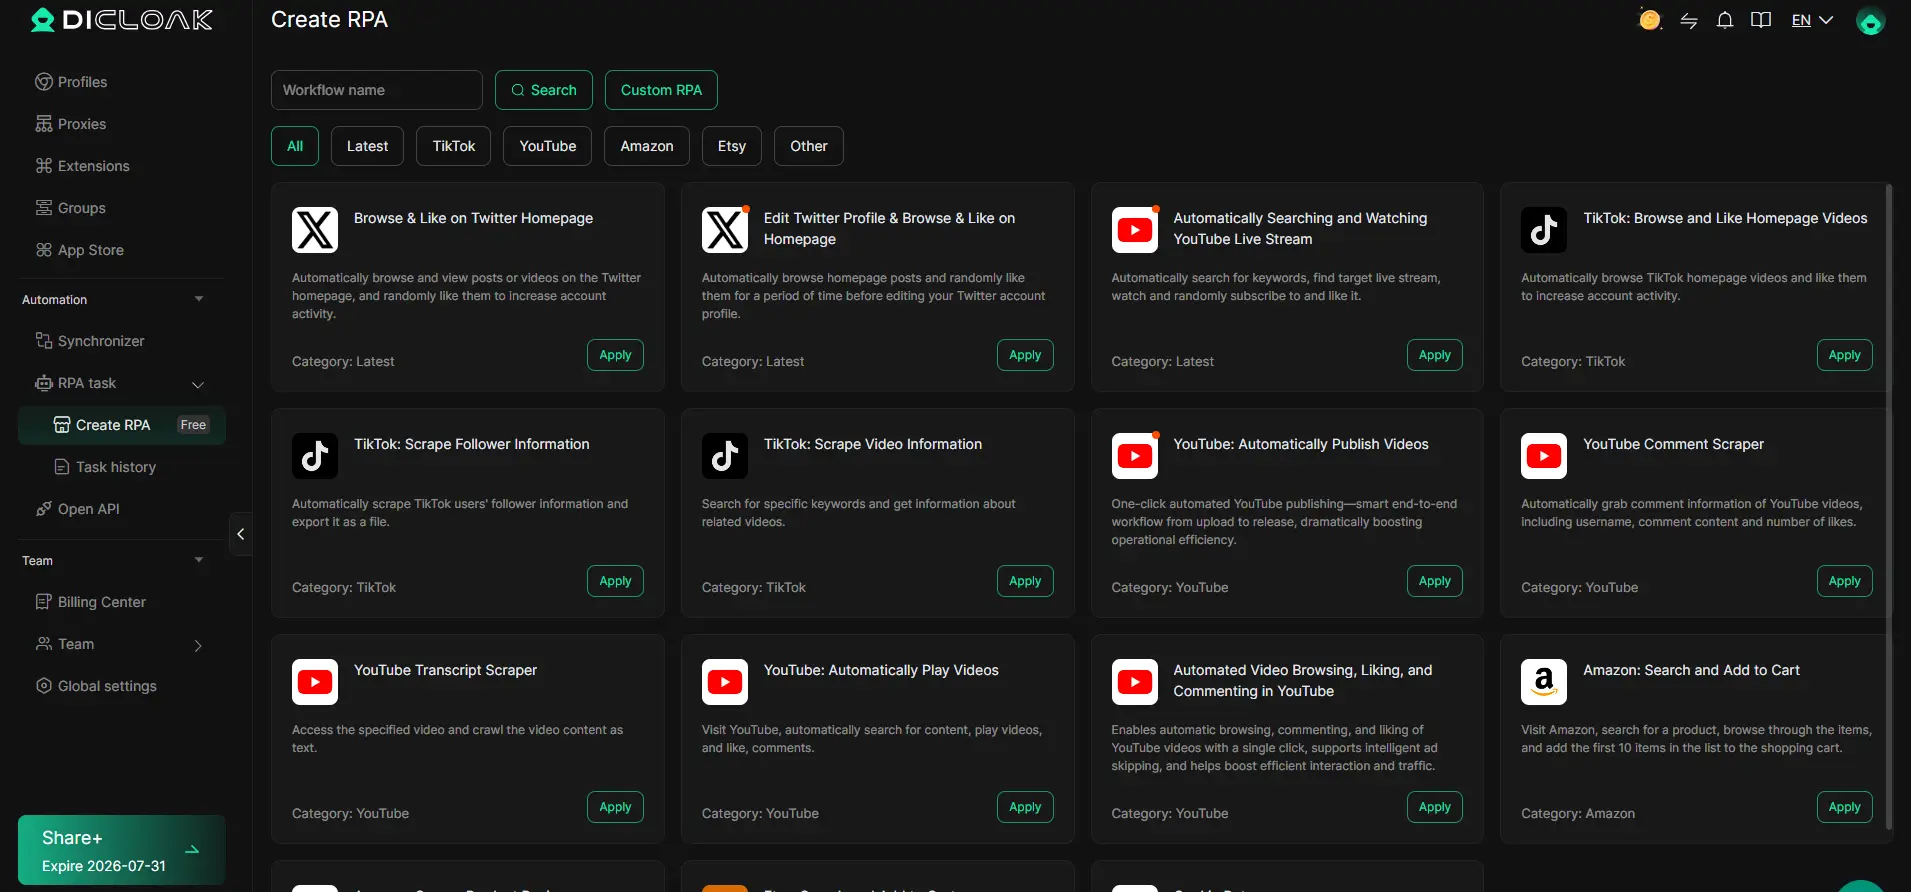
With profiles, proxies, and automation in place, advanced users can handle high-variation, multi-account work without the noise and risk of browser overlap. This foundation makes it possible to claim perks or manage student tools at scale, if you also nail the platform-side details, which the next section covers.
Maximizing Your Cursor Student Perks: Advanced Tips and Common Pitfalls
Combine Cursor with Other Student Developer Perks
Stacking your Cursor student plan with other perks like the GitHub Student Pack, extra cloud credits, and free productivity tools can unlock more than just code editing, think upgraded API access and project hosting for zero cost. Check each program’s details; some require the same edu email, so line them up while your student status is valid.
Bring Your Own API Keys and Integrations
- Add your own API keys for GPT or cloud services to skip shared limits.
- Set up integrations early, since some require school credentials.
- Use private browser sessions for each platform when connecting accounts.
Avoiding Pitfalls: Plan Expiry, Usage Limits, and Support
Don’t wait for your student plan to end, missed deadlines can mean lost data or features.
- Check expiry dates and set reminders.
- Export projects before losing access.
- Plan budget for paid upgrades if you’ll keep using Cursor.
Frequently Asked Questions About free edu email for cursor
Can I use a free EDU email for Cursor if I’m not in the US?
Yes, you can use a free edu email for cursor from outside the US if your school’s email uses a recognized academic domain. However, many student offers only accept .edu or certain country-specific domains. Some non-U.S. emails may not pass verification, so check Cursor’s requirements before trying to get free edu email for Cursor benefits.
What happens to my Cursor account when my EDU email is deactivated?
If your school deactivates your EDU email, you may lose access to your Cursor student plan. Cursor may ask you to re-verify your email, and if you can’t, you could lose features or even your account. To stay safe, back up important files and consider transferring your account to a personal email before graduation.
Is it safe to use a borrowed or purchased EDU email for Cursor?
No, using a borrowed or bought EDU email for Cursor is risky. Cursor may suspend or ban accounts found using fake or unauthorized student emails. You could lose access at any time, and sharing accounts can also break school or platform rules. Always use your own school email to claim the Cursor student plan.
How many Cursor accounts can I create with one EDU email?
Cursor allows only one account per EDU email address. Creating multiple accounts using the same email can lead to all accounts being suspended. Platform policies strictly limit account creation to prevent abuse. Stick to one Cursor account per student email to avoid losing access.
Can I use proxies or profile isolation to manage multiple Cursor or student accounts?
Using proxies or browser profile isolation can help separate accounts, but Cursor’s terms often prohibit having multiple student accounts per person. Advanced tools may hide your activity, but if detected, you risk losing all linked accounts. Use these tools only within platform rules and never to bypass account limits.
Take a moment to consider how an educational email can open up valuable resources and discounts tailored for students and educators. If you’re ready to improve your learning or teaching experience with added benefits, explore secure tools that protect your digital identity as you sign up. Try DICloak For Free
 Web Proxy Tools
 Free Tools
 Cookie Plugin
 UA Generator
 MAC Address Generator
 IP Generator
 IP Address List
 2FA Code Generator
 World Clock
 Anonymous Check
 WebRTC Leak Test
 UUID Generator
 Free Web Proxy Site
 Proxy Checker
 FB Ad Checker
 AI Web Scraping
 Free SMM Tools
 Twitter Shadowban Checker
 Instagram Name Checker
 UTM Generator
 Username Generator
 AI Hashtag Generator
 LinkedIn Headline Generator
 Social Media Image Resizer