Trying to figure out how to resell tickets on ticketmaster usually means you’re stuck between two headaches: you have tickets you can’t use, but you also don’t want to get stuck losing money or breaking the rules. The Ticketmaster resale process looks simple at first, there’s a Sell button right in your account. But the actual steps, the timing, and the fees aren’t always clear until you’re mid-process and facing a deadline.
What trips up most people isn’t just finding where to list their tickets. The real catch is the restrictions, some tickets don’t have resale enabled, some events set price floors or caps, and transfers are sometimes blocked. If you skip over these, you risk a last-minute panic or having your sale canceled for reasons you only see buried in the fine print.
You also need to watch out for payout delays, account verification issues, and buyer protection rules that can hold your money for days after the event. Even if you manage to list your seats, the timing of when you post, how you set your price, and what info you update (like payment details) can mean the difference between a smooth sale and getting stuck with unsold tickets.
So before you click sell, here’s what actually works, and what can backfire, when reselling tickets on Ticketmaster.
What to Check Before Trying to Resell Your Ticketmaster Tickets
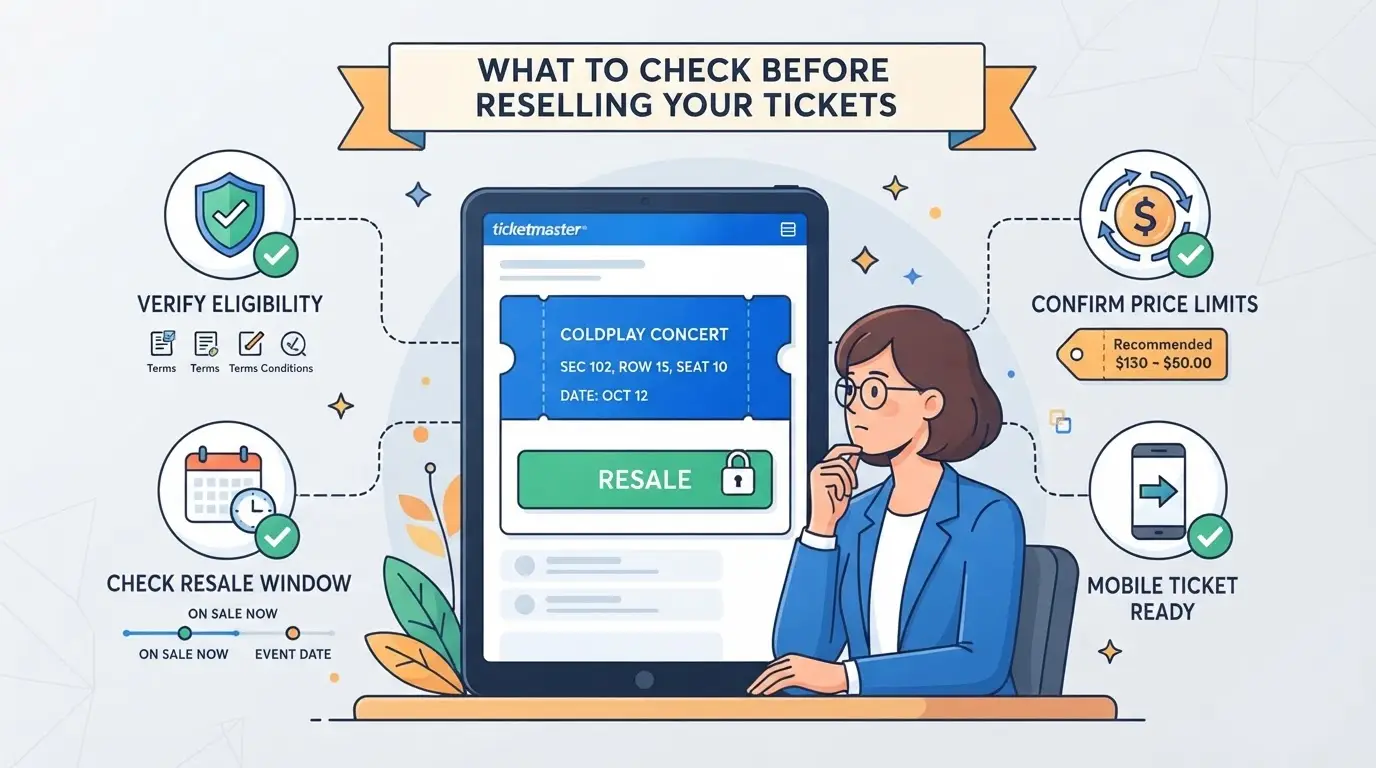
If you want to list your Ticketmaster tickets, the first step is checking whether resale is actually allowed for your event and ticket type, otherwise, you could waste time setting up a listing that never goes live.
How to find out if your event allows resale
Inside your Ticketmaster account, open your order and look for a “Sell” button next to the tickets. If you see it, your event allows resale. If the button is missing or grayed out, that event or ticket type isn’t eligible, no workaround will unlock it. Most sports, concerts, and theater shows let you resell, but some festivals, high-demand onsales, and charity events are locked from the start. Always check from your account, not the event page, since public listings can’t show your ticket’s status.
Ticket types and delivery methods that affect resale
Mobile and paper tickets aren’t treated the same. These delivery details can block your listing:
- Paper tickets mailed to you can’t be resold online through Ticketmaster.
- Mobile tickets marked “non-transferable” or “restricted” usually block resale.
- Will-call pickup or delayed release tickets often can’t be posted until closer to the event.
Event and account restrictions to watch for
Geography, account history, and ticket transfer timing all matter. You might get blocked even if your ticket type is allowed.
- Check if the event restricts resale to buyers in certain states or countries, Ticketmaster sometimes enforces these limits.
- Make sure your account hasn’t had recent failed payments, suspicious transfers, or pending verifications; these can freeze resale access.
- If you bought or received the tickets in the last 72 hours, some listings are delayed to prevent fraud, watch for a waiting period notice before you try to post.
Missing any of these checks can leave you unable to sell, even if you thought the ticket “should” be eligible. Next up, you’ll see why Ticketmaster sets these limits and what options you have when resale isn’t available.
Why Some Ticketmaster Tickets Can’t Be Resold (and What to Do About It)
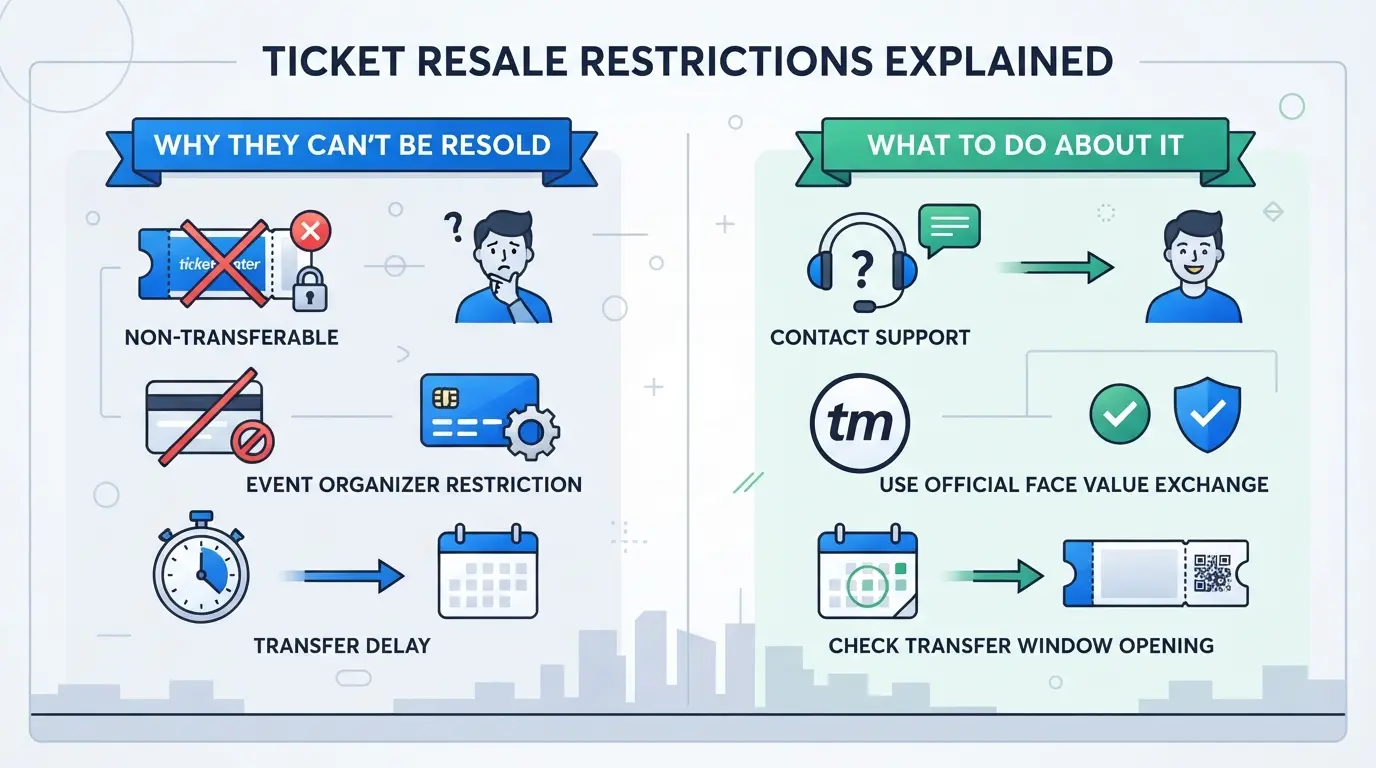
Ticketmaster blocks resale for some tickets, often with no clear warning until you try to list. If you’re stuck with a non-resellable ticket, you need to know what caused it and whether you have any real options left.
Common reasons for resale ineligibility
The biggest blocker is usually a restriction from the event organizer. Some concerts, sports teams, or promoters disable resale to control pricing or limit scalping. You’ll also hit a wall if the ticket type (like a presale or special promo) isn’t eligible or if you chose a delivery method (such as paper tickets or certain mobile-only formats) that doesn’t support resale.
What you can do if resale isn’t allowed
If Ticketmaster says your ticket can’t be resold, your options shrink fast. The main workaround is a ticket transfer, sending the ticket to a friend or family member using Ticketmaster’s own transfer tool. This keeps things above board, but the new holder can’t resell either if the event blocks it. Refunds are rare and only kick in if the event is canceled or significantly changed. Exchanges for another date or seat are almost never offered unless the promoter sets it up. One common headache: you list, the system seems to accept, but later Ticketmaster cancels the sale because the barcode isn’t eligible, leaving you with a ticket you can’t unload and no payout. Always check actual resale status before counting on a sale, since the rules can change even after you buy.
How to avoid buying non-resellable tickets in the future
- Read the event page and ticket details, look for “resale not available” or similar phrases before purchase.
- Ask the seller or support about resale eligibility if you don’t see it listed.
- Avoid buying special presale, fan club, or “will call” tickets if you plan to resell, they’re often locked down.
If you confirm your ticket is eligible, you’re ready for the actual listing process. The next step is getting your tickets posted correctly so they can sell before the event.
How to List Your Tickets for Resale on Ticketmaster: Step-by-Step (2026)
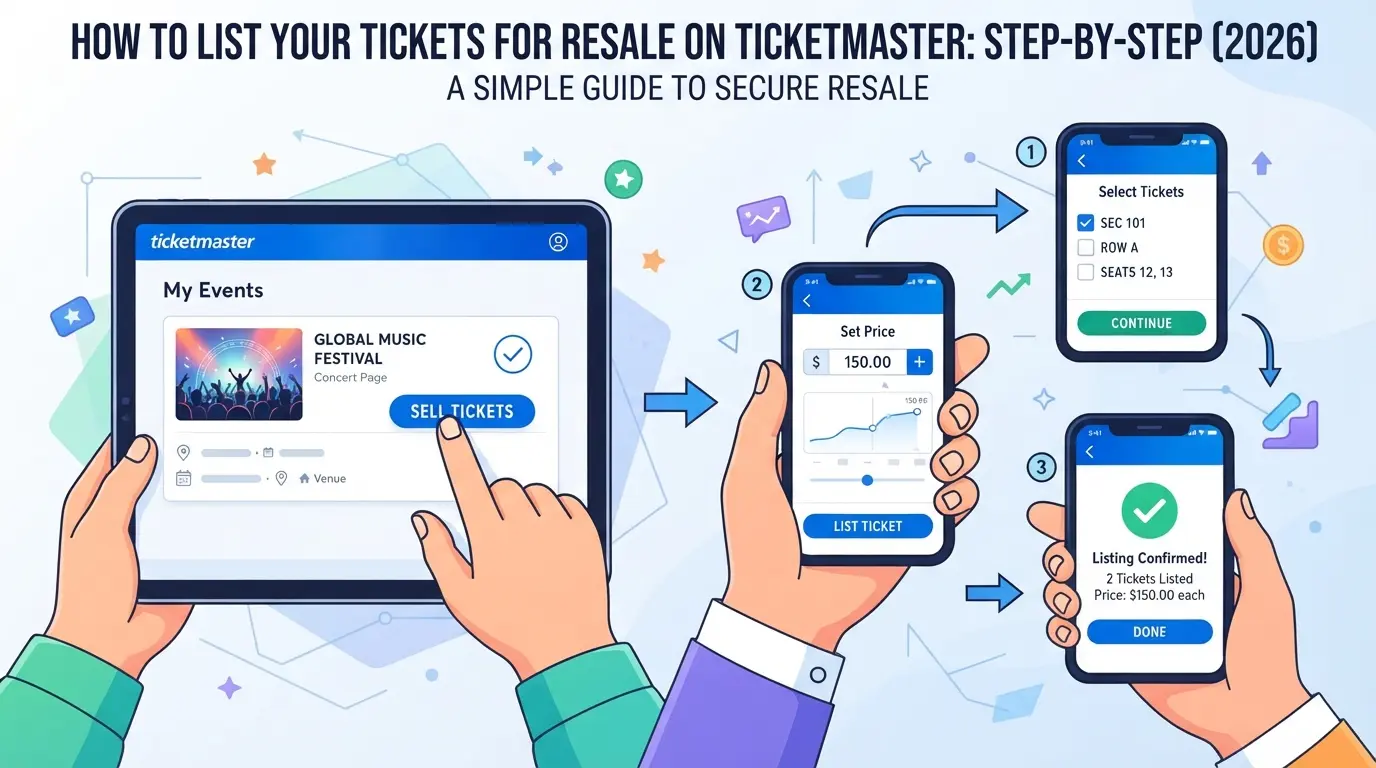
If your tickets are eligible for resale, you can post them on Ticketmaster in under 10 minutes, but skipping even one step can lead to failed listings or payout delays. Here’s exactly how to list your tickets, what can go wrong, and what to expect next.
Step 1: Log in and locate your tickets
- Go to the Ticketmaster website or open the app. Log in using the account where your tickets were purchased.
- Click “My Tickets” in your account dashboard. Find the event you want to resell.
- If you don’t see your tickets, double-check you’re logged into the correct account, Ticketmaster does not merge multiple logins.
Step 2: Check resale eligibility and select 'Sell'
- Look for the “Sell” button next to your ticket. If it’s missing, resale isn’t available for this event or ticket type.
- If you see “Transfer” but not “Sell,” only peer-to-peer transfer is allowed, not resale.
- Tickets marked as “resale not available” can’t be listed, see earlier for workarounds. The “Sell” button only appears if the event organizer has enabled resale for your specific ticket type.
Step 3: Set your price and listing details
- Enter your desired sale price, Ticketmaster may show a suggested range based on recent sales.
- Check what similar seats are listed for. Overpricing by even $5 can leave your tickets unsold until the last minute.
- Fill in required listing info (seat details are pulled in automatically).
Step 4: Confirm payout method and review fees
- Double-check your payout method: update or add your bank account or PayPal if needed.
- Review the seller fee, Ticketmaster usually deducts 10-15% from your final sale price.
- If your payout info is incomplete, your listing may go live but you won’t get paid until details are fixed.
Step 5: Publish your listing and monitor status
- Click “List Tickets.” Wait for the confirmation screen.
- Once live, track your listing in your account, Ticketmaster shows its status and any buyer interest.
- After a sale, you’ll get a confirmation email, funds are usually released after the event, not instantly.
Once your listing is up, the next step is understanding how Ticketmaster handles the sale process, payout timing, and what status updates actually mean.
What to Expect After Listing: Sales Process, Payouts, and Timeline
Once your tickets are listed, the real work shifts to waiting, managing your listing, and tracking payment timing. Here’s how the Ticketmaster resale process plays out after you hit “Sell”, and what actually happens if no one bites.
How Ticketmaster processes your resale listing
Buyers see your tickets mixed with others for the same event, sorted by price and seat location. Each listing updates status, “Listed,” “In Progress,” or “Sold.” If your tickets switch to “In Progress,” someone’s trying to buy; if the status hangs here, the buyer’s payment may be stuck or declined.
When and how you receive payment
After a buyer completes checkout, you don’t get paid right away. Ticketmaster usually waits until after the event has occurred to process your payout. Funds are sent by direct deposit or the original payment method you set up. If you used a new account or changed bank details, expect a verification delay, sometimes up to 5 business days. For example, if you sell concert tickets that happen next month, you’ll only see the funds hit your account a few days after the show, not instantly when the tickets sell. If your payout is missing a week after the event, check your payment info for typos, this is a common reason for failed transfers.
What to do if your tickets don’t sell
- Lower your price: Listings that sit unsold for days are almost always priced above similar seats.
- Update or remove: You can edit the listing details or pull the tickets off the market if you want to use them yourself.
- Check event policies: Some events lock listings or restrict removals close to showtime, so act early if you plan to adjust your strategy.
Getting these steps right helps you avoid most of the payout headaches and last-minute surprises that trip up new sellers.
Risks and Common Mistakes When Reselling Tickets on Ticketmaster
Even if you know the resale process, one misstep can cost you either your tickets or your payout. Here’s how to avoid the mistakes that catch most sellers off guard.
Pricing errors and market misjudgments
Listing too high means your tickets sit unsold, while a low price can have you losing money the moment someone buys. Always check both Ticketmaster and secondary resale sites for real-time prices, don’t just copy the original face value.
Account and payment issues
A missed payment setup or a flagged account can leave you with sold tickets but no payout.
- Payment info errors often lead to payout delays of a week or more.
- The safer move: verify your bank details and clear any account holds before listing, Ticketmaster sometimes freezes sales for incomplete profiles.
Listing and transfer mistakes
If you transfer tickets outside Ticketmaster, your sale may get canceled or your account restricted. Double-check you’re listing the correct event and seat, since edits are locked after submission. The most common irreversible error is sending tickets to a buyer’s email instead of completing the Ticketmaster resale steps, this almost always voids your protection and payout.
For sellers managing multiple listings or accounts, the next step is learning how to avoid account flags and keep transactions separate.
How Frequent Sellers Can Manage Multiple Ticketmaster Accounts and Listings More Safely
Why separating accounts and browser profiles matters
Mixing logins or devices will almost always get accounts linked, Ticketmaster tracks browser fingerprints, cookies, and IP addresses. Once patterns overlap, bans or restrictions are common.
Using proxies and isolated browser profiles for safer operations
Rotating proxies with unique browser profiles let each account look like a separate real user. This reduces the chance of shared info, like cookies or device IDs, tipping off the system. If two profiles ever share a proxy or browser session, your accounts become easy to link and at risk.
When to consider workflow tools for multi-account management
- You manage 3+ accounts or events at once
- Logins start failing without clear reason
- Manually tracking cookies, sessions, or proxies becomes unmanageable
If you’ve hit these friction points, you’re ready for a more controlled setup, next, see how to build that isolation into your workflow.
Using DICloak for Safer, More Efficient Multi-Account Ticketmaster Resale
For sellers or teams handling several Ticketmaster accounts, separating browser profiles and network connections is the only practical way to cut down cross-account risks and keep workflows organized. DICloak doesn’t manage Ticketmaster listings or payouts, but it does manage browser profiles and session separation, key for anyone running multiple accounts or handling team logins.
Creating isolated browser profiles with custom fingerprint settings
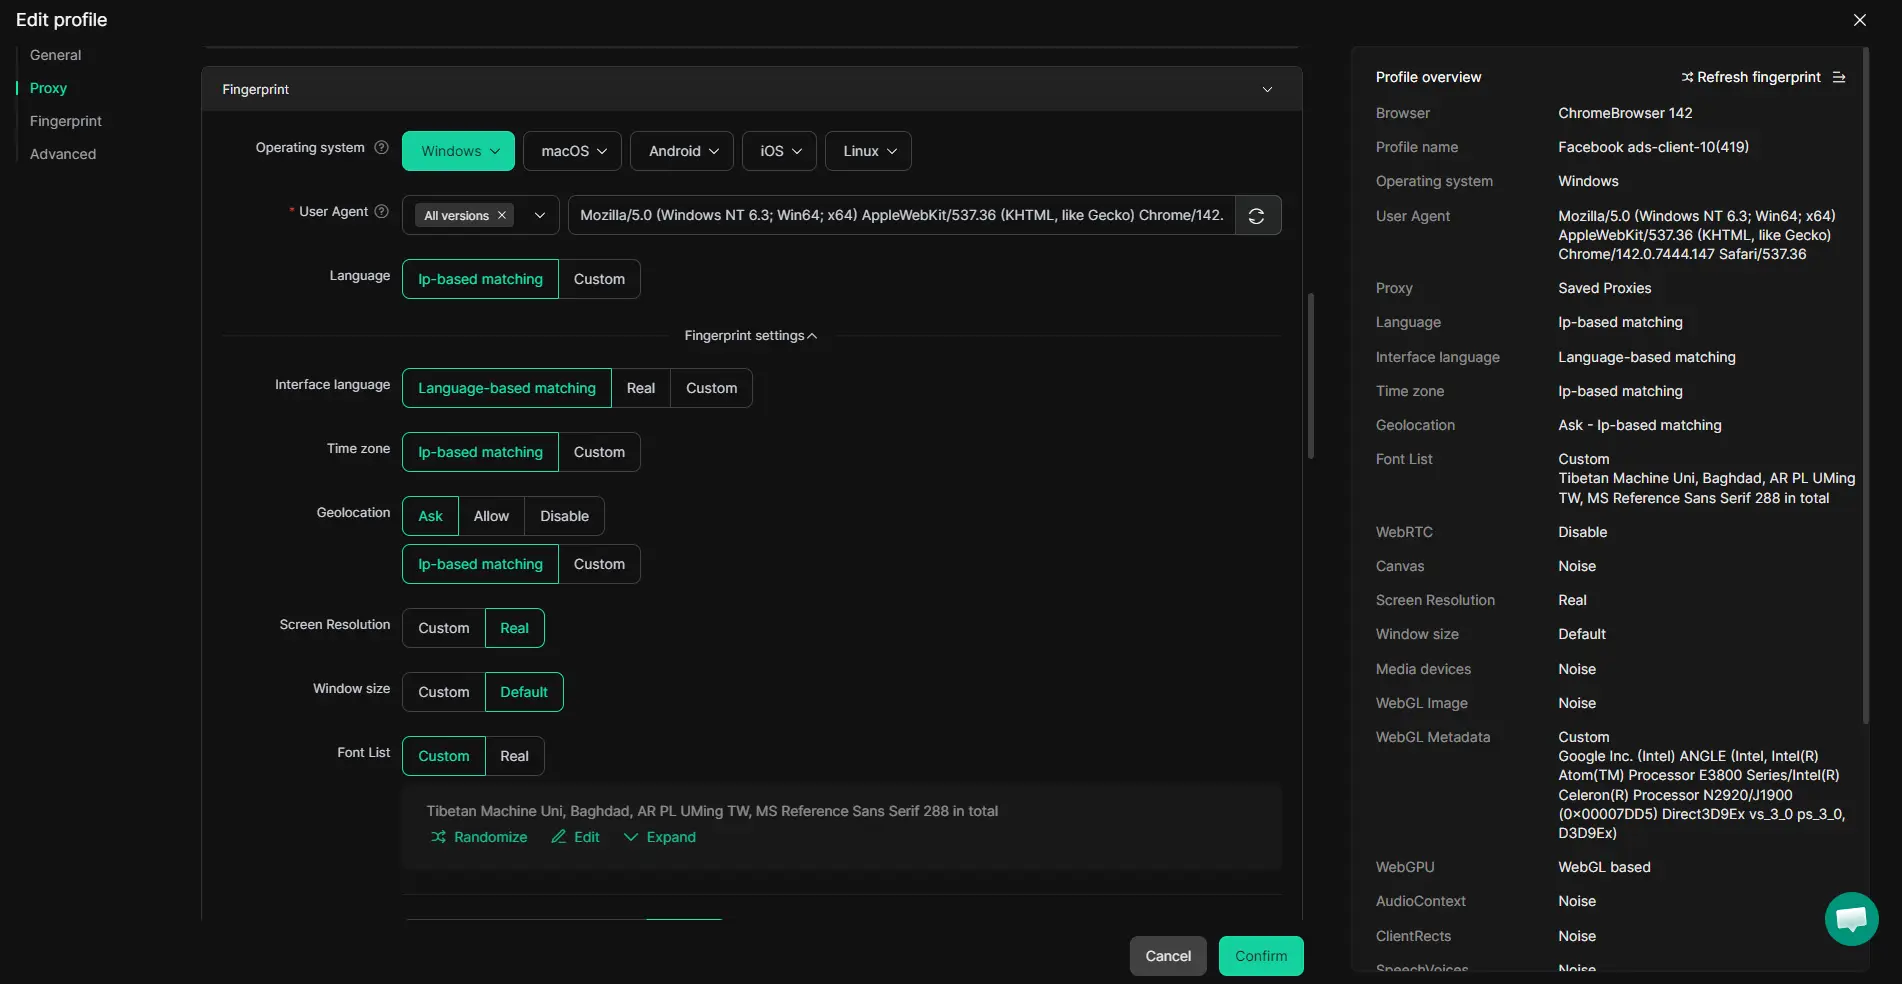
Operators can create a dedicated browser profile in DICloak for each platform account, storing all browser storage, cookies, and session data separately. Each profile’s fingerprint settings, like user agent, time zone, screen size, and graphics info, can be set to fit the device or workflow needs. This prevents profiles from sharing browser storage or leaking signals between accounts during resale work. The scope here is limited to browser profile setup; it does not affect the Ticketmaster account itself.
Configuring user-provided proxies for each profile
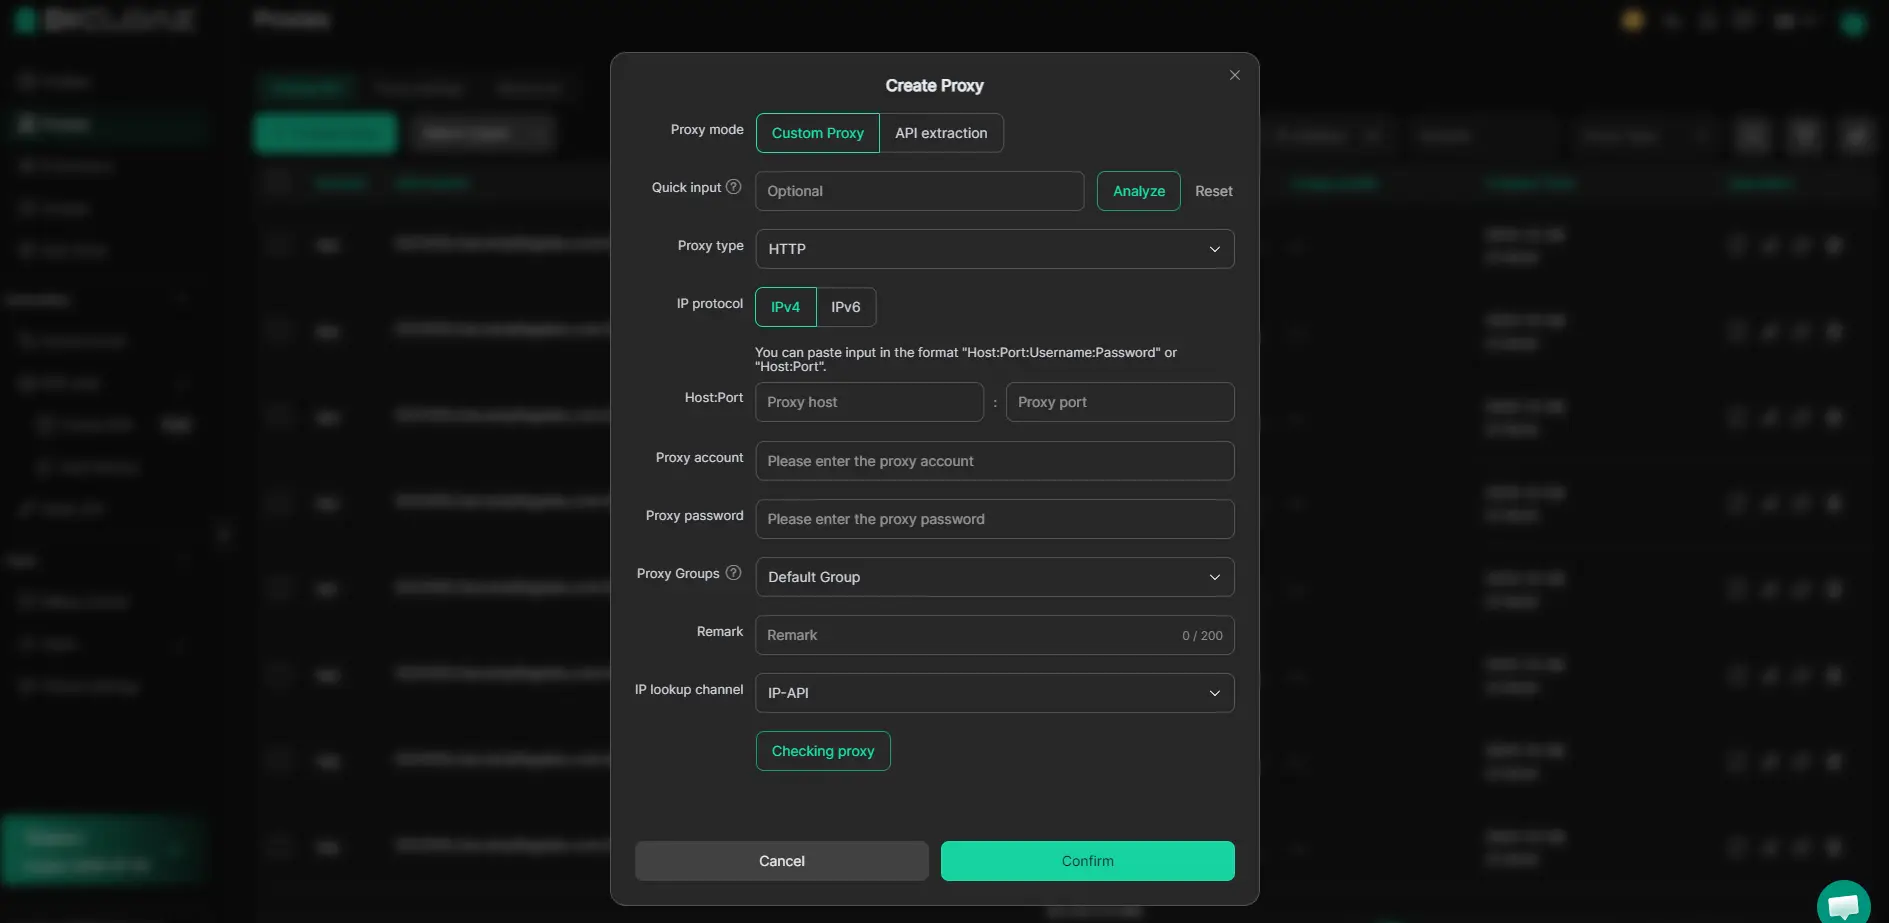
Every DICloak browser profile can use a user-supplied HTTP, HTTPS, or SOCKS5 proxy, which the operator configures in the profile settings. This lets each account session connect through its own network path, helping maintain separation in multi-account workflows. Operators can test and confirm connectivity in the profile before logging in, but the choice and management of proxies is up to the user. DICloak does not supply or recommend proxies, it only applies the configuration per profile.
Synchronizing actions across multiple profiles with the Window Synchronizer
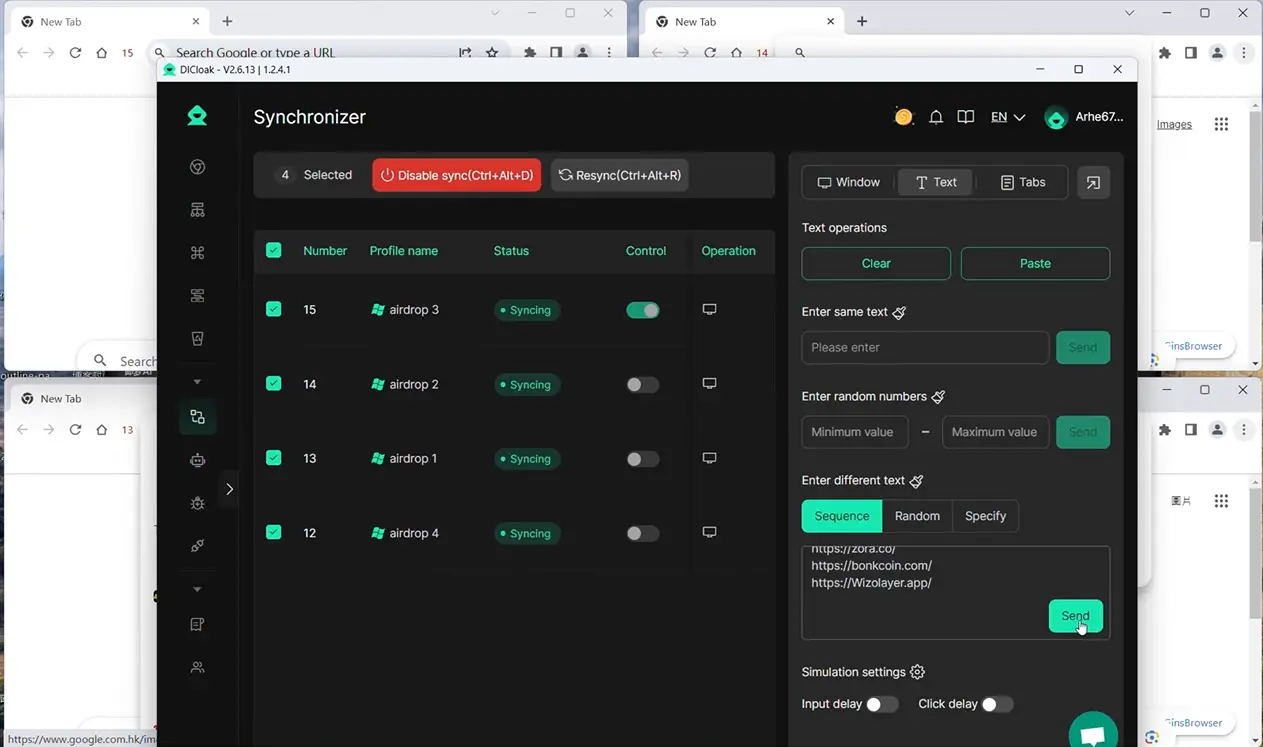
Manual work gets slow when you need to repeat steps across many accounts. With DICloak’s Window Synchronizer, an operator can mirror supported actions, like clicks, typing, and scrolling, from a master window to several open profiles at once. This is live, operator-driven mirroring; it doesn’t run without supervision or automate everything, but it can speed up the process of listing tickets for resale across accounts.
This setup leaves every account session cleanly separated, so you can focus on the real work instead of fixing preventable cross-account issues. The next section covers hands-on tips for reselling tickets on Ticketmaster more efficiently.
Pro Tips for Successful Ticket Resale on Ticketmaster in 2026
Getting your tickets sold fast comes down to timing, price, and account safety. Here’s what actually helps you move listings and avoid headaches on Ticketmaster.
How to price competitively and adjust listings
Check similar listings for your section, if you’re not in the lowest third, you’ll wait longer. Lower your price if your tickets haven’t moved after two days, or if the event date is less than a week away. The fastest sellers update price daily when demand shifts.
Timing your listing for maximum visibility
- List just after paydays (Friday/Saturday) when buyers are active
- Post in the evening (6–9pm local) for higher browsing
- Relist closer to event day if demand picks up
Avoiding scams and protecting your account
Stick to Ticketmaster’s platform, never send tickets or payments offsite.
- Ignore buyers asking for outside contact
- Confirm buyer’s payment cleared before confirming transfer
- Update your Ticketmaster password after each big sale
Frequently Asked Questions About how to resell tickets on ticketmaster
Can I resell tickets on Ticketmaster if I bought them from a third-party site?
No, Ticketmaster only allows resale of tickets that you bought directly through their platform. If your tickets came from a third-party site like StubHub or Vivid Seats, you can’t use Ticketmaster’s resale feature. Only tickets stored in your Ticketmaster account are eligible for their resale process.
How long does it take to get paid after selling tickets on Ticketmaster?
After your tickets sell, Ticketmaster usually sends your payout within 5–7 business days. The timeline can depend on your bank or payment method. Delays may happen if you’re a first-time seller or if there are issues verifying your account details, so check your email and payment info.
What fees does Ticketmaster charge for reselling tickets?
Ticketmaster charges a seller fee, usually a percentage of your ticket’s resale price. The exact fee can vary by event and location. Before you list, Ticketmaster will show the fee amount on the listing page. Always review these details before confirming your Ticketmaster ticket resale.
Is it safe to use multiple Ticketmaster accounts for reselling?
Using multiple Ticketmaster accounts can violate their terms of service. If caught, you risk account suspension or canceled sales. Ticketmaster tracks accounts for unusual activity. To stay safe, use one account for all your transactions and keep your information accurate.
What should I do if my resale listing isn’t selling?
If your listing isn’t selling, try lowering your price to match or beat similar tickets. Update your listing details and make sure your tickets are clearly described. You can also remove and relist them later. Check demand for the event and adjust your strategy as needed.
Once you’ve reviewed your ticket details and set a fair price, you’re ready to list them for sale and monitor their status. Consider acting early to increase your chances of a successful resale, especially as event dates approach and demand can fluctuate. Try DICloak For Free
 Web Proxy Tools
 Free Tools
 Cookie Plugin
 UA Generator
 MAC Address Generator
 IP Generator
 IP Address List
 2FA Code Generator
 World Clock
 Anonymous Check
 WebRTC Leak Test
 UUID Generator
 Free Web Proxy Site
 Proxy Checker
 FB Ad Checker
 AI Web Scraping
 Free SMM Tools
 Twitter Shadowban Checker
 Instagram Name Checker
 UTM Generator
 Username Generator
 AI Hashtag Generator
 LinkedIn Headline Generator
 Social Media Image Resizer