Getting a Meta account disabled with no warning feels like running into a wall, especially when your appeal gets rejected and every login attempt just throws a “permanently disabled” message. Most people hit this point, search for a fix, and land on the meta account recovery form after appeal rejected permanently disabled. The problem: one wrong step here can lock you out for good, or send you in circles with generic replies and zero progress.
Some think the recovery form is just a backup appeal, but Meta’s backend tracks every attempt. Submitting the wrong ID, using inconsistent info, or flooding the form with repeat requests often triggers automated blocks. Recovery isn’t about luck, Meta’s process checks for exact matches in your previous account data and device history. If you miss a detail, you’re flagged as suspicious, and the support loop gets even longer.
The right move is to treat the Meta permanently disabled account recovery form as your last real shot. That means preparing your documents the way Meta expects, matching every field to your original registration, and knowing which browser or device fingerprint you’re submitting from. Skipping these checks, like uploading a selfie that doesn’t match your profile photo, usually means you’ll get the same “not eligible” decision, no matter how many times you try.
Here’s what you need to check before sending your recovery form.
Why Meta Accounts Get Permanently Disabled and Appeals Are Rejected
Meta rarely gives second chances after a permanent disable. The reason most users end up at the “meta account recovery form after appeal rejected permanently disabled” stage is because their account hit a clear policy violation, and the appeal didn’t bring new proof or context that could overturn it.
Common Policy Violations Leading to Permanent Disable
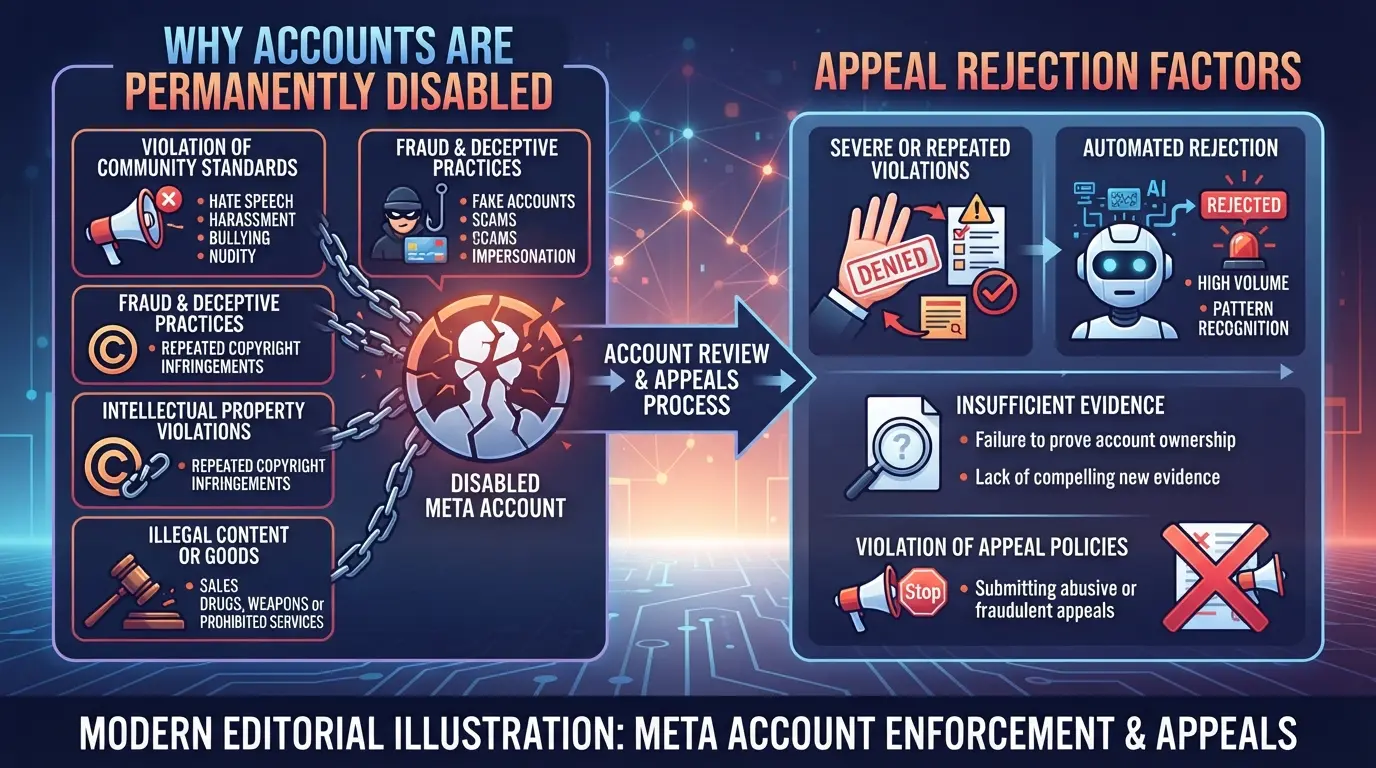
Meta’s review systems lock down accounts when certain patterns show up. The most common triggers are:
- Spam or automation: Mass messaging, fake engagement, or using bulk tools can get flagged, even if you only did it once.
- Fake identity or impersonation: Registering under a name that doesn’t match your documents, or running profiles with mismatched photos, almost always leads to a permanent block.
- Unsafe content or abuse: Posting hate speech, threats, or nudity (even by accident) can trigger instant disables, especially if you get mass-reported.
It only takes one of these to trigger a permanent disable. Sometimes, people don’t realize their actions fit Meta’s definition of abuse until the lockout lands.
How Meta Reviews Appeals and Why They Get Rejected
Once your account is flagged, Meta’s system starts with an automated review. Most appeals never see a human unless you bring in new evidence, like a scan of your real ID that exactly matches the original registration. If your appeal just repeats the story you sent before or leaves out key details (like not explaining why your login came from a new country), it usually gets auto-rejected in under 24 hours.
Manual reviews only happen if the system sees a close match between your documents and your original account details. If your selfie doesn’t look like your profile photo, or your name is spelled differently, the review ends right there. Here’s where most people trip up: they submit the right document, but something small doesn’t match, maybe they used a nickname before, or their ID is from a different country than the one on the account. Even one mismatch can send your case back to the “permanently disabled” pile.
For example, if you try to recover an account registered as “Jon Smith” with an ID that says “Jonathan Smith,” the system usually rejects it without escalation. Appeals with mismatched device histories or login locations are often flagged as suspicious activity, not evidence of a mistake.
The bottom line, unless every detail you submit matches Meta’s records, their system treats you as a risk and blocks further appeals. Relying on repeated requests or “explaining your case” in new words rarely changes the outcome once the system has made its call.
This leads directly to the next step: understanding what actually happens after you see the “permanently disabled” message and your final appeal is rejected.
What Happens After Your Meta Appeal Is Rejected and Account Is Permanently Disabled
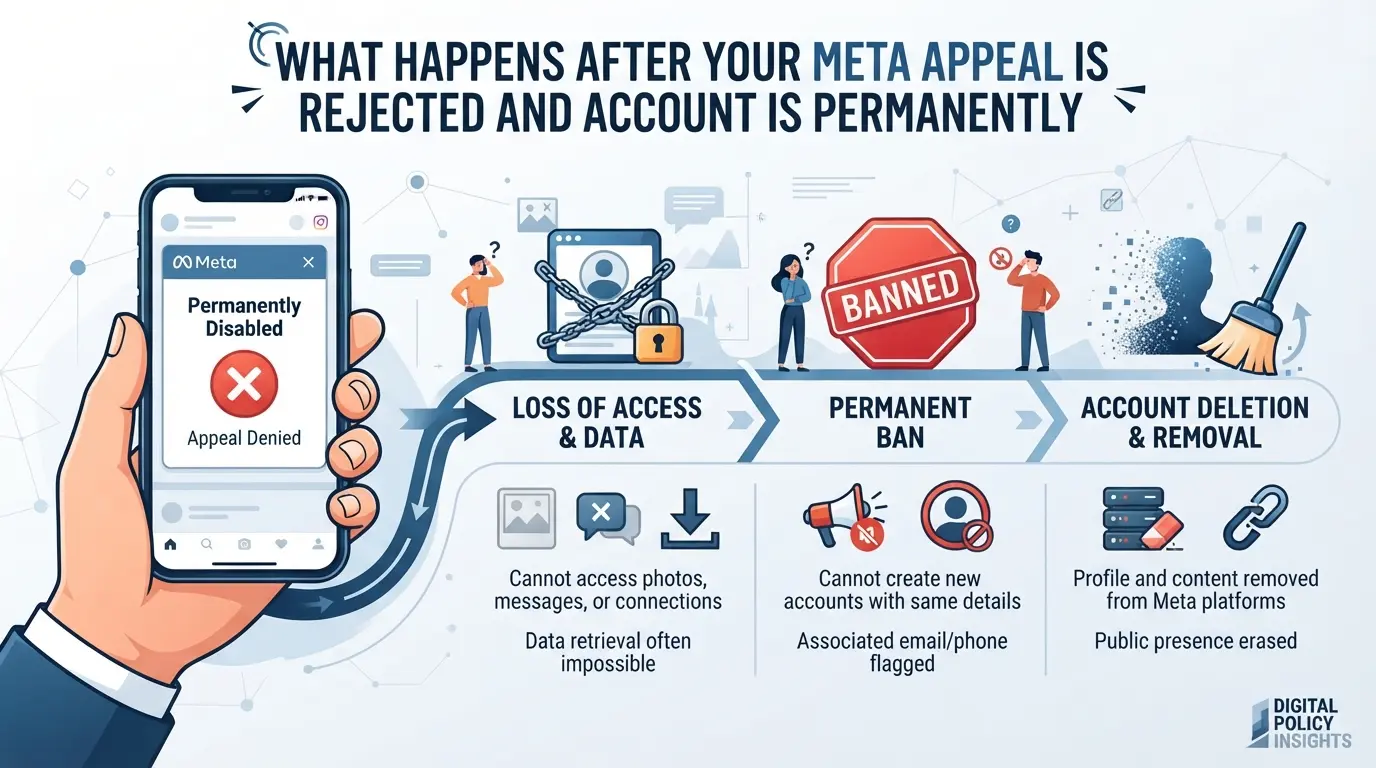
When Meta turns down your appeal and locks your account for good, you’re out of the usual support loop. That means you can’t log in, access messages, or use linked features, your profile is gone, and most options are closed. What’s left is a single route: the Meta account recovery form after appeal rejected permanently disabled. Everything depends on how you handle this last shot.
Meta's Final Decision: What It Means for Your Account
Meta’s “permanently disabled” verdict isn’t just a warning, it’s a full shutdown. Here’s what you’ll see:
- No login allowed: Trying to sign in triggers a “disabled” screen, not a password prompt.
- Data access lost: You can’t download your data or recover photos, chats, or contacts.
- Account closure: All linked services, like Facebook or Instagram, stop working immediately.
Options Left After Appeal Rejection
Once appeals fail, you’re stuck with limited options, and most users hit dead ends fast. The recovery form is your real move, Meta’s process checks if you can prove identity, match original account details, and submit from a device with a history tied to your profile. If you miss even a small detail (like an old email typo or a mismatched ID photo), the system flags your request and auto-rejects it. That’s why retrying with the same info rarely gets a different result.
For example, if you submit a recovery request using a device you never used with your account, Meta’s backend sees it as a mismatch. You’ll get another “not eligible” response, often within hours. Trying to contact Meta support directly, through chat or email, usually just loops you back to the disabled notice. The only cases where support can help are rare: like if you have legal proof of ownership or a major billing record. Even then, the answer is almost always “no,” unless you fit very specific criteria.
The key insight is that sending multiple recovery forms with new info is more likely to trigger automated blocks than to get your account back. If you’re locked out, focus on matching your original details exactly, use the device you always accessed Meta with, and double-check every field before you submit. Missing that step is where most people lose their last shot at recovery.
If your account stays disabled after recovery attempts, the process is done, Meta closes the case, and you won’t get manual review or feedback. This is the moment to decide whether to try again with new information (if you genuinely have it), accept the loss, or start planning for replacement. The next section breaks down how to use the recovery form step-by-step, so you can avoid the common mistakes and see if you actually have a chance to get your account back.
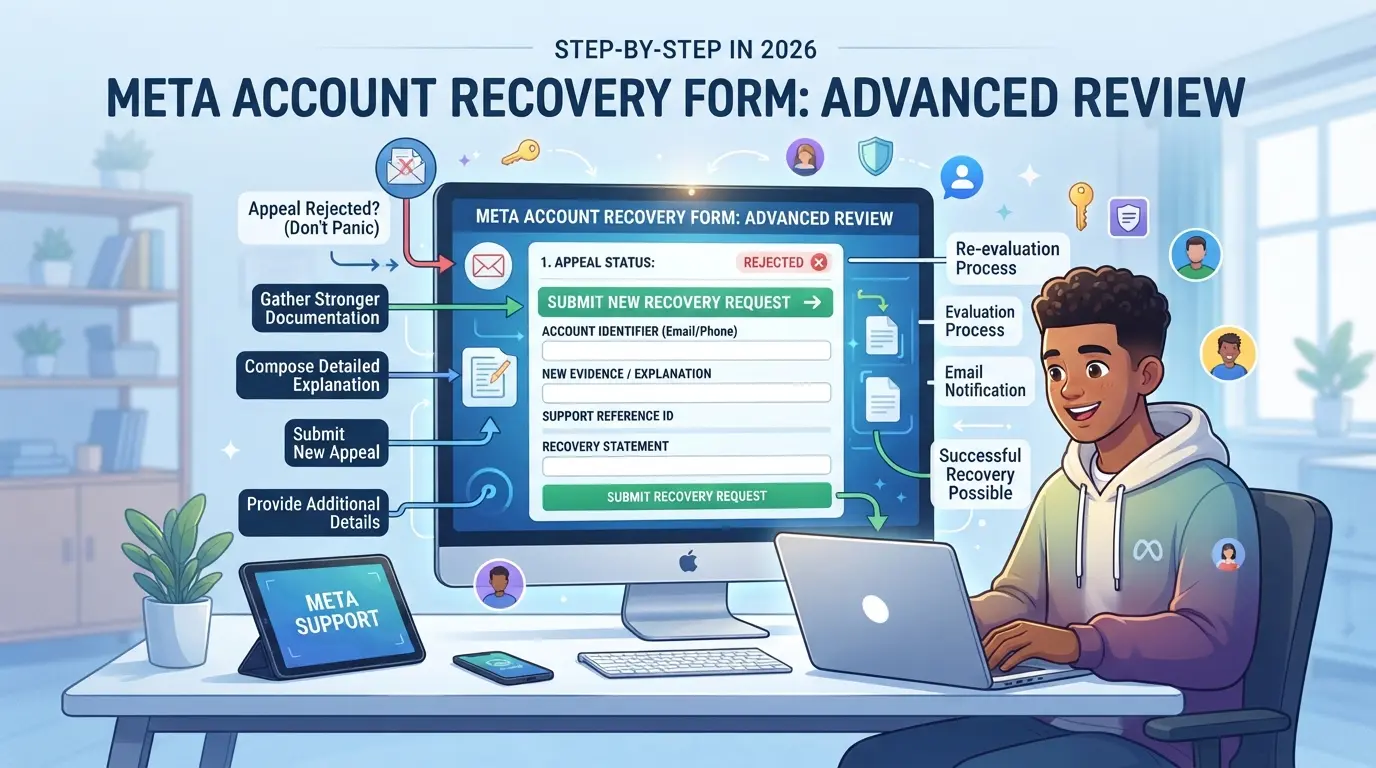
How to Use the Meta Account Recovery Form After Appeal Rejected: Step-by-Step in 2026
If your Meta appeal was rejected and your account is marked permanently disabled, the official recovery form is your only shot left, this is where you can submit new evidence and try to prove your identity one last time. Rushing or skipping details here almost always leads to another denial, so each step matters.
Finding the Correct Meta Recovery Form
- Search for “Meta account recovery form” only on Meta’s Help Center. Ignore any third-party sites or links shared in forums, many are phishing traps.
- Check the URL: it must start with “facebook.com” or “meta.com/help”. Anything else is not official. Fake forms often look identical but steal your info.
- If you’re locked out, use a browser where you’ve logged in to Meta before. This can help Meta’s systems recognize your device as trusted.
- Never pay for a link or “priority” access. Official forms are always free. If you’re asked for money, close the page.
Completing the Recovery Form: What Information to Provide
- Enter your exact full name, email, and phone number as registered on your disabled account. A mismatch here is the most common reason for instant rejection.
- Upload a clear photo ID. The name and birthdate must match your Meta profile, if your profile used a nickname, upload supporting evidence showing both names.
- Describe the situation in the “additional info” box, but skip long stories. Instead, focus on facts: when you lost access, what action triggered the disable, and why you believe it was a mistake.
- Double-check all fields before submitting. A typo or blurry ID often means you wait days just for an auto-reply saying “not eligible.” If you’re unsure about a detail, stop and check your old emails or device screenshots first.
What Happens After Submission: Timeline and Outcomes
- After you submit, Meta sends a confirmation email within a few minutes. If you don’t get it, check your spam folder. No email usually means the form wasn’t processed.
- Most users get a reply in 1-5 business days, but weekend submissions often sit in queue until Monday. If you get no answer after 7 days, submit again with fresh evidence, not a duplicate form.
- Outcomes are usually one of three: account restored, more info requested, or permanent disable confirmed. If you’re asked for more info, respond within 48 hours, delays often close your case for good.
- If the reply is still “not eligible,” your options are basically exhausted, repeated requests rarely change the outcome and can lock you out of future appeals.
The next step is knowing what risks and scams to watch for as you try these last recovery methods.
Risks, Mistakes, and Scams to Avoid When Using the Meta Recovery Form
Submitting the Meta account recovery form after appeal rejected permanently disabled comes with new risks, one wrong move can lock you out for good or hand your info to a scammer. Here’s what to watch for before you enter any personal data or documents.
Fake Recovery Forms and Phishing Scams
The only safe way to reach Meta’s real recovery form is through the official Meta Help Center. Avoid links from random emails, ads, or Telegram groups. Scam sites often fake Meta’s branding, but look for odd URLs, typos, or requests for extra fees, Meta will never ask for payment to review your case. Entering your login details or ID on a fake form usually means the scammer takes over your account or sells your data.
Mistakes That Can Lead to Further Account Issues
Even small errors can make a bad situation worse. Double-check every field before you submit.
- Match your recovery info exactly to your original registration, spelling or date mistakes almost always trigger rejection.
- Never submit multiple forms from different devices or browsers within 24 hours, Meta tracks fingerprints and flags unusual patterns.
- Don’t upload edited, blurry, or outdated documents, this can get your case marked as inauthentic with no further review.
Missing these checks is the fastest way to lose your last shot at recovery. Next, it’s about handling multiple accounts safely after your main recovery attempt.
Managing Multiple Meta Accounts Securely in DICloak After Recovery Attempts
Once you’ve tried the Meta account recovery form after appeal rejected permanently disabled, the next step is to treat any new or recovered Meta account as a separate asset. For social media marketers handling several accounts, sometimes for clients, sometimes for backup, the risk isn’t just losing one login. It’s mixing up browser storage, leaking sessions, or exposing linked fingerprints that can trip platform security checks. Building a safer workflow means isolating each account environment, keeping network signals consistent, and reducing manual mistakes that get teams flagged in the first place.
Profile Isolation and Fingerprint Configuration for Each Meta Account
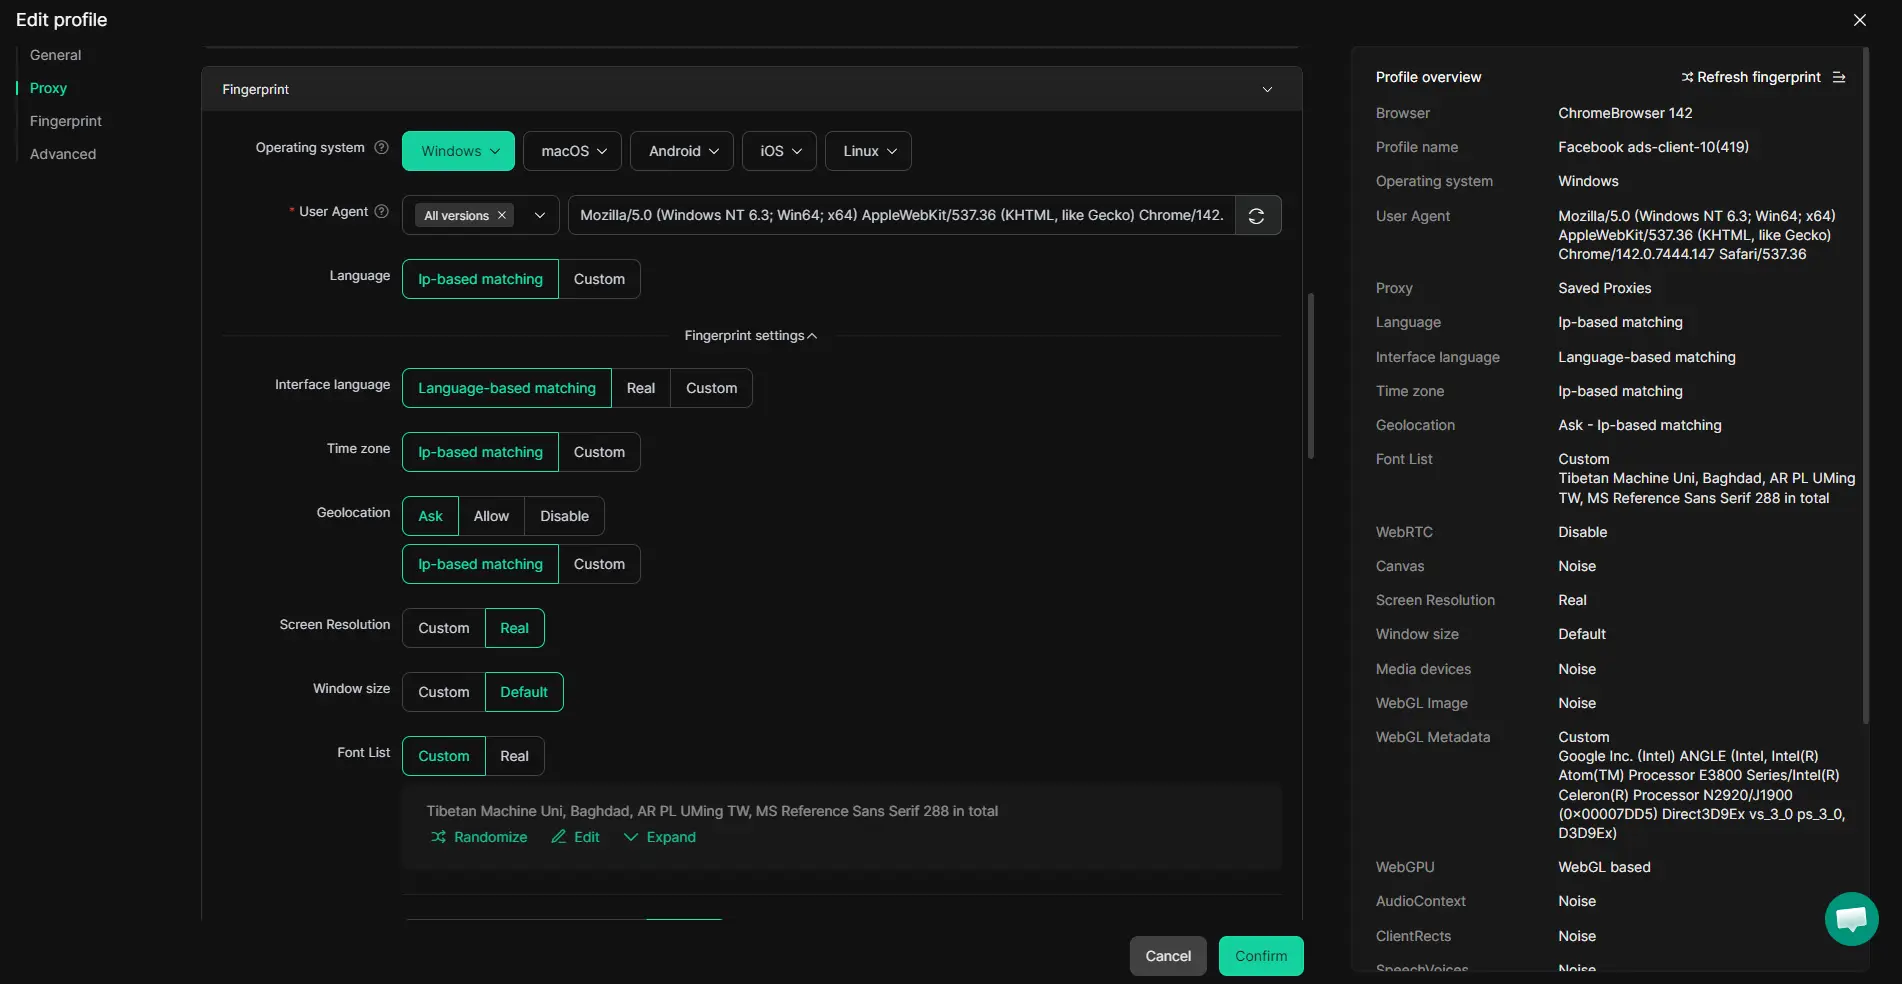
Every recovered or newly created Meta account should run in its own browser profile, not just a new tab or window. Operators can use DICloak to create a dedicated browser profile for each account, separating cookies, local storage, and session data. Inside each profile, you can configure fingerprint details, like system language, time zone, and screen properties, so that each session reports a consistent browser profile. Skipping this step means one account’s activity can bleed into another’s, which often leads to unexplained lockouts or review requests, especially if a device shows sudden account swaps. The scope here is limited to browser-profile setup; it does not change, recover, or manage Meta platform accounts directly.
User-Provided Proxy Configuration for Assigned Profiles
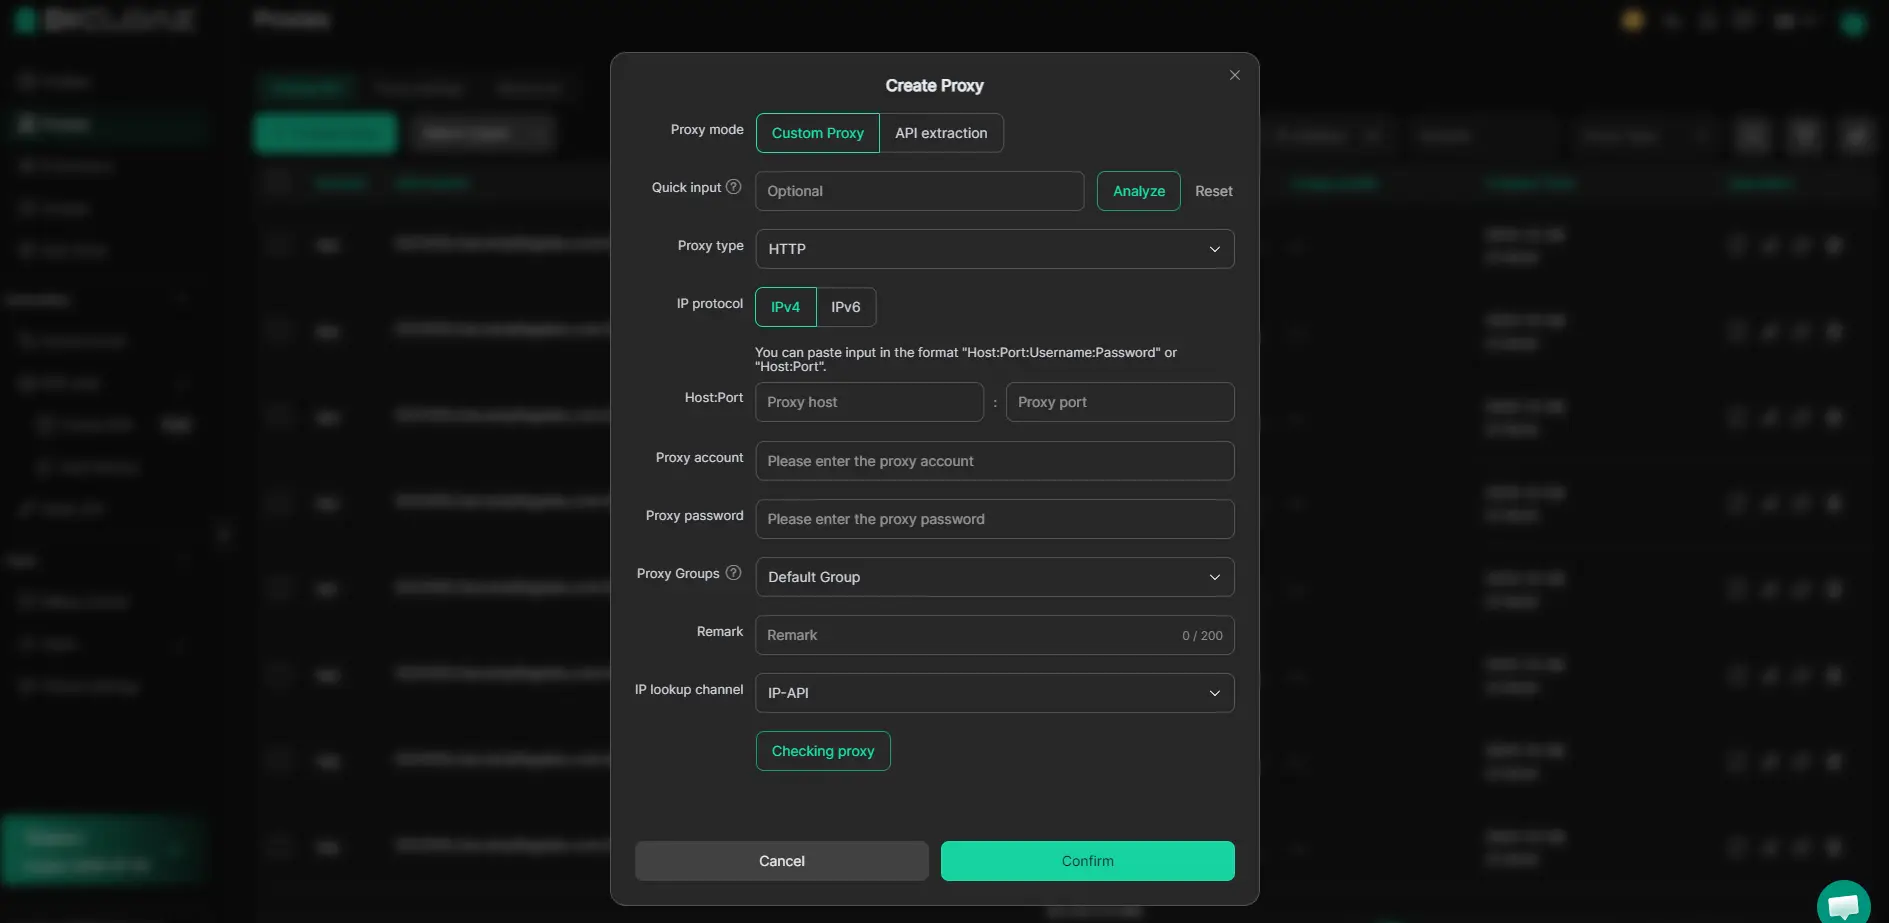
Managing multiple accounts means more than just browser separation. Each account workflow may also need its own network connection to avoid session overlap. Operators set up a user-provided proxy for each profile in DICloak and can run a built-in check to confirm the proxy’s exit IP and region before opening a Meta session. This step makes sure the account’s network signal matches its usual login history, helpful if you’ve ever had Meta reject a login because it came from an unfamiliar location. You pick and test the proxy; DICloak only stores and applies your settings. There’s no bundled proxy pool, and the platform’s rules still apply.
RPA Automation: Streamlining Routine Account Actions
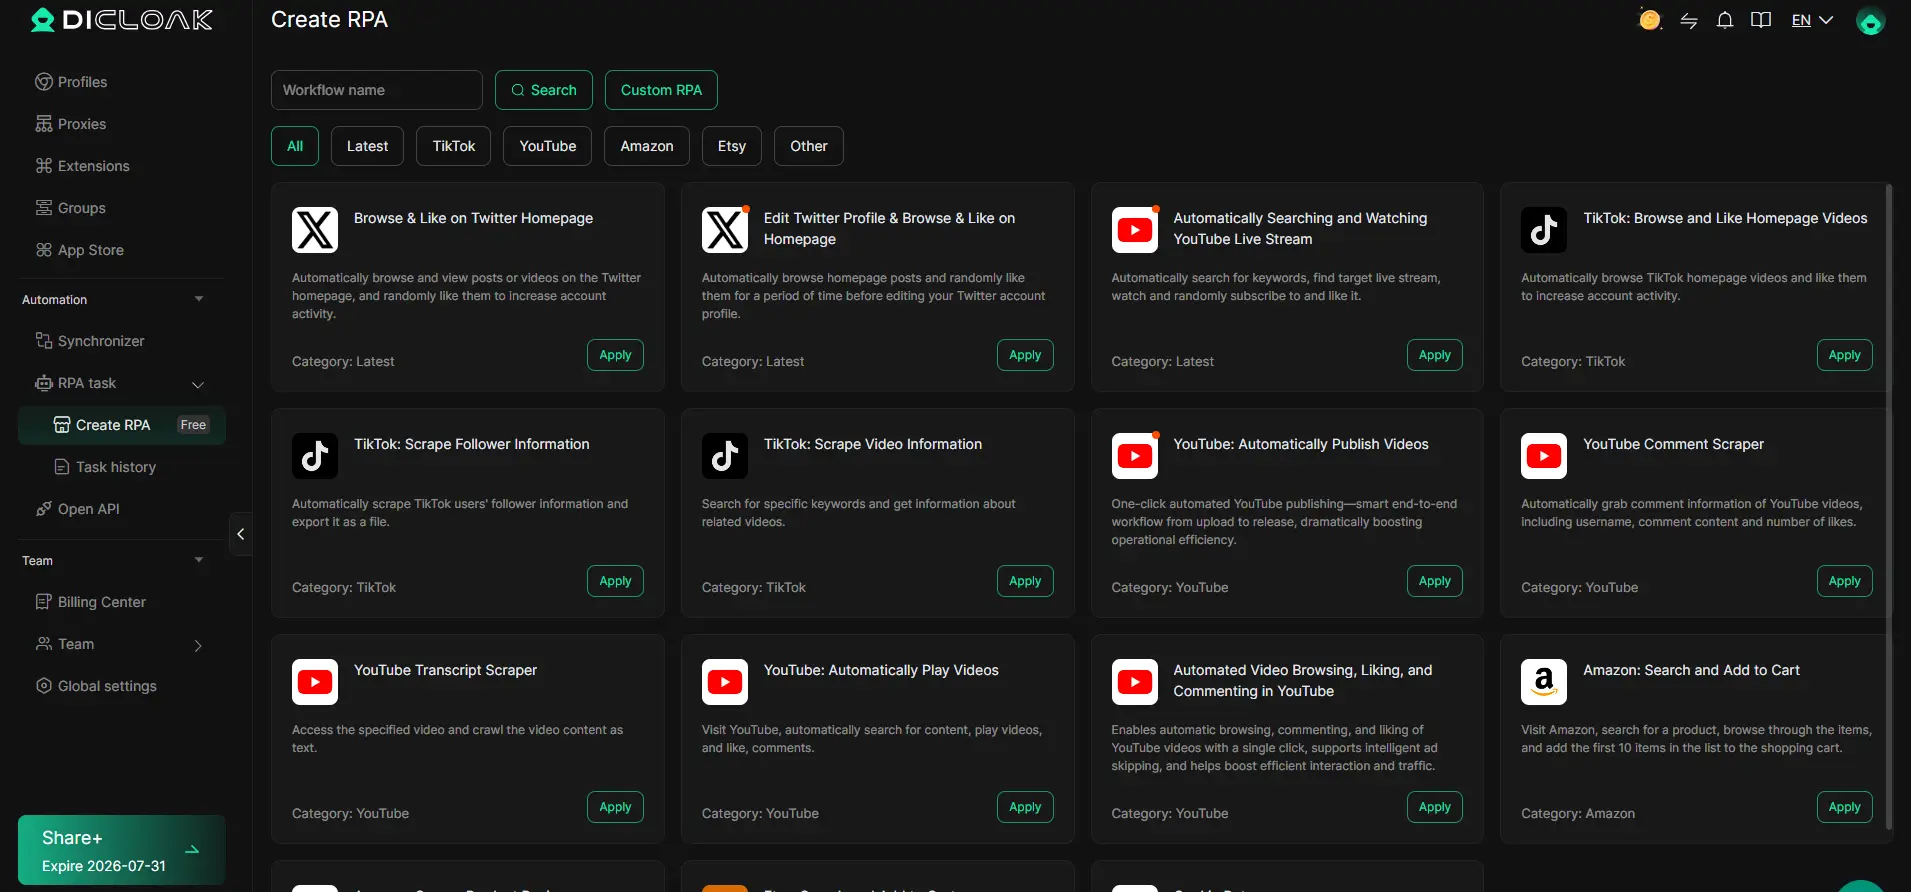
Manual login and routine actions across several Meta accounts quickly become a source of mistakes. Operators can set up an RPA (Robotic Process Automation) task in DICloak to repeat permitted browser actions for selected profiles, like navigation or safe data entry, then review the results with built-in run logs. This is not about automating risky engagement but about cutting down on errors from copy-paste or missed steps when switching profiles. RPA tasks can be run once or scheduled, and admins stay in control of reviewing what each session did. Where available, this feature reduces the slowdowns that come with managing accounts one by one.
A clean separation of browser profiles, network paths, and repeatable workflows is what keeps teams from making preventable mistakes after a recovery attempt. The next step is to plan for what to do if you’re locked out for good, and how to decide when it’s time to let an account go.
What to Do If Recovery Fails: Accepting Loss and Planning Next Steps
Sometimes every attempt with the Meta account recovery form after appeal rejected permanently disabled ends the same way. When that happens, the only move left is to protect yourself going forward.
Accepting Permanent Loss and Protecting Personal Data
- Remove saved passwords for the lost account from browsers and password managers.
- Stop using the same email, phone, or device for new Meta accounts, reuse can flag you.
- If emotional stress hits hard, step back and talk it out with someone you trust.
Building New Accounts: Safer Practices for the Future
Rushing to create a new Meta account with the same details is a common mistake, Meta tracks device, IP, and contact info. Changing your setup before registering again reduces the risk of instant disable. Use new credentials and devices, and document your sign-up details in a secure place, so you’re prepared if you ever need to appeal again.
Frequently Asked Questions About meta account recovery form after appeal rejected permanently disabled
Is it possible to recover a Meta account after permanent disable and appeal rejection?
Recovering a Meta account after it’s been permanently disabled and your appeal is rejected is usually not possible. Meta rarely restores accounts after this stage. Exceptions may happen if you can show strong proof of a mistake, like a hacked account or a clear error. Most users do not get their accounts back after a final rejection.
Where can I find the official Meta account recovery form in 2026?
You can find the latest recovery forms on the official Meta Help Center or Facebook’s support page. Always check for URLs starting with “facebook.com” or “meta.com.” Beware of scam links and third-party sites that promise recovery, they often try to steal your account information or money.
How long does Meta take to respond to recovery form submissions?
Meta usually responds to recovery form submissions within a few days to a week. Sometimes, it can take longer if there are many requests or extra checks are needed. Watch your email and the “Support Inbox” on Facebook for updates about your submission.
What information should I provide in the Meta recovery form?
Include your full name, email, phone number linked to the account, and a clear copy of your government ID. Add a short explanation of your situation and any evidence that shows your account was disabled in error. Giving complete, honest details helps Meta review your case faster.
How can I safely manage multiple Meta accounts after recovery?
Use unique emails and strong passwords for each account. Enable two-factor authentication on all profiles. Keep account recovery information up to date. Always log out from shared devices. Never share your login details with others. Follow Meta’s terms to avoid future account issues.
If your account appeal has been permanently rejected, consider safeguarding your online presence by exploring alternative privacy tools and platforms that offer more control over your data. Taking proactive steps now can help minimize risks and protect your digital identity moving forward. Try DICloak For Free
 Web Proxy Tools
 Free Tools
 Cookie Plugin
 UA Generator
 MAC Address Generator
 IP Generator
 IP Address List
 2FA Code Generator
 World Clock
 Anonymous Check
 WebRTC Leak Test
 UUID Generator
 Free Web Proxy Site
 Proxy Checker
 FB Ad Checker
 AI Web Scraping
 Free SMM Tools
 Twitter Shadowban Checker
 Instagram Name Checker
 UTM Generator
 Username Generator
 AI Hashtag Generator
 LinkedIn Headline Generator
 Social Media Image Resizer