You’re not alone if you’ve paid to boost a Facebook Marketplace listing and then realized you need to stop the promotion, maybe you sold the item faster than expected, need to adjust your budget, or just want to stop the extra exposure before your payment cycle finishes. The real headache starts when you try to cancel the Facebook Marketplace boost and can’t find clear steps, or you’re worried pausing the ad might still charge you for days you don’t need.
Here’s where most people get tripped up: Facebook’s interface treats boosted listings differently from regular ads, and the “turn off boost for Facebook listing” button isn’t always obvious. If you miss the right window, you might pay for unwanted days or have your item keep showing up after it’s already gone. Some sellers try deleting the post, but that can cause issues with order history or buyer messages, making things even messier.
If you want to stop promoting a Facebook Marketplace item without risking extra charges, losing your listing, or confusing buyers, you need a step-by-step approach that covers both desktop and mobile, plus what to check if your boost still looks live after cancellation. This guide breaks down where the controls actually are, what to expect after you hit “cancel,” and how to confirm your boost is really off.
Start by checking the status of your boosted listing in your Facebook account dashboard.
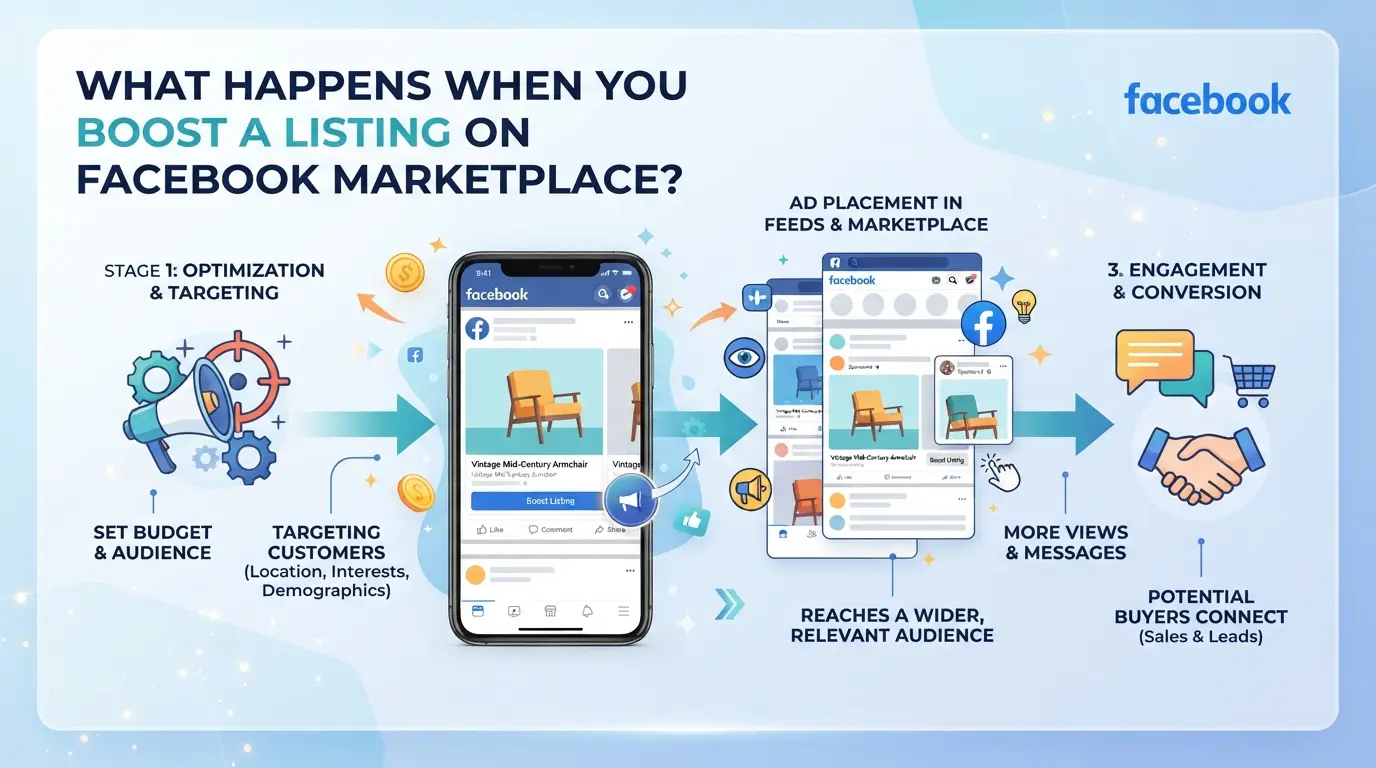
What Happens When You Boost a Listing on Facebook Marketplace?
Boosting a Facebook Marketplace listing turns your item into a paid ad. Once active, your listing moves from just showing to your local network to appearing in sponsored slots across the Marketplace, and Facebook starts charging the ad fee. If you want to stop boosting a listing on Facebook Marketplace, you need to know what changes after a boost starts and what risks show up if you cancel too late.
What Changes After You Start a Boost
When you boost a listing, Facebook starts billing your payment method immediately. Your listing shows a "Sponsored" tag and moves to ad reporting status. If you check your dashboard, you’ll see new metrics, views, clicks, and ad spend, updating in real time. Stopping the boost means these numbers freeze, and billing for that promotion ends.
How Boosting Increases Listing Exposure
Boosting doesn’t just bump your listing higher for your followers. It launches your item into targeted ad slots, often reaching buyers outside your usual region. For example, a $10 boost can place your couch in front of 3,000 extra users, but those users might not be local or actually interested. The main upside is fast visibility, your item appears for shoppers searching similar products. The catch: if buyers message you after the item sells, you’ll have to explain it’s gone, since the ad keeps running until you stop it. This can lead to wasted budget or confused buyers. Boosting increases reach, but you’re paying for every impression, even if your item is already sold.
Why Sellers Want to Stop Boosting Early
- Item sold or removed, but ad still running
- Budget running out faster than expected
- Too many unwanted buyer messages from outside your target area
If you notice your ad is still spending after your item is gone, stopping the boost prevents extra charges and keeps your listing history clean.
Once you understand these changes, the next step is knowing exactly where to click and what to check when you want to cancel Facebook Marketplace boost. The controls aren’t always obvious, so the step-by-step guide in the next section covers both desktop and mobile, plus what to do if your boost won’t turn off.
How to Stop Boosting a Listing on Facebook Marketplace: Step-by-Step
Stopping a Facebook Marketplace boost means more than just clicking a “cancel” button, if you miss a step, your listing might keep showing up in ads, or you could get billed for extra days you didn’t want. Here’s how to end a boost cleanly, avoid payment surprises, and make sure your listing updates as expected.
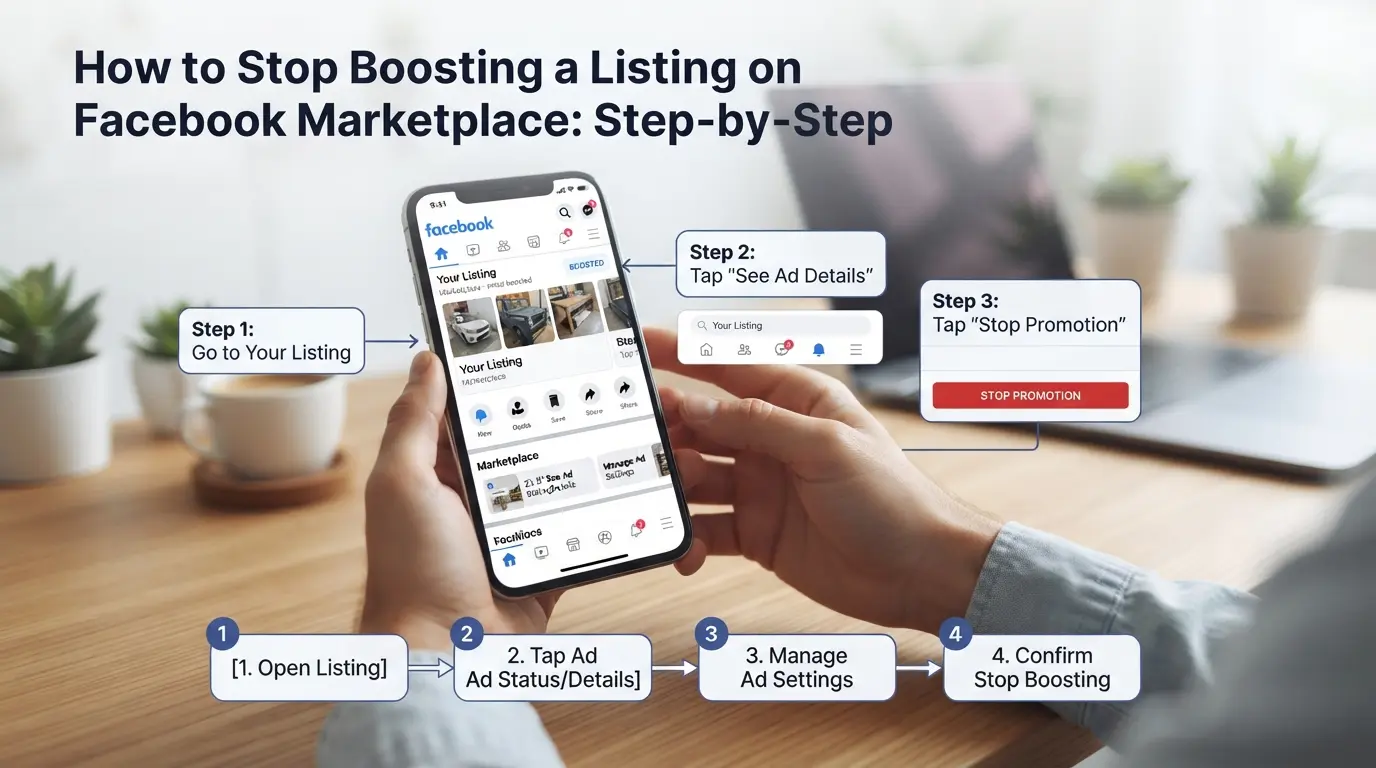
Find Your Active Boosted Listings
- Go to Facebook on your phone or computer and open Marketplace from the left menu or bottom bar.
- Tap or click “Your Listings.” Look for listings with a “Boosted” badge or a blue lightning bolt, those are the ones currently promoted.
- If you have many listings, use the filter or search bar to narrow down. Accidentally missing a boosted listing means you risk leaving a promotion running in the background.
Access Boost Management Options
- Click on the boosted listing you want to manage.
- Look for the “Ad Center” or “View Insights” button, boost controls often hide here, not under the regular edit menu.
- If you don’t see boost options, switch between the mobile app and desktop browser. Some controls only appear in one view, not both. If the controls are still missing, reload the page and confirm you’re logged into the correct seller account.
Cancel or Stop the Boost
- Inside the Ad Center or Insights panel, find the “Manage” or “Edit Boost” button. Click it.
- Hit “End Boost” or “Delete Promotion.” On mobile, this may read “Turn Off Boost.”
- Confirm cancellation when prompted. The screen should show a success banner or “Boost ended” message, if it doesn’t, refresh and check again.
- Take a screenshot of the confirmation for your records. Facebook sometimes processes cancellations with a short delay, and having proof helps if you get charged after stopping.
Check Listing Status and Billing After Stopping
- Go back to “Your Listings.” The “Boosted” badge should be gone. If it’s still there after 15 minutes, clear your browser cache or log out and back in, cached data can make old badges stick around.
- Open your Facebook Ads Billing or Payment Settings. Check that the boost shows as “Completed” or “Stopped.” Any pending charges should match the days your listing was actually promoted.
- If you see “In Review” or “Pending,” wait an hour. Facebook sometimes needs extra time to update billing. If your card is charged for more than you used, contact Facebook support with your cancellation screenshot.
- For listings tied to product delivery or buyer messages, double-check those functions still work. Deleting a boosted listing instead of ending the promotion can sometimes wipe out buyer chats or order history, always stop the boost, not the listing, to keep your records intact.
Once you’ve confirmed your boost is off and payment is correct, you’re set. If something doesn’t match up or you can’t stop a boost, the next section covers what to do when things go wrong.
Common Issues When Trying to Stop a Boosted Listing (and How to Fix Them)
If you tried to cancel a Facebook Marketplace boost but hit a wall, missing buttons, stuck payments, or the ad staying live, you’re not alone. Here’s what usually goes wrong and how to fix it fast.
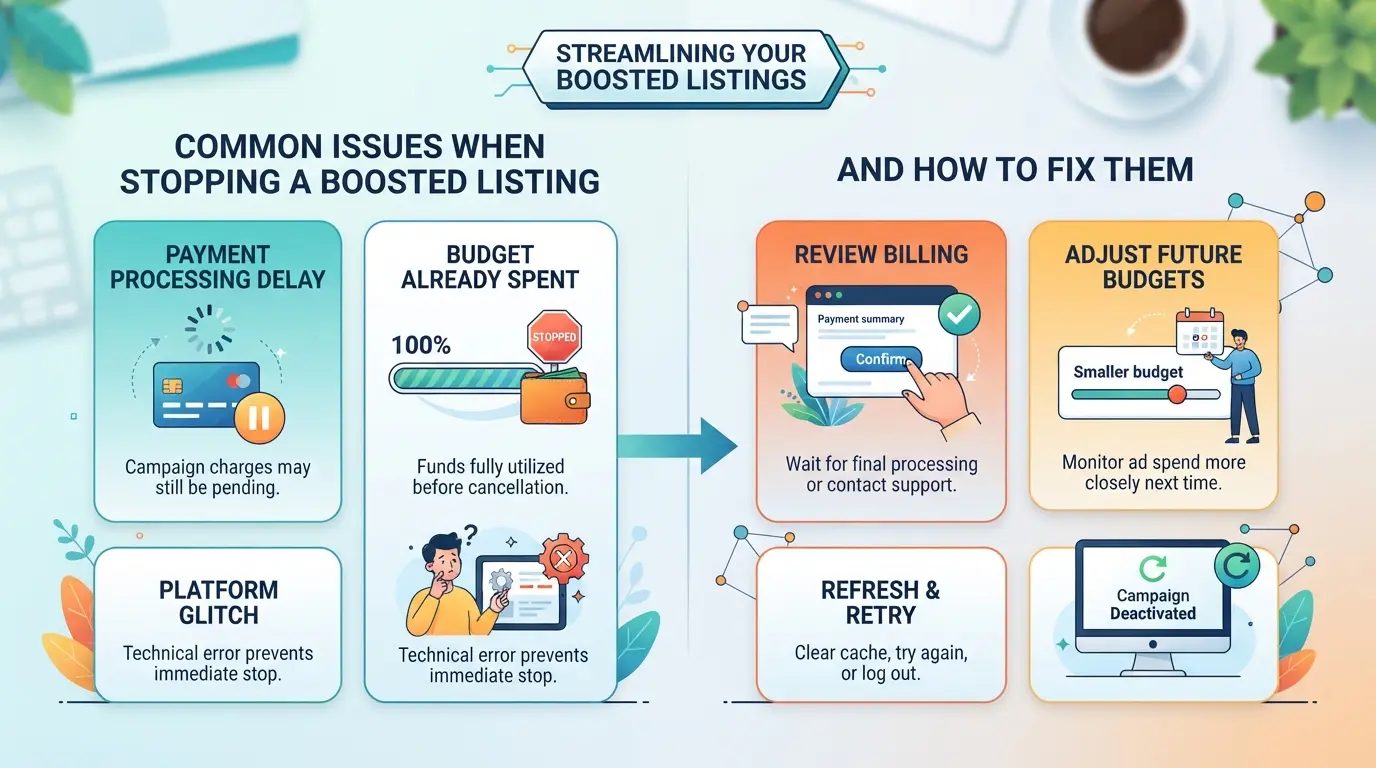
The Stop/Cancel Option Is Missing
You might not see the cancel or stop button if your payment is still processing, the listing already expired, or Facebook has a bug on your account. Sometimes the controls only appear on desktop or in the Facebook app, not both. If you’re stuck, switch devices, check your payment tab for status, and clear your browser cache before escalating to Facebook support. If the option still won’t show and you’ve ruled out a pending charge, report the problem through Facebook’s Help Center with screenshots attached.
Boosted Listing Still Shows as Active After Canceling
- Refresh the page and log out, then back in, browser cache can show old boost status.
- Wait up to 1 hour, Facebook sometimes delays boost status updates across devices.
- If boost still shows as active after 2 hours, use Facebook’s in-app support chat.
Billing or Refund Problems
Partial refunds for unused boost time are not instant. If you see a charge after stopping a boost, check your Facebook payment history before contacting support.
- Review your payment activity for pending refunds.
- Download the receipt, refund lines often appear 24-48 hours later.
- If no refund after 72 hours, open a dispute via Facebook’s billing support.
Once you’ve resolved these issues, you can focus on what changes for your listing and payment after stopping the boost.
What Happens to Your Listing and Payment After Stopping a Boost?
Once you cancel your Facebook Marketplace boost, your item drops out of promoted spots almost instantly. You’ll notice a sharp cut in paid visibility, organic reach stays, but your listing stops appearing in sponsored placements.
Listing Visibility After Stopping a Boost
Expect your listing to lose extra exposure within minutes. Paid reach ends right away, while regular search and browse spots remain. If you’re tracking clicks, the change is obvious, views from ads stop, but organic traffic may keep coming for a few days.
How Facebook Handles Billing and Refunds
Facebook bills you for the boost period used up to cancellation. Partial refunds rarely happen unless the boost fails to deliver as promised; most sellers see only the prorated charge for active days. To check your payment status or refund, go to your Facebook Payments settings and review the boost invoice.
Can You Boost the Same Listing Again?
- You can re-boost any listing if it’s still active.
- Wait for the previous billing cycle to finish before starting a new boost.
- Only boost again if your item still needs fresh exposure; repeat boosts on stale listings usually waste money.
Mistakes to Avoid When Stopping a Boosted Listing
Stopping a Facebook Marketplace boost looks simple, but the real pain usually comes from bad timing, missed confirmations, or billing surprises that show up days later.
Stopping Too Late or Too Early
If you cancel too late, you might pay for days you don’t need, Facebook charges for the full period if you miss their cutoff. Cancel too early and your listing’s exposure drops fast, sometimes before you’ve made any sales. The best move: watch your listing’s stats daily and time your stop for when views and messages start to slow, not just when your item sells.
Not Confirming Cancellation
Even when you hit “Stop” on a boost, you’re not done until you see confirmation. Missing this step means your promotion may keep running and charging your account. Here’s what to check:
- Look for a “Boost ended” or similar confirmation in your dashboard.
- Refresh the page to see if the boost status updates.
- Check your email for a cancellation notice from Facebook.
Overlooking Billing Details
Extra charges often creep in if you ignore billing after stopping a boost. Facebook sometimes bills for pending clicks or impressions that happened before you canceled, so don’t just trust the cancel button.
- Review your billing section for any “pending” or “processing” charges.
- Compare the charge amount to your ad spend and cancellation date.
- If charges look high, open a support ticket with screenshots and timestamps.
These checks help you avoid repeat mistakes and keep extra costs off your next bill.
Using DICloak to Organize and Secure Multi-Account Facebook Listing Workflows
After you’ve cleaned up boost mistakes and want to make sure each Facebook Marketplace listing and its promotions stay organized, even when switching between accounts, multi-account teams face a different kind of risk. If your e-commerce workflow involves more than one Facebook account, browser sessions can get mixed up, team members can click the wrong listing, and accidental boosts or cancellations become harder to trace. DICloak does not manage listings or boosts, but operators can use it to separate browser profiles, set up proxy connections, and control team access for each Facebook account tied to a Marketplace business.
Separate Facebook Accounts with Isolated Browser Profiles and Fingerprint Settings
Operators working with multiple Facebook accounts can avoid cross-session confusion by creating a dedicated browser profile for each account in DICloak. Each profile stores its own cookies, browser data, and fingerprint settings such as time zone, language, and system details, matching the account’s normal environment. The scope is limited to browser-profile separation; it does not touch listings or boosts inside Facebook. 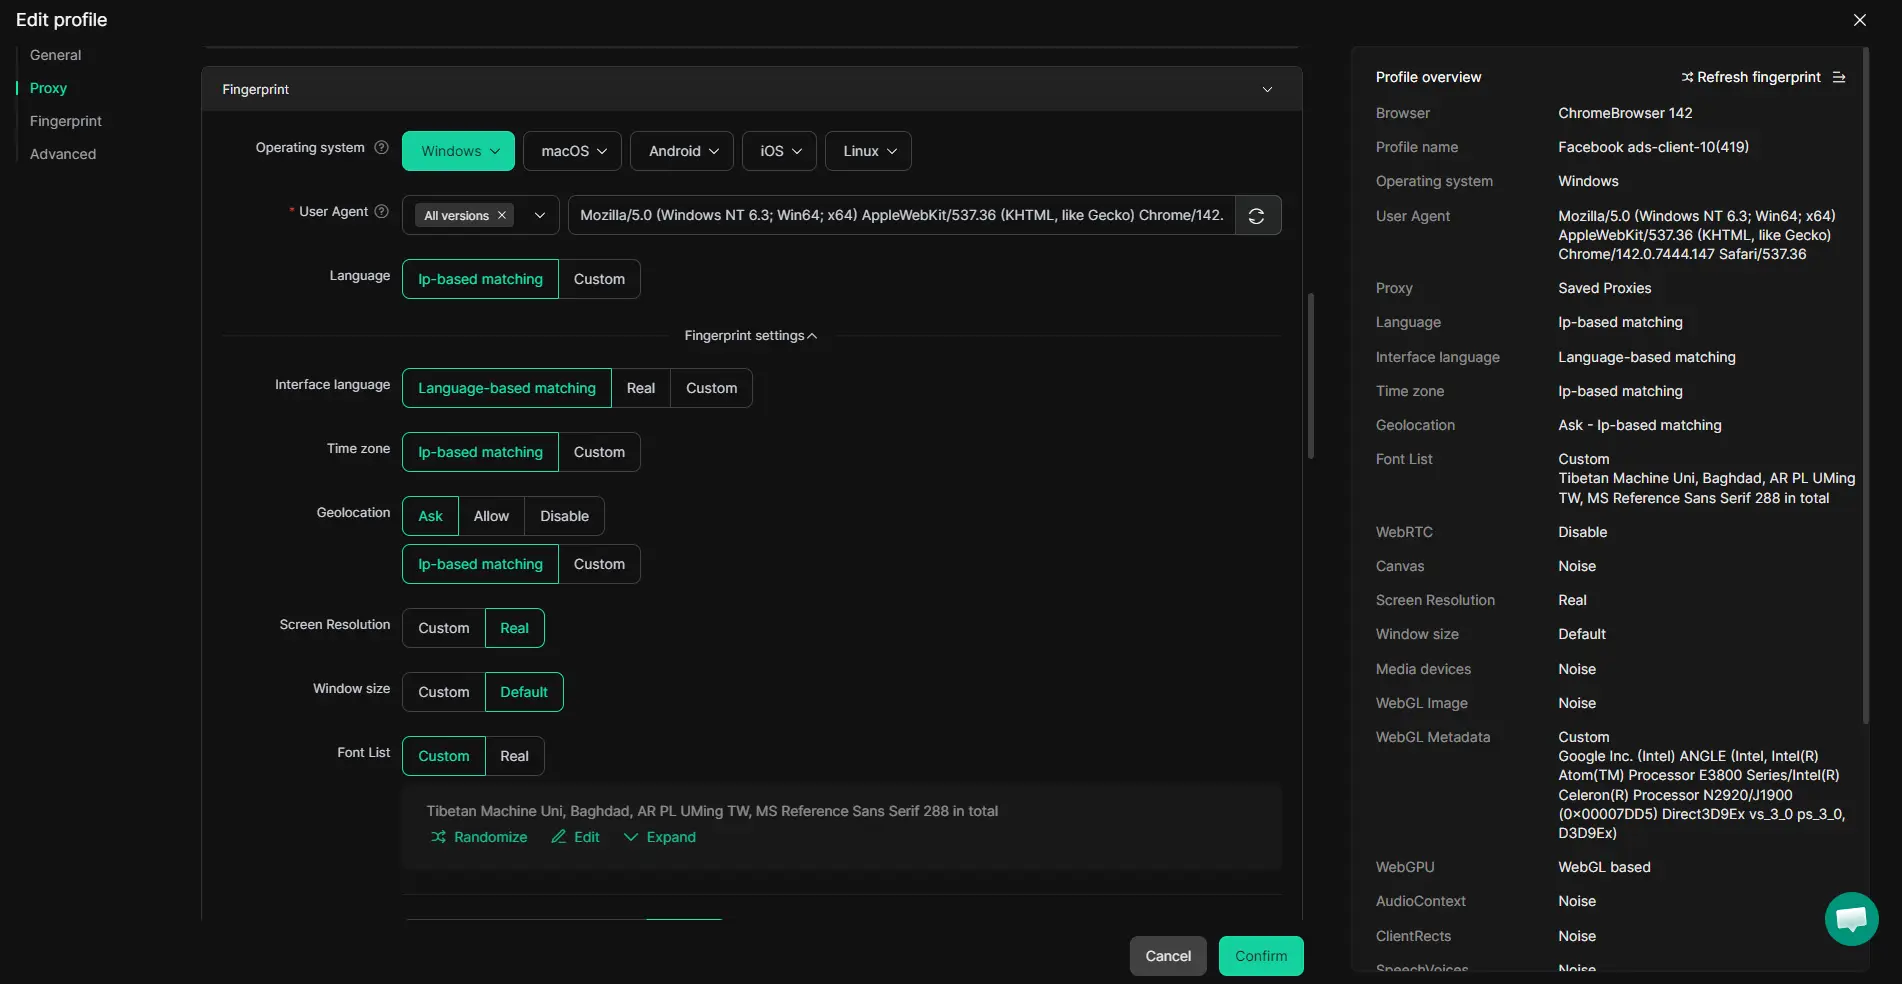
User-Provided Proxy Configuration for Assigned Profiles
Some sellers need each Facebook account to connect from a consistent network. Operators can add a custom HTTP, HTTPS, or SOCKS5 proxy to each profile in DICloak, test the connection, and check the detected location before opening the session. Proxy selection and quality stay in your hands, DICloak only stores and applies the proxy per profile. 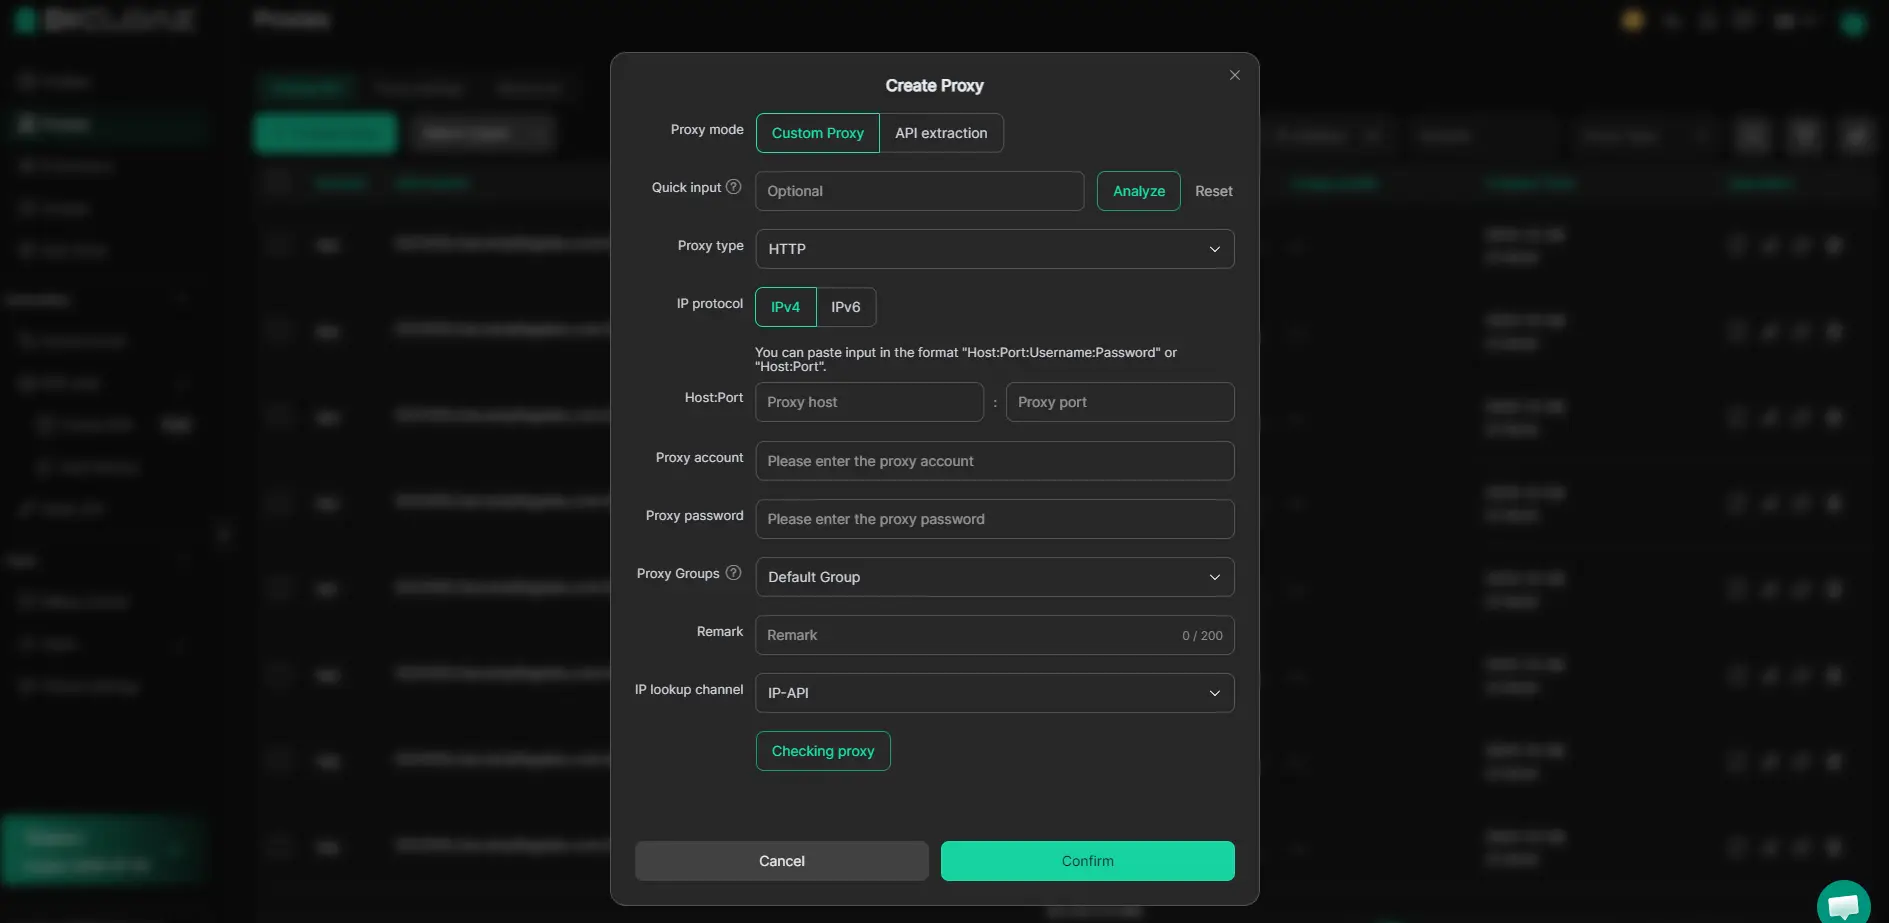
Team Permissions for Assigned Browser Profiles
Admins running a team can control which members access which Facebook account profiles, and what actions they can take, reducing the odds of someone accidentally stopping or boosting the wrong listing. These permissions only apply inside DICloak; they do not change Facebook account or listing rights. 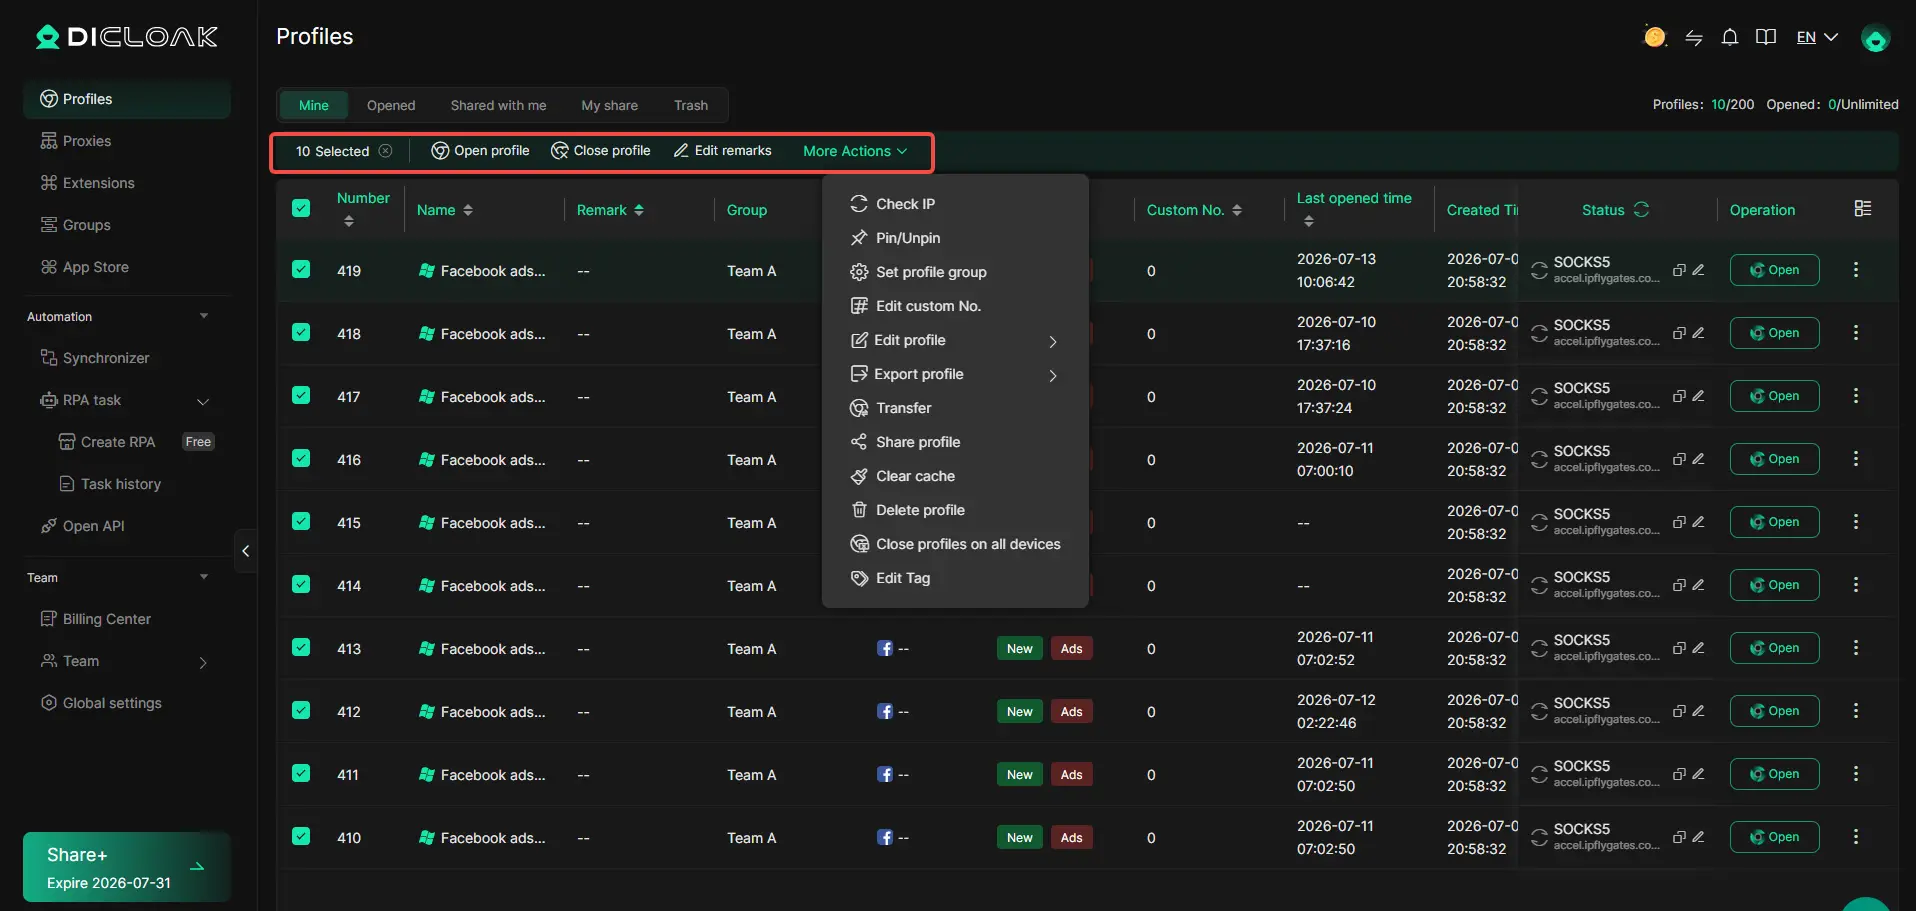
If you’re planning to boost a listing again, the next section covers when it’s worth restarting promotion and what situations to avoid.
When Should You Boost a Listing Again (and When to Avoid It)?
If your last boost barely moved the needle or your item’s audience has shifted, re-boosting can seem tempting, but repeating paid promotion isn’t always the smartest call. Sellers juggling multiple listings often wonder if it’s worth paying for another boost or if improving the listing itself will get better results.
Signs That Re-Boosting May Help
| Situation |
Re-Boost Worth It? |
Why It Matters |
| New audience or timing shift |
Yes |
Old boost may miss new buyers |
| First boost underperformed |
Maybe |
Try with better photos or copy |
| Listing already sold |
No |
Paid boost wastes money |
Re-boosting works best when your item didn’t reach the right buyers the first time, or if demand spikes due to timing, like weekends or local events.
When to Focus on Organic Listing Improvements
If your photos are blurry, title is generic, or replies are slow, paying for another boost won’t fix the core problem. Sellers often see stronger results by updating their images, rewriting descriptions, and joining local buying groups. Improving the listing itself usually brings more lasting results than short paid boosts.
Risks of Repeated Boosting
Running boosts back-to-back can lead to diminishing returns, your listing may still get buried if the fundamentals are weak. Some sellers also run into account issues, like payment flags or temporary restrictions, especially if boosting repeatedly from several accounts. If you notice less engagement after each boost, it’s time to pause and rethink your approach instead of sinking more money into paid promotion.
Ready to level up your Marketplace strategy? The next section covers expert moves sellers use to get their listings seen in 2026.
Expert Tips for Managing Facebook Marketplace Listings in 2026
Smart sellers track policy shifts and document every boost or cancellation. One missed update or lost receipt can mean real trouble, here’s what to check right now for safer, more reliable listing management.
Stay Updated on Facebook’s Marketplace Policies
Marketplace rules change fast, check the official Facebook Marketplace Policies monthly, especially after app updates. Policy changes can affect how you boost or cancel listings, so don’t rely on last year’s process.
Keep Records of Your Boosts and Cancellations
- Download receipts for each boost and cancellation
- Save screenshots of listing status after stopping promotion
- Log dates and results to track any unexpected charges
Use Profile and Team Management Tools for Multi-Account Sellers
Selling across accounts? Profile tools and clear team roles help avoid cross-account mistakes.
- Assign unique browser profiles to each seller
- Set team permissions to control who can boost or cancel
- Keep a shared log so changes are visible to all
Frequently Asked Questions About how to stop boosting a listing on facebook marketplace
How do I stop boosting a listing on Facebook Marketplace if the cancel option is missing?
If you don’t see the cancel option, first refresh the page. Sometimes, Facebook hides the button if there’s a pending payment or technical issue. Check your billing section for any unpaid balances. If the cancel option still won’t show, contact Facebook support for help with how to stop boosting a listing on facebook marketplace.
Will I get a refund if I stop boosting my Facebook Marketplace listing early?
Partial refunds are possible if you cancel before the full boost budget is spent. Go to your billing or payments section to see how much was used. Facebook may refund the unused portion, but the exact amount depends on how much exposure your listing already got.
How long does it take for a boost to stop after I cancel it?
Once you cancel, the boost usually stops right away. In some cases, it takes a few minutes for changes to appear. Try refreshing your browser or app to check if the promotion has ended. If the boost still shows as active after a refresh, contact support.
Can I boost the same listing again after stopping the previous boost?
Yes, you can boost the same Facebook Marketplace listing again unless it has expired, been deleted, or removed by Facebook. Just click “Boost Listing” and set your budget. Stopping a previous promotion does not prevent you from promoting the item again.
Is it safe to manage multiple boosted listings from different Facebook accounts on one device?
It’s safer to use separate browser profiles and proxies for each account. This reduces the risk of Facebook linking your accounts together. Also, use permission controls to keep account data separate and avoid accidental cross-posting or access issues.
Now that you know how to manage promoted posts, consider whether you want to adjust your advertising strategy or explore alternative platforms for reaching buyers. Taking control of your listing’s visibility allows you to increase your budget and focus on what works best for your business goals. Try DICloak For Free
 Web Proxy Tools
 Free Tools
 Cookie Plugin
 UA Generator
 MAC Address Generator
 IP Generator
 IP Address List
 2FA Code Generator
 World Clock
 Anonymous Check
 WebRTC Leak Test
 UUID Generator
 Free Web Proxy Site
 Proxy Checker
 FB Ad Checker
 AI Web Scraping
 Free SMM Tools
 Twitter Shadowban Checker
 Instagram Name Checker
 UTM Generator
 Username Generator
 AI Hashtag Generator
 LinkedIn Headline Generator
 Social Media Image Resizer