You launch a campaign and watch it stall, Google Ads get rejected for reasons that aren’t always clear. Maybe your headline seemed fine, your landing page loads fast, and your targeting looks textbook. Still, you get a disapproval notice with a vague policy label or a warning about “circumventing systems.” It’s not just annoying. Every hour your ad is down, you lose traffic, leads, and budget momentum.
What trips up most teams isn’t a glaring policy break, it’s missing a detail that Google’s automated review flags, or having one account action trigger a chain of rejections across related campaigns. Changes as small as a misplaced brand term, an old tracking template, or reusing creatives across profiles can all get your Google Ads not approved, even when they worked yesterday.
The hard part? Fixing rejected Google Ads isn’t just about resubmitting. You have to dig through cryptic policy lists, double-check your account setup, and sometimes undo changes that seemed harmless. If you skip a step, like clearing session data or isolating account logins, you risk a pattern of fast repeat rejections or even a full account suspension.
Start by breaking down the real reasons Google Ads disapproval happens and what to check before you even click submit.
What Usually Causes Google Ads to Get Rejected in 2026?
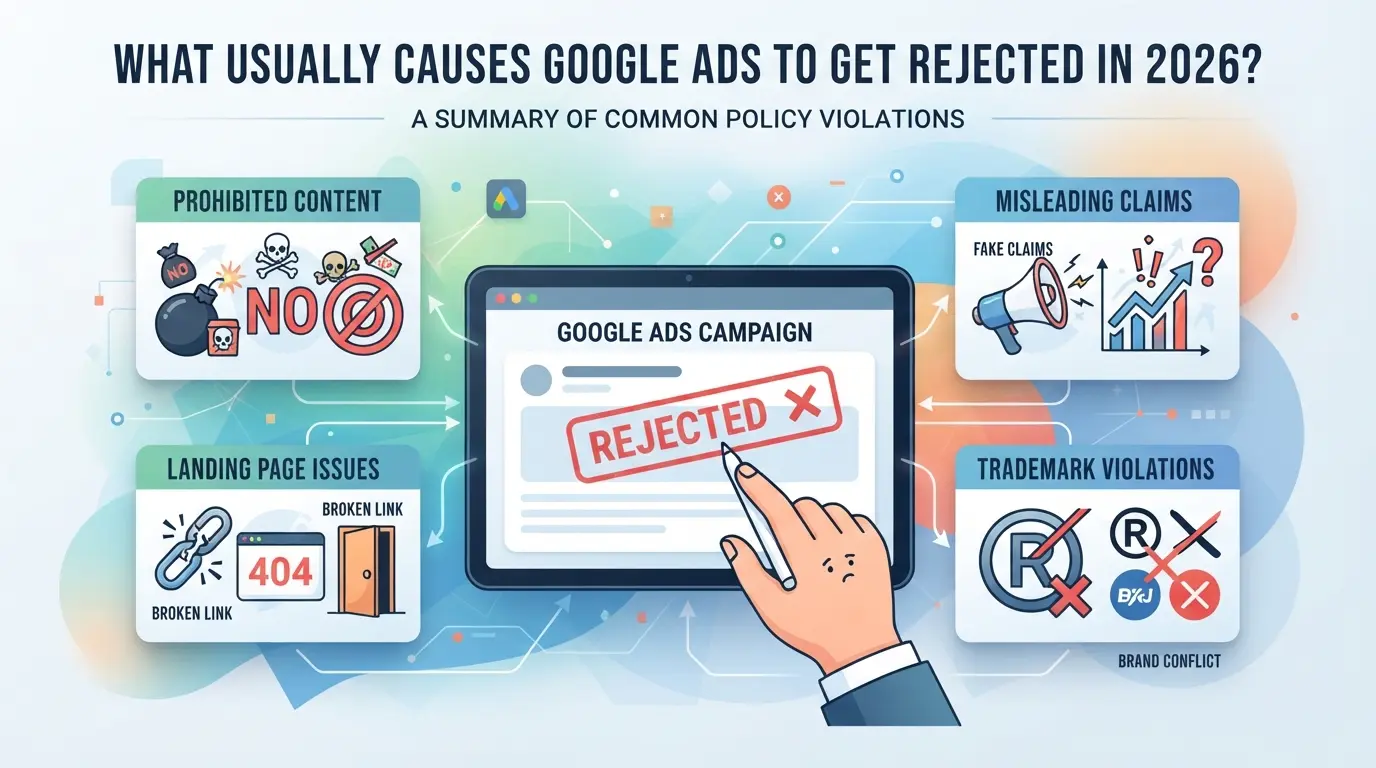
Most ads get rejected because one of three things goes wrong: you break a policy, your ad setup has a technical error, or your account signals trigger extra scrutiny. Small details now trigger hard rejections faster than in past years, so fixing the root cause is the only sustainable way to avoid repeat trouble.
Policy Violations That Trigger Immediate Rejection
Google blocks ads on sight for misleading claims, restricted content (like supplements or crypto), or if your business type is on the prohibited list. The rules in 2026 are stricter, policy updates now cover more phrases and landing page types than before.
Technical and Formatting Errors
Even if your copy is clean, technical mistakes can tank your ad. The biggest sources: broken links, formatting that doesn’t match Google’s display rules, or a mismatch between your ad’s promise and the actual landing page. For example, if your ad headline says “free trial” but the landing page has no mention of a free offer, that’s an instant disapproval. Google’s automated checks spot missing privacy policies, non-functional buttons, or even slight discrepancies in your display URL versus the final destination. Sometimes, the issue is subtle, a redirect chain that works for you in one browser but breaks for mobile users will flag the ad as failed, even if you can’t reproduce it on your own device. Fixing these errors means manually testing every path, device, and browser, not just assuming one successful click means the setup is correct for everyone.
Account-Level Risk Factors
- Suspicious account activity, like logging in from new locations or rapid changes to billing info, often triggers extra reviews.
- Multiple rejections in a short window push your account into a higher-risk group, making future approvals slower and more strict.
- Inconsistent details, such as mismatched business info or frequent name changes, raise red flags, even if each change seems small on its own.
The next step is to pinpoint why your specific ad was rejected, since the error message alone rarely tells the whole story.
How to Diagnose Why Your Google Ad Was Rejected
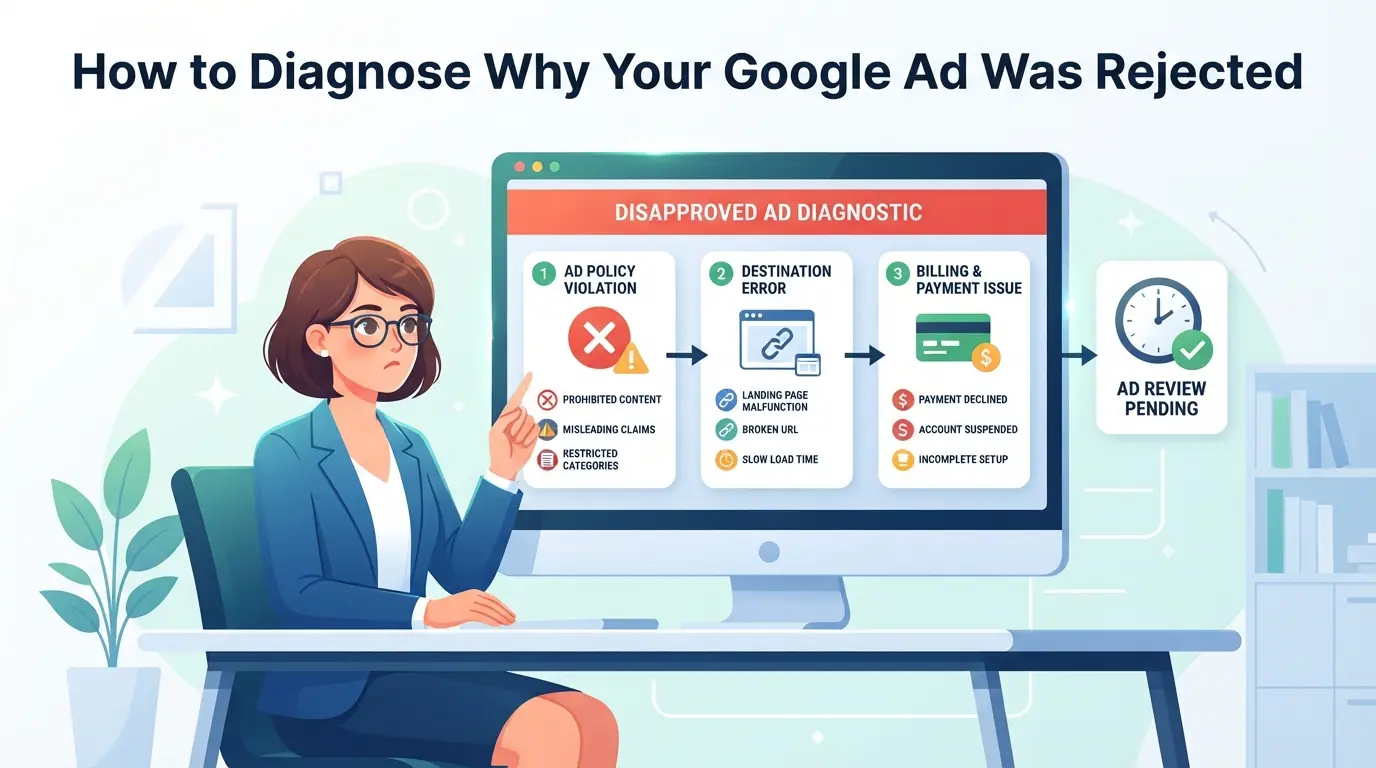
You won’t get your ad live again until you know the exact reason for rejection. Google’s policy notes are often vague, and guessing costs time. The fastest way to fix rejected Google Ads is to pinpoint the exact policy label and match it to the flagged asset, before you make any changes.
Checking Disapproval Notifications and Policy Manager
- Open your Google Ads account and look for a red banner or the bell icon, this flags new disapprovals.
- Check your email inbox for messages from Google Ads, especially the “Ad Disapproved” subject line.
- In your account, click the left menu > Policy Manager to see a list of affected ads and their rejection reasons.
- If Policy Manager lists “Multiple violations,” expand each row, missing this hides the real cause.
Interpreting Policy Labels and Limited Eligibility
- In the Policy Manager, look for the policy label next to each rejected ad, these are usually short phrases like “Trademarks” or “Destination not working.”
- If you see “Eligible (limited),” your ad runs with restrictions, usually lower reach or blocked regions.
- Ignore “Approved” labels, focus only on ads marked “Disapproved” or “Eligible (limited),” or you’ll waste time editing ads that are already running.
Tracking Appeal Status and Rejection History
- In the Policy Manager, check the “Appeal status” column, if it says “Under review,” wait for a final decision before editing.
- Click the ad to see “Rejection history”, this lists past disapprovals and shows which fixes worked.
- If you see the same policy repeat, your changes didn’t resolve the issue, use this history to spot what you missed.
Once you’ve matched the rejection to its policy label and checked your appeal status, you can start fixing the ad, focus on the flagged asset, not just resubmitting everything.
What to Fix First When Your Google Ad Gets Rejected
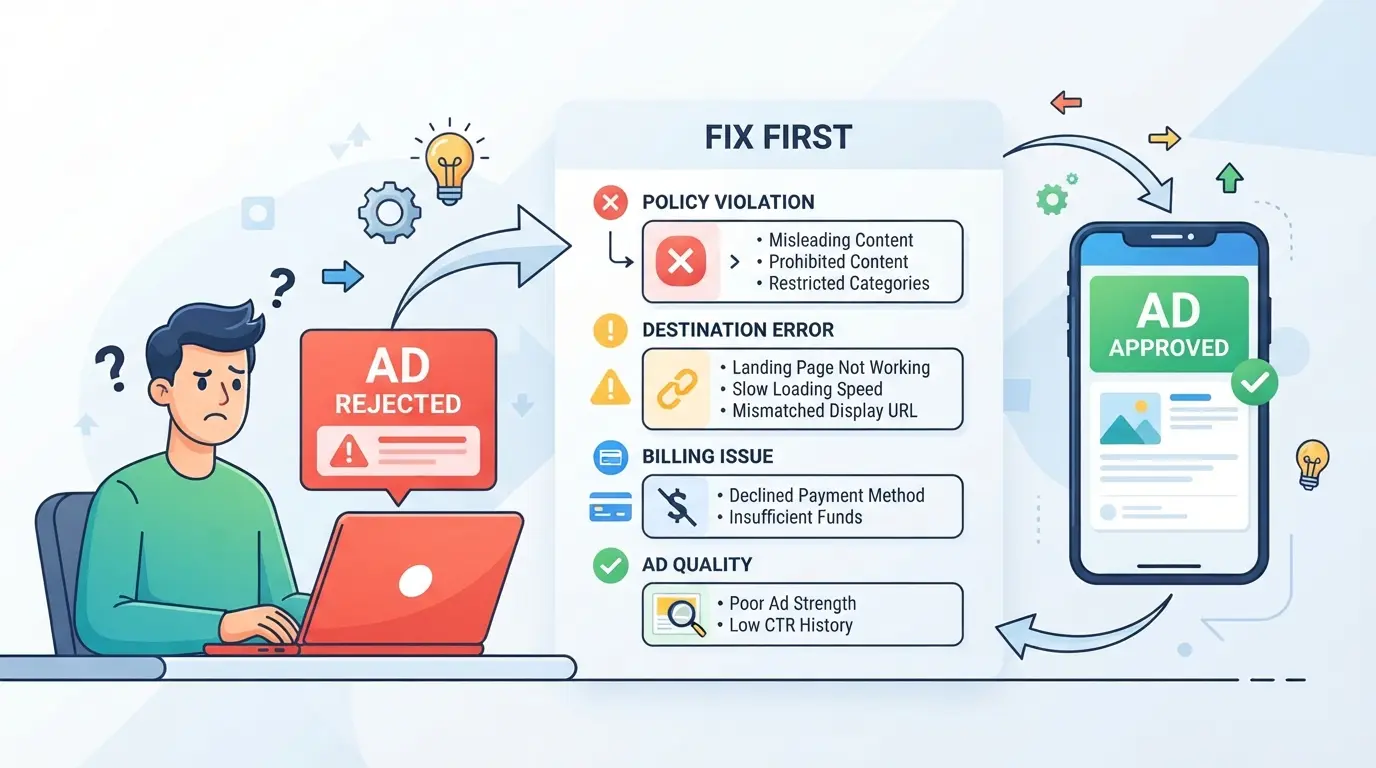
The fastest way to get a rejected Google Ad back online is to fix whatever triggered the policy flag at the ad level, usually, that means editing your content or removing restricted terms. If you only repair technical details but leave a policy violation in place, your next resubmission will fail again.
Correcting Content and Policy Violations
Edit your ad copy so it matches Google’s current policies, and cut any restricted keywords or claims. Focus on the flagged section, this is the step that gets most ads re-approved after a single edit. If you’re not sure which word or phrase caused the issue, compare your copy to the rejection notice and Google’s policy page. The fastest recoveries come from fixing content violations before anything else.
Fixing Technical and Destination Issues
- Double-check your ad’s final URL, no typos or expired domains.
- Test the landing page on both desktop and mobile.
- Make sure the page matches ad promises (no bait-and-switch).
Resolving Account-Level Problems
Sometimes, the ad is fine but the account isn’t. If the rejection mentions “account suspension” or “repeated violations,” stop and:
- Update your business info and billing details.
- Review your account history for past strikes or warnings.
- Pause other flagged ads before trying again.
Ignoring account-level issues can lead to a full suspension, not just a single ad rejection. Now that you know what to fix first, it’s easier to avoid the most common mistakes that keep ads from getting approved.
Common Mistakes That Lead to Google Ads Rejection
Skipping key checks before submission will get your Google Ads not approved, even if the last campaign worked fine. The fastest way to fix rejected Google Ads is to know what triggers the review filter and avoid these mistakes up front.
Ignoring Policy Updates and Regional Restrictions
Most rejections happen because advertisers miss new rules or overlook requirements tied to location. Google updates its ad policies every quarter, and regional restrictions change often. If you submit ads without checking the current policy page for your target country, you risk instant disapproval and wasted ad spend.
Submitting Ads With Incomplete Information
Missing details get flagged right away. Always check for:
- Business address and contact info are fully listed
- Every required image, headline, and description is present
- No fields are left blank or filled with placeholders
Using Duplicate or Inconsistent Accounts
Duplicate accounts or mismatched info trigger account-level reviews. Even small inconsistencies can cascade into wider disapproval.
- Confirm all account names, payment details, and business info match across profiles
- Avoid submitting identical ads from more than one account
- Double-check for reused tracking templates or creatives across campaigns
The next step is making sure teams and agencies don’t repeat these mistakes across multiple accounts.
How Agencies and Teams Can Reduce Google Ads Rejection Risk
For agencies and teams, rejections aren’t just a one-off, mistakes compound fast when multiple people or accounts are involved. The main way to lower Google Ads rejection risk is by controlling account information, isolating browser profiles, and tracking every team action, so no small misstep spreads across profiles.
Coordinating Account Information and Permissions
Account mismatches often start with sloppy data or unclear permissions. Using a single shared sheet or master login usually leads to confusion, one person updates a business address, but another launches a campaign with the old info. The fastest way rejections stack up is when an account’s settings, billing, or business details don’t match what Google expects. Give each team member only the access they need, and double-check credentials before making changes.
Preventing Fingerprint and IP Overlap
Mixing browser sessions is where agencies get burned. If one team member logs into two client accounts from the same device or IP, Google’s systems can flag both. This isn’t just theory, one client’s account can get suspended because another’s ad was rejected, and the only link is browser overlap. Isolating each account in separate browser profiles with unique proxies and fresh fingerprint data helps keep Google from connecting them. The tradeoff: it takes more setup and active coordination. If someone forgets to switch profiles or reuses a session, both accounts can trigger a review cycle, and you might lose access to your whole client roster for days. The biggest pain comes when you think you’ve fixed one rejected ad, but the rejection pattern spreads because the session data was shared, undoing hours of work and putting multiple budgets at risk.
Tracking Team Actions and Audit Trails
- Keep logs of who made each change and when, this lets you spot patterns if Google Ads disapproval repeats.
- Review permission changes weekly, not just after a problem.
- Require short notes or tags for each campaign update, so you can retrace steps if new ads get flagged.
Strict control beats fast fixes. Small process gaps, like letting one login handle every account, almost always lead to more rejections down the line.
Managing Multiple Google Ads Accounts Safely: Practical Workflow with DICloak
Agencies and teams managing several Google Ads accounts face a unique risk: small mistakes or shared logins can trigger a wave of disapprovals, making “Google ads get rejected” a recurring problem rather than a one-off event. Once accounts or sessions overlap, even just once, Google’s systems can link behaviors, and a single rejected ad may spill over to other profiles. For teams that also need to keep account environments separate, DICloak supports a structured workflow, isolating browser sessions, configuring proxies, and controlling team permissions, so every account runs in its own lane.
Setting Up Isolated Browser Profiles and Fingerprint Configuration
When handling more than one Google Ads account, it’s not enough to use browser incognito mode or change devices. Operators can create a dedicated browser profile in DICloak for each account, storing all cookies, sessions, and cache separately. This means one account’s login never crosses over to another. Each profile’s fingerprint can be set, including browser version, OS, time zone, and screen details, so every account works in an environment that stays consistent from login to login. The scope here is limited to browser-profile isolation; it does not affect Google’s internal review systems or account settings.
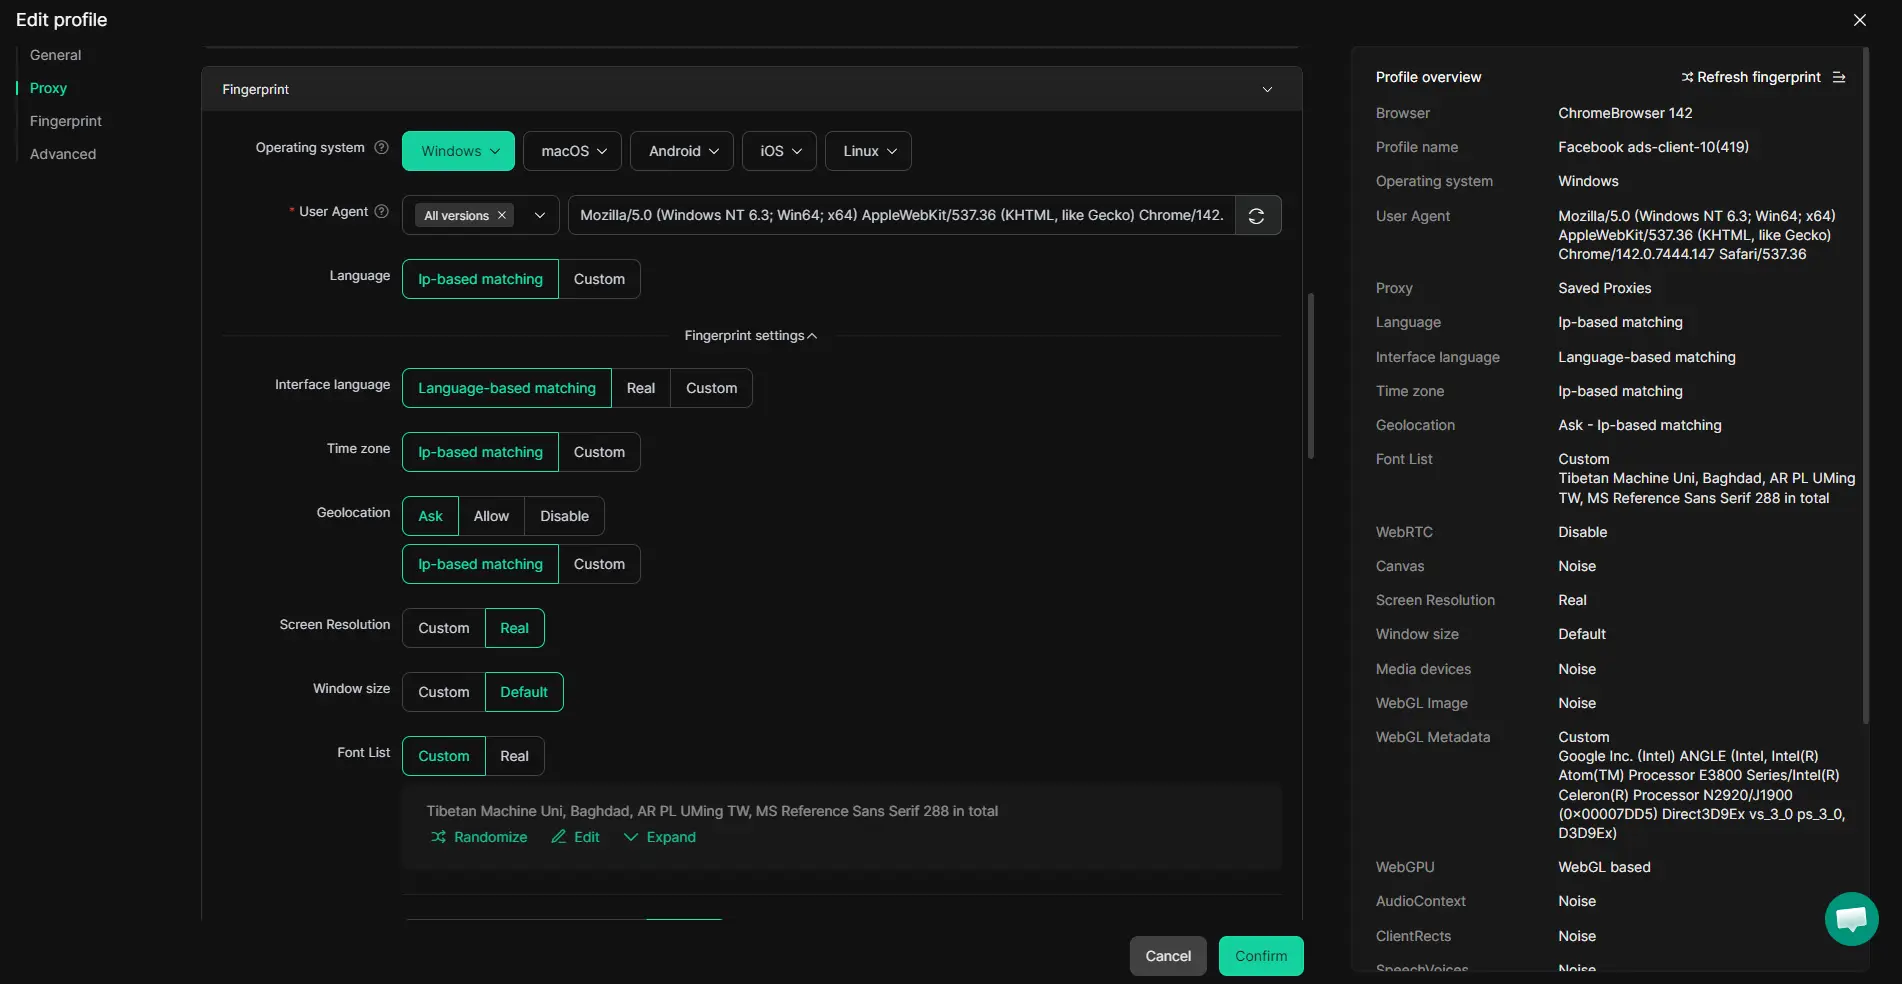
Configuring User-Owned Proxies for Each Profile
For workflows where Google Ads accounts need to appear from different locations or consistent IPs, operators can assign a separate proxy to each browser profile in DICloak. This setup might involve entering proxy details manually or choosing from saved proxies. Before opening a session, operators can test the connection and confirm the location matches what the account expects. Proxy selection, quality, and location are up to the user, DICloak stores and applies the configuration but does not supply proxies or guarantee suitability for any platform.
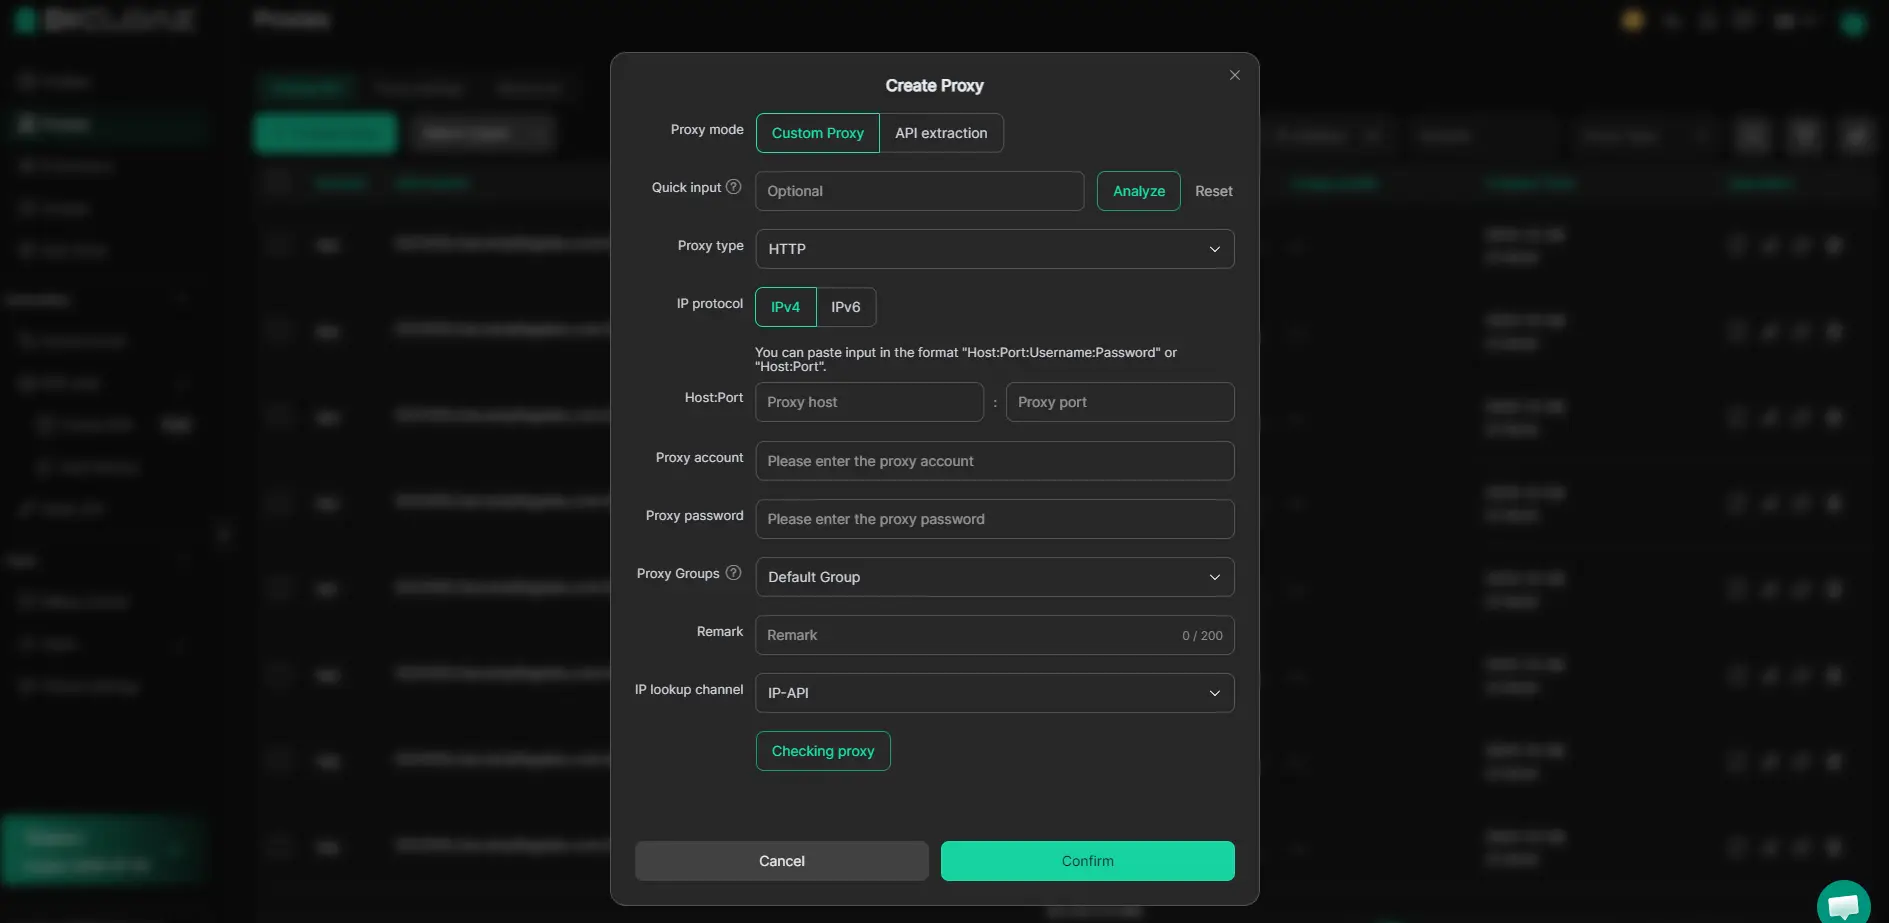
Controlling Team Collaboration and Member Permissions
Team handoffs often cause accidental leaks, someone logs into the wrong account or edits a setting outside their scope. By setting up role-based access in DICloak, admins can restrict each member’s view to just the profiles they’re assigned. Only approved actions and fields show up for each group, so there’s less chance of cross-account mistakes or policy violations when working with Google Ads. These controls apply at the browser profile and session layer only, not inside Google’s own team or user settings.
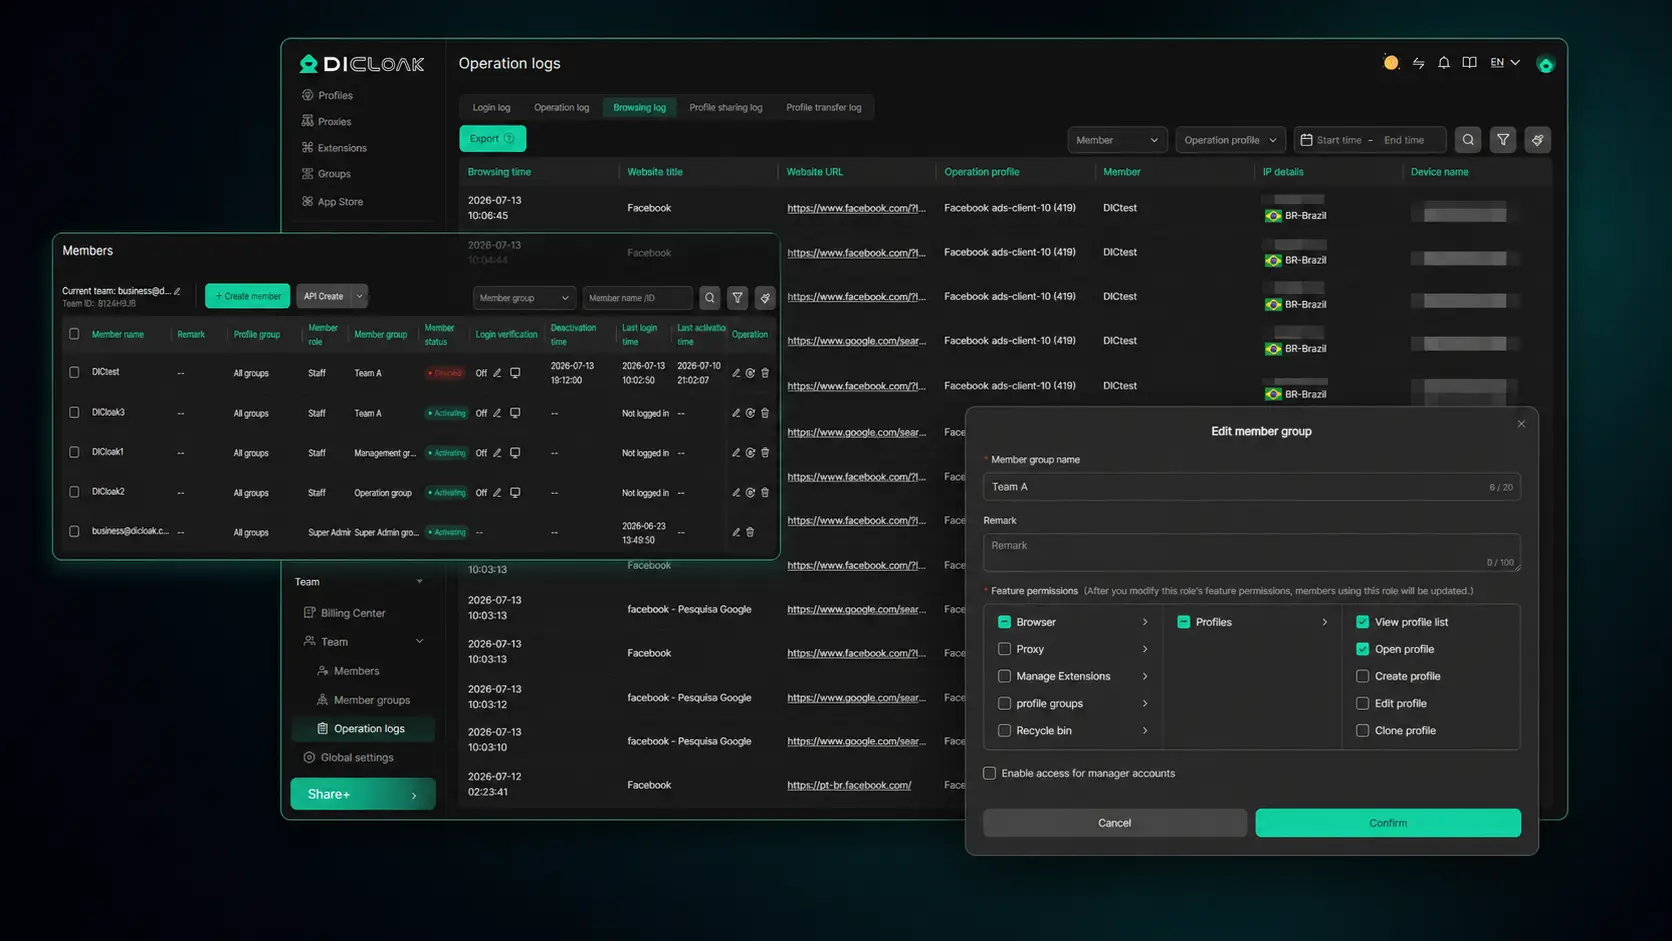
Teams that manage scale and access this way can spot and correct the real source of repeat ad rejections faster, before it’s time to appeal or escalate with Google.
When to Appeal a Google Ads Rejection and What to Expect
Sometimes, an appeal makes sense, but only if you’re sure the rejection was a mistake or a one-off review error. Here’s how to decide and what happens next.
Deciding If an Appeal Is Worthwhile
- Double-check the policy violation, appeals rarely succeed if the ad actually breaks a rule.
- Appeal if you fixed a simple error (like a typo or wrong URL) and the ad still gets rejected.
- Skip the appeal and edit your ad if the rejection is clear (e.g., restricted content, missing disclosures).
How to File an Appeal in Google Ads
- In Google Ads, click on the rejected ad and select “Appeal.”
- Choose a reason: “Fixed policy violation” if you changed the ad, or “Disagree with decision” if you believe it’s an error.
- Submit and watch for status updates, appeals can take 1-3 business days.
What Happens After an Appeal
- If approved, the ad restarts; if denied, you’ll get a short reason.
- Multiple failed appeals can lock the ad permanently, don’t repeat if nothing changed.
- You can still edit and resubmit, but policy flags stack fast if you ignore feedback.
How to Prevent Google Ads Rejection Before You Submit
If you want to avoid Google Ads disapproval, start with a checklist before you hit submit. The right checks catch problems early, saving you days of back-and-forth or repeat rejections.
Reviewing Google Ads Policies and Updates
Always scan Google’s policy center for the latest changes, even if you’ve run similar ads before. Check for new rules on restricted content, trademark use, and ad copy. Missing an updated restriction is the fastest way to get an ad rejected, even if it passed last month.
Testing Landing Pages and Technical Details
- Load the landing page in an incognito window, if it times out, Google’s bot will fail it too.
- Make sure your ad headline matches the main offer on the destination page.
- Check for broken links or redirects, Google checks every URL.
Coordinating Account and Team Information
Inconsistent business details across accounts or missing team roles trip automated reviews. To avoid account-level rejections:
- Confirm business name, phone, and address match everywhere Google reviews.
- Assign clear roles, avoid multiple “owners” with overlapping permissions.
- Review team edits before submission to catch last-minute changes.
Skipping even one of these steps can mean your Google Ads get rejected instantly. Run this list every time, especially if you handle several accounts or rotate creatives.
Frequently Asked Questions About Google ads get rejected
Why did my Google Ad get rejected even after fixing the issues?
Sometimes, Google ads get rejected again if earlier violations were not fully fixed or if there are new problems in the ad or landing page. Multiple rejections can put your account at risk of suspension. Carefully check your email for policy details and use the Policy Manager in Google Ads to find hidden violations or account-level issues.
Can I run Google Ads for restricted industries in 2026?
No, Google does not allow ads for certain industries like adult services, counterfeit goods, or illegal drugs. Some areas, such as alcohol or gambling, have strict rules and require approval. Always check Google’s latest policy page for updates before creating ads in any restricted sector.
How long does it take for Google Ads to be reviewed after resubmission?
Most resubmitted ads are reviewed within one business day. However, some reviews can take up to three days if the ad is complex or falls under sensitive categories. Weekends and holidays may cause delays. You can check the review status in your Google Ads account.
Is it safe to manage multiple Google Ads accounts from one device?
Managing several accounts from one device can cause Google to link them through device fingerprints or shared IP addresses. This may trigger account suspensions, especially if one account is penalized. Use separate browsers, user profiles, or different devices to reduce the risk of unwanted linking.
What happens if my appeal for a rejected Google Ad is denied?
If your appeal is denied, you can’t run that ad unless you make significant changes that fully address the policy violation. There is a limit to the number of appeals you can submit. If appeals keep failing, consider creating a new ad that follows Google’s policies or abandon the ad to avoid account risks.
When facing ad disapprovals, reviewing Google’s policies and making the necessary adjustments can help get your campaigns back on track. If compliance challenges persist, considering privacy-focused solutions can also mitigate future rejections. Try DICloak For Free
 Web Proxy Tools
 Free Tools
 Cookie Plugin
 UA Generator
 MAC Address Generator
 IP Generator
 IP Address List
 2FA Code Generator
 World Clock
 Anonymous Check
 WebRTC Leak Test
 UUID Generator
 Free Web Proxy Site
 Proxy Checker
 FB Ad Checker
 AI Web Scraping
 Free SMM Tools
 Twitter Shadowban Checker
 Instagram Name Checker
 UTM Generator
 Username Generator
 AI Hashtag Generator
 LinkedIn Headline Generator
 Social Media Image Resizer