Trying to set up an eBay US seller account can get confusing fast once you hit the real questions: personal or business account, US or non-US registration path, and what eBay will ask you to verify before you can list your first item.
A lot of guides make this look like a 10-minute form fill. That is not the hard part. The part that trips people up is matching your legal name, address, phone, payout details, and tax information so the account passes review without delays.
If you are figuring out how to open an eBay US seller account, the goal is not just to finish signup. You need to get the setup right the first time, so your seller profile, identity checks, and payout settings line up with how you actually plan to sell. That matters even more if you want to register as an eBay seller in the US from outside the country, or if you plan to run more than one store workflow later.
Start with the account type and eligibility rules, because that choice affects every step after it.
What do you need before you set up an eBay US seller account?
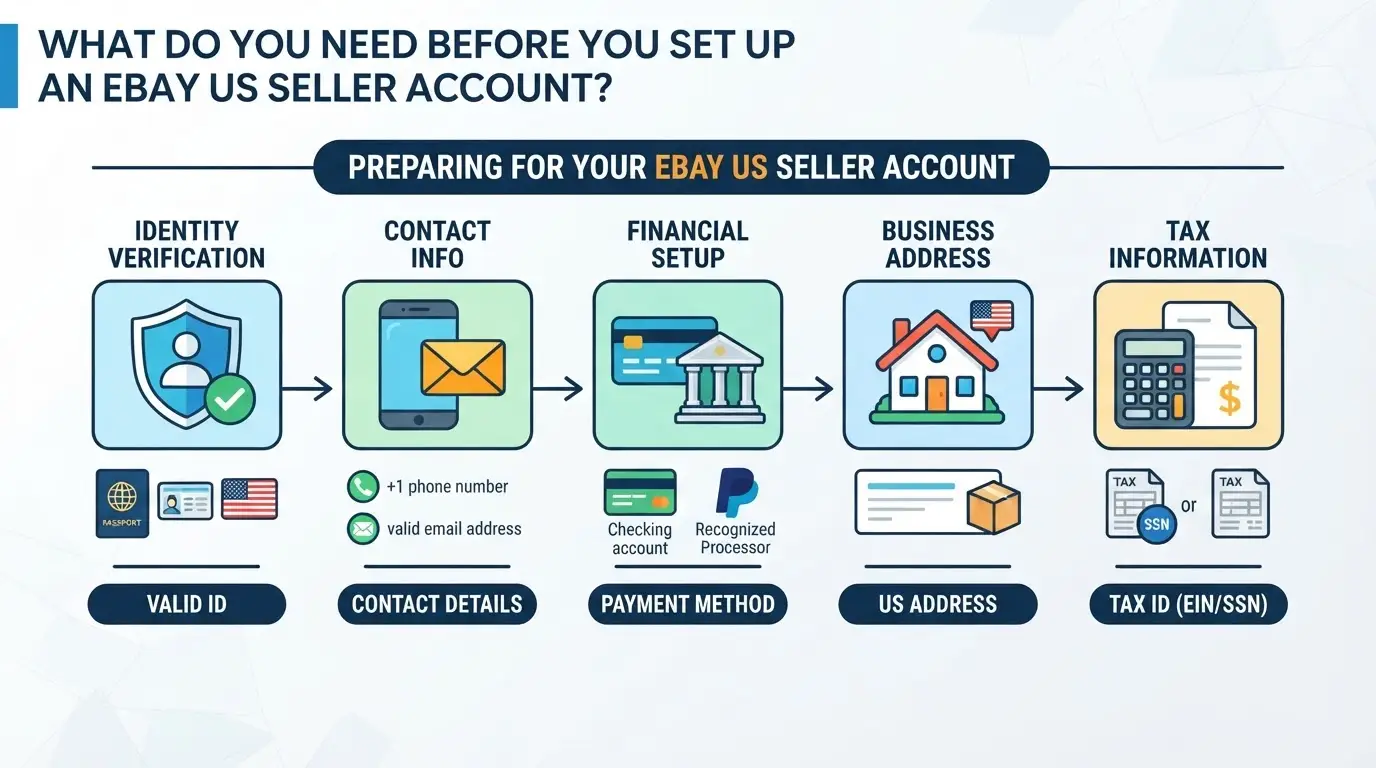
Before you start the form, gather your legal name, address, phone, email, tax details, and payout bank account. The part that causes delays is usually not missing a document, but small mismatches across those records.
Choose whether you need a personal or business seller account
Use a personal seller account if you are selling as an individual under your own legal name and tax identity. Pick a business account if you sell through an LLC, corporation, or registered business name, or if you want your business details tied to the account from day one. A common mistake is opening as personal, then trying to run payouts and tax details through a business entity later. That often creates extra review steps.
Prepare your contact, identity, and tax details
- Check that your full legal name is written the same way on your ID, bank account, and tax record.
- Use one real street address and phone number you can access during verification. Avoid mixing old and new details.
- Have your tax information ready before signup, such as your SSN or EIN, plus the exact business name if you plan to register as an eBay seller in the US as a company.
Get your bank account ready for payouts
Use a bank account that matches your seller type: personal name for an individual account, business name for a business account. You will usually need the account holder name, routing number, account number, and online access in case eBay asks you to confirm activity or ownership.
Check whether your documents are current and readable
Expired or blurry files slow reviews fast. If the address on your ID does not match the address you enter, expect follow-up checks.
- Make sure your ID is current, not cropped, and easy to read in one image.
- If you use a utility bill or bank statement, confirm it shows the same name and address you entered.
- Remove nicknames, shortened company names, and formatting differences like “Suite 200” in one place and “Ste 200” in another if your records can be updated.
Once these details are lined up, the actual account creation flow is much easier to finish without backtracking.
How do you create the account and register as an eBay seller?
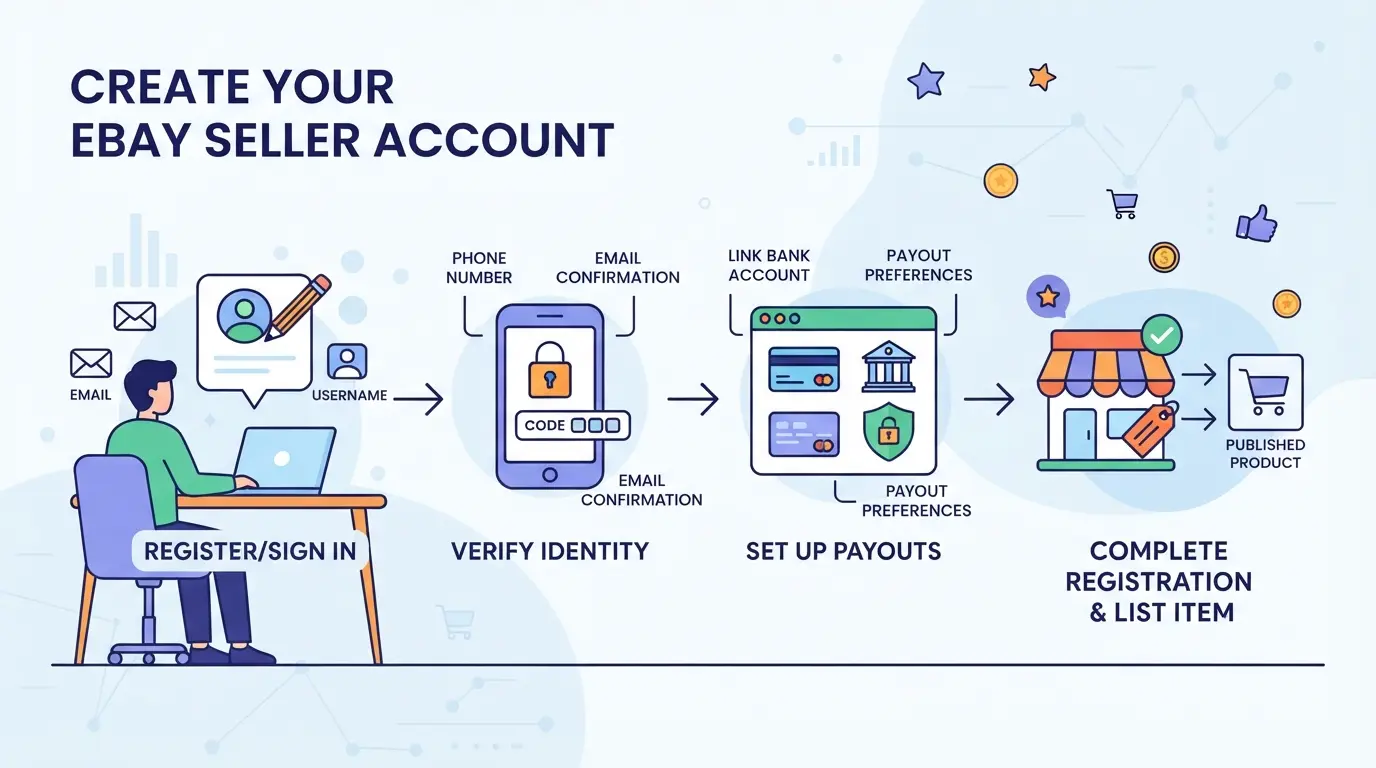
Once you have your legal, tax, and payout details ready, the actual flow is straightforward. The goal is not just to open an account, but to finish the seller setup with details that match cleanly when eBay checks them later.
Create your eBay login with email and basic account details
- Go to eBay and create an account with an email address you control long term. Do not use a shared inbox. If you lose email access later, account recovery gets messy fast.
- Enter your legal name, phone number, and address exactly as you plan to use them for selling. Small mismatches here often turn into review delays later.
- Confirm the email and phone when prompted. If the code does not arrive, stop and fix that before moving on. A half-verified login often causes trouble during seller registration.
Go to the selling section and start seller registration
- After login, open the Sell area from the top menu or go straight to eBay Seller Center.
- Start the seller registration flow. This is the point where a buyer account begins turning into a selling account with payout and verification steps attached.
- If eBay loops you back to the home page or asks you to sign in again, clear the session by logging out and back in once. That usually points to a stale browser session, not a failed application.
Select the right account type and confirm your business details
- Choose personal or business account based on how you will actually sell. Use business only if your legal business details, tax details, and payout details are ready to match.
- Enter business name, contact name, and address exactly as your records show them. Abbreviations like “St.” in one place and “Street” in another can trigger manual review.
- If you start as personal and plan to switch later, expect extra checks. For most new sellers, picking the right type now is cleaner than editing it after registration.
Review seller policies before you continue
- Read the core selling rules in eBay's selling policies. Focus on restricted items, seller performance, and payout holds.
- Check the return and shipping settings shown during setup. Bad defaults can create your first buyer dispute before you notice them.
- Once this is done, the next gate is verification: identity, tax status, and bank account matching.
How does eBay verify your identity, tax status, and bank account?
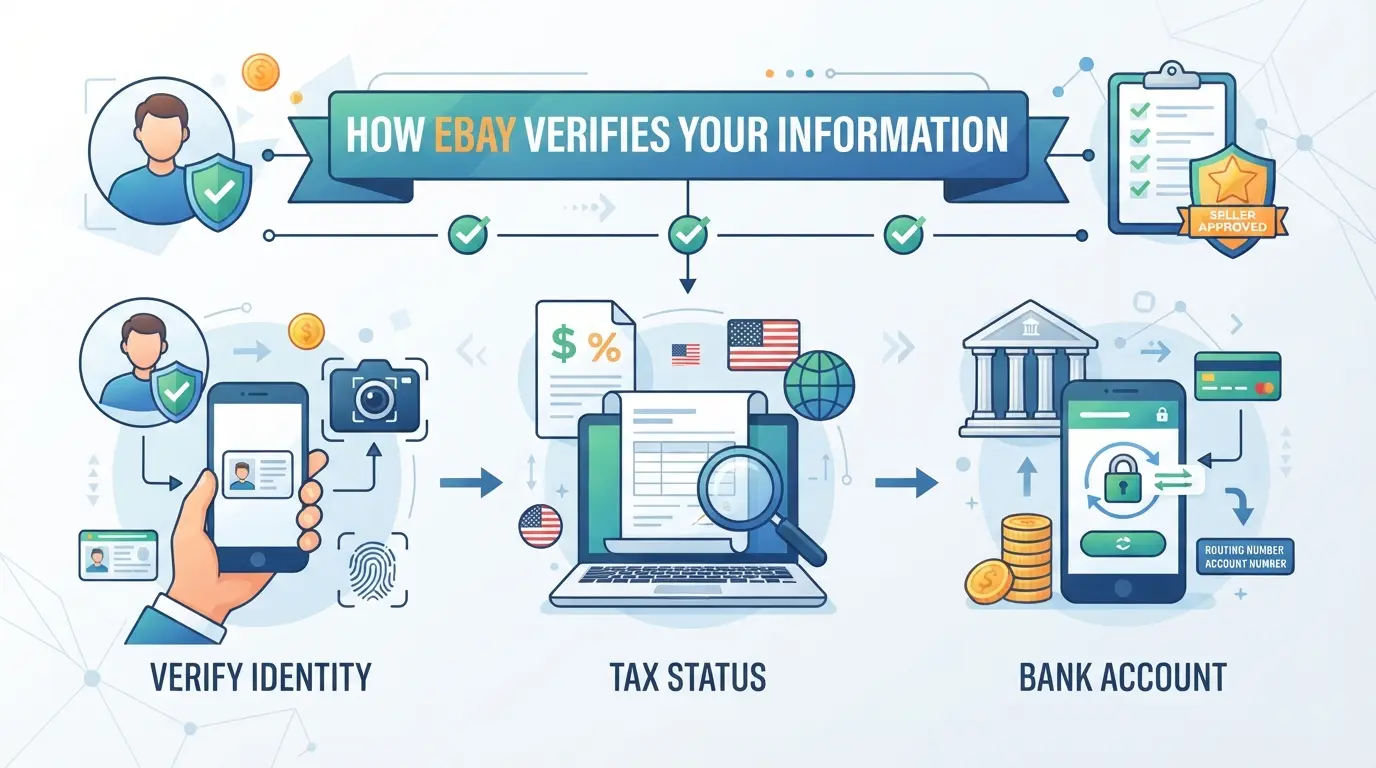
After you create the account, eBay usually checks three things before payouts and selling access work smoothly: who you are, which tax record applies to you, and whether the bank account can receive payouts. The hard part is not uploading documents. It is making every detail match across your seller profile, tax form, and payout account.
How tax information is usually collected
eBay usually asks for personal tax details if you sell as an individual, or business tax details if you sell through a registered company. If the legal name or taxpayer information is incomplete, setup can pause until you correct it, which is why people trying to set up an eBay US seller account often get stuck here.
What identity checks eBay may ask you to complete
eBay may ask for a government ID, a selfie check, proof of address, or business registration papers if you signed up as a company. The review usually fails for simple mismatch reasons: a shortened first name on the account, an old address on the ID, or a business name entered differently from the registration record. A common mistake is using a personal bank account while registering as a business seller under a company name. That does not always fail right away, but it often triggers manual review later, right when you are trying to list or receive payouts.
How bank verification works for payouts
For payouts, eBay may ask you to connect a bank account through a secure bank login flow, confirm small test deposits, or upload a bank statement for review. If your bank account shows “J. Smith LLC” but your seller profile says “John Smith,” fix the name mismatch before resubmitting, or the payout check can loop back into review.
How long verification can take and what delays it
Some checks finish the same day. Manual review can take longer.
- Blurry photos, cropped document edges, or dark screenshots often get rejected.
- Name, address, or business type mismatches are the most common delay.
- If a request sits too long, check the eBay Seller Center message area before uploading the same file again.
That last point leads into the next problem: the setup issues that usually cause seller approval delays.
What usually causes eBay seller account setup problems?
Most delays happen after you submit, not while you fill the form. The usual cause is a mismatch between the identity, payout, tax, and access details eBay checks during review.
Mismatched names, addresses, and account types
This is the setup mistake that causes the most avoidable reviews. If your legal name, address, and bank details do not match across records, eBay can pause approval for manual checks. A common example is using a business checking account while opening a personal seller setup, or entering a shortened name that does not match bank records.
Unreadable or outdated verification documents
- Upload full-color images with all four corners visible.
- Check the expiry date before submitting ID or business documents.
- Use the file format eBay accepts, then reopen the upload to confirm it is readable.
Rushing through setup without checking payout and tax details
Small typing errors cause big delays here. One wrong digit in your bank account, tax ID, or address can send your eBay US seller account setup back into review, so recheck every field before you submit.
Using inconsistent devices, sessions, or team workflows
This usually shows up after signup, when more than one person starts handling the account.
- Keep one owner responsible for verification steps.
- Do not mix shared logins, saved browser sessions, and last-minute edits.
- Write down which device, browser profile, and proxy each account uses before your team expands access.
How DICloak fits after you set up an eBay US seller account for team access
If you run only one store by yourself, a normal browser may be enough. If more than one person handles approved eBay seller accounts, teams can use DICloak after setup to keep browser sessions separate, add user-provided proxies where needed, and limit who can open which profile. The scope is limited to browser-profile access and session handling; it does not change eBay registration, verification, or seller permissions inside eBay.
Use separate browser profiles for different eBay seller accounts and workflow roles
A shared browser gets messy fast. An operator can create one DICloak profile for one eBay seller account and another for a second store or a support-only workflow, then keep language, time zone, screen settings, and other browser signals consistent inside each profile. This is mainly about clean session separation for people and tasks, not about changing eBay account outcomes. 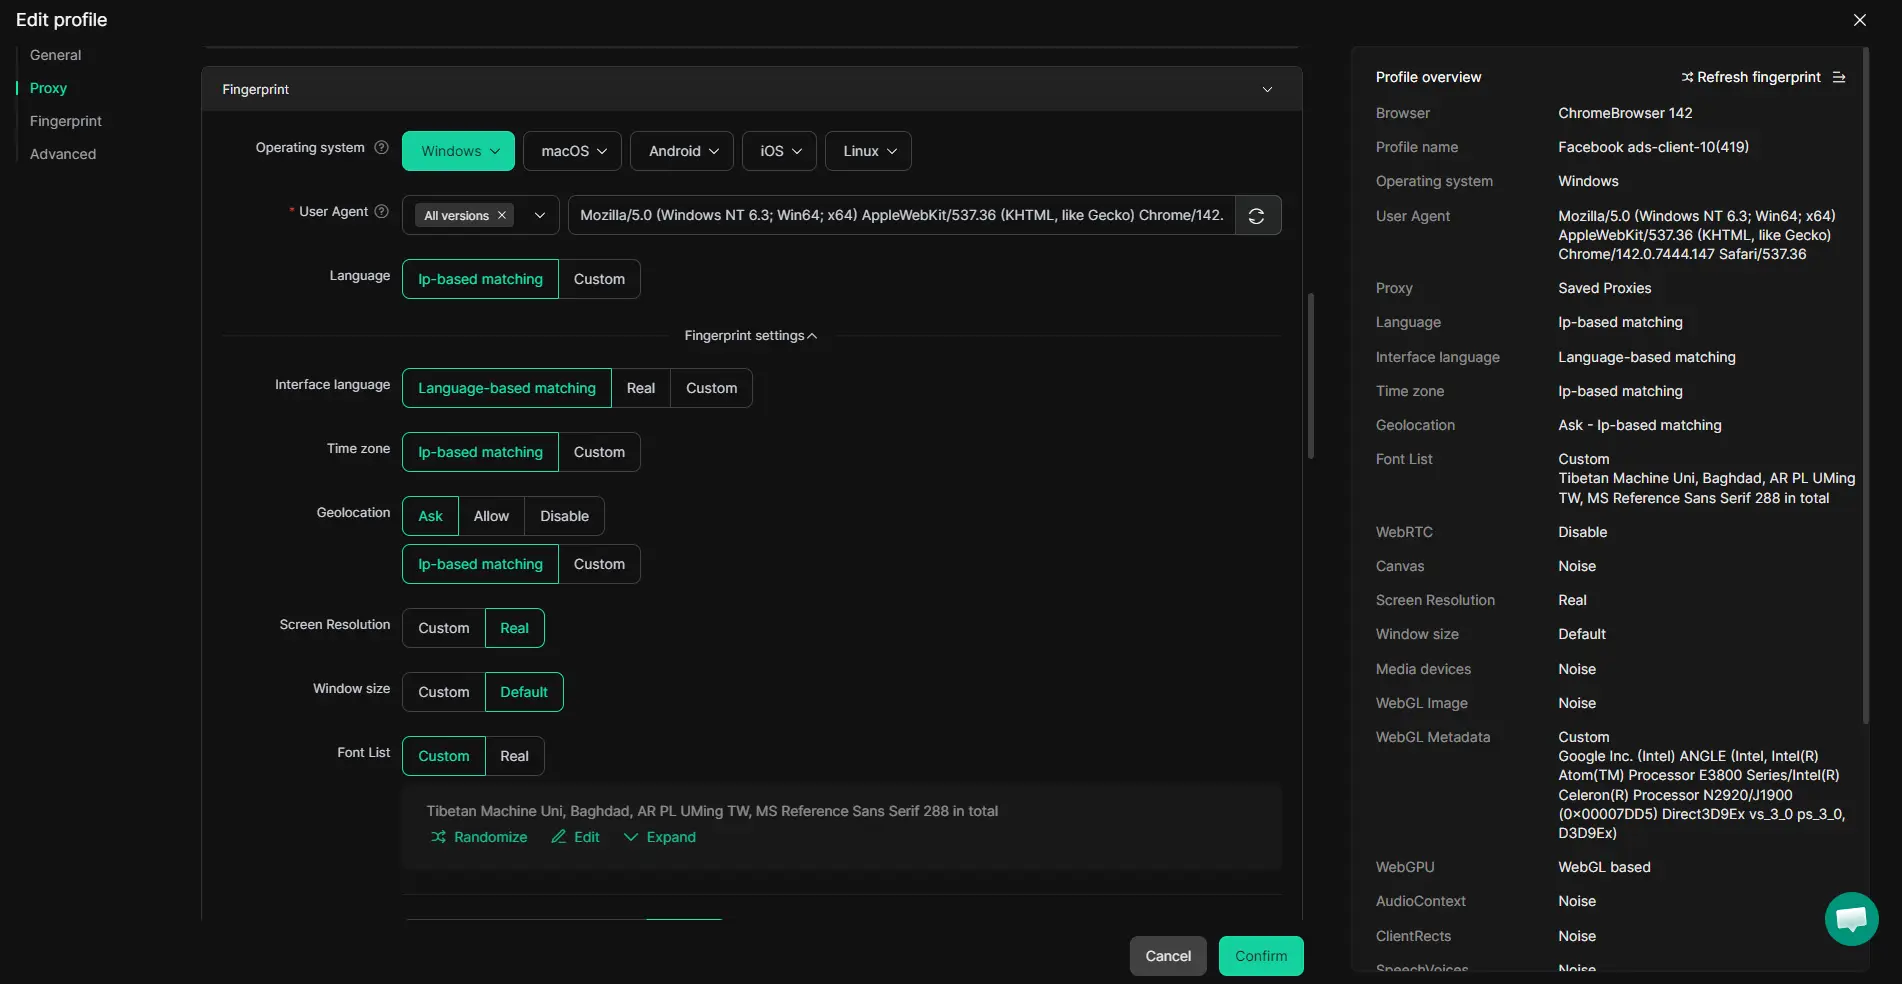
Add a user-provided proxy to each profile and test the connection before use
If your team does not want every profile using the same local connection, an operator can edit the profile, choose No Proxy, add a Custom Proxy, pick a Saved Proxy, or use API Extraction where supported. The built-in check shows the exit IP, country or region, and time zone before saving. A passed check only confirms the connection works; it does not prove the proxy is suitable for eBay work. 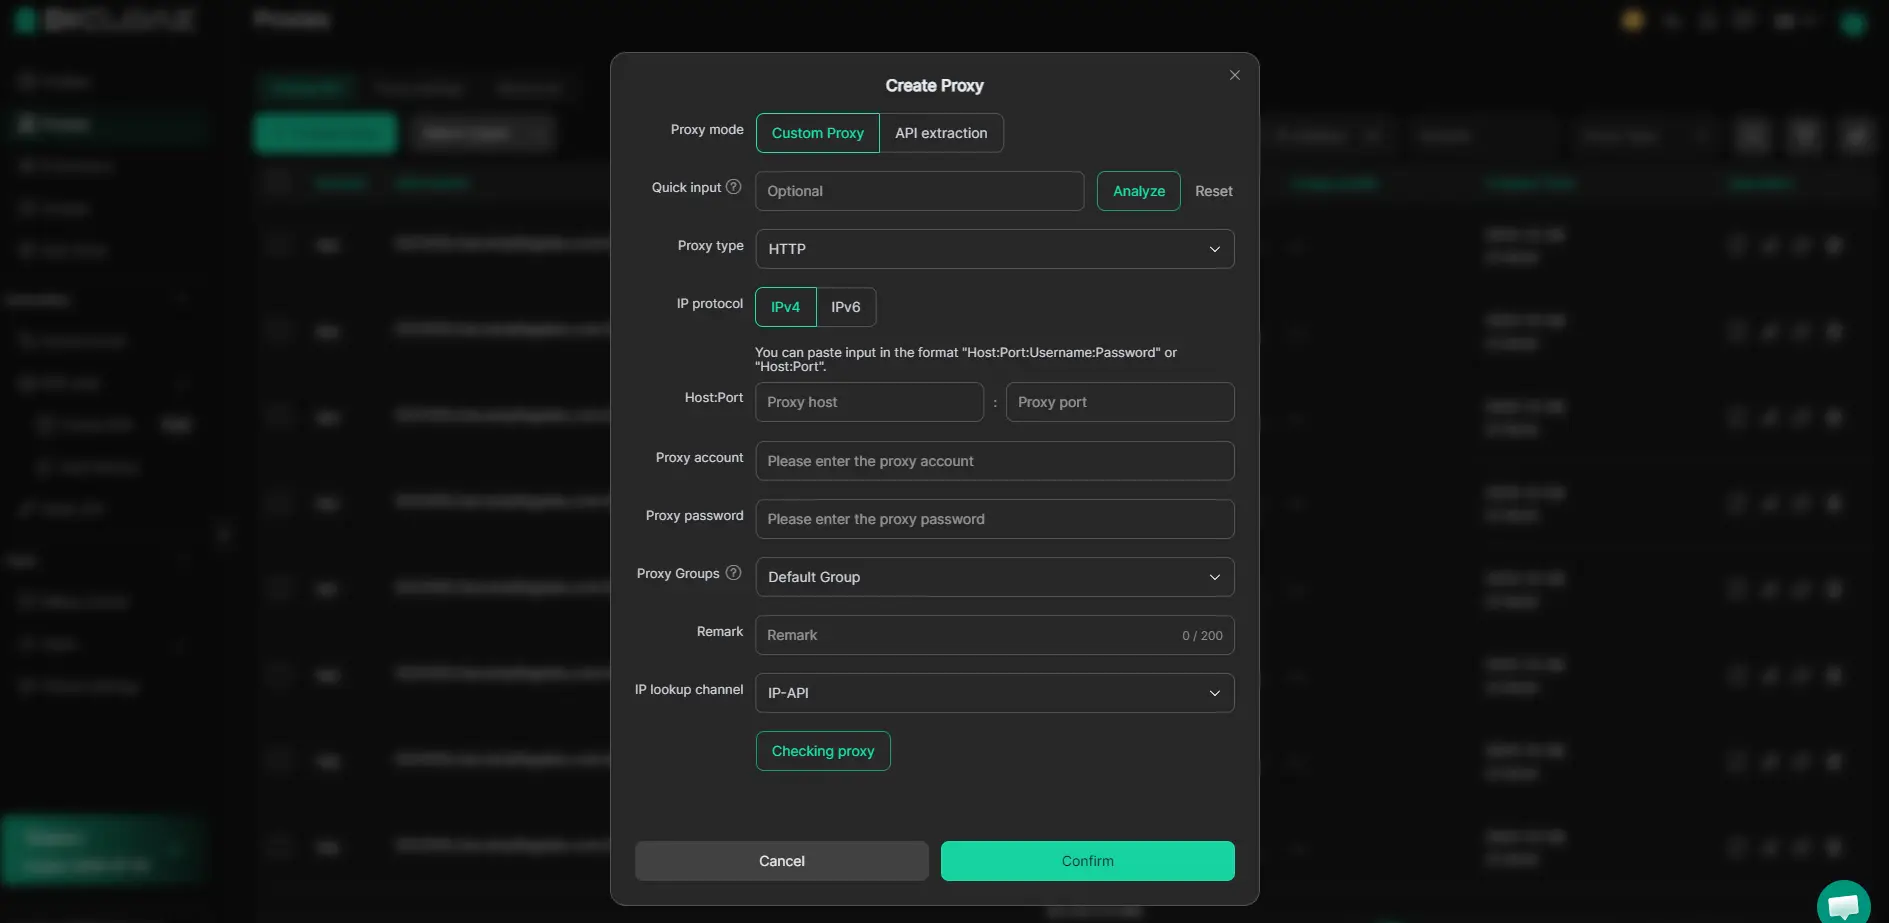
Give each team member only the profile access and actions they actually need
A small resale team is a good example: support staff may only need assigned profile groups and limited visible fields, while operations staff may need broader profile access. An admin can set those member-group permissions inside DICloak, but those controls apply only to DICloak functions and profile access, not to eBay roles themselves. 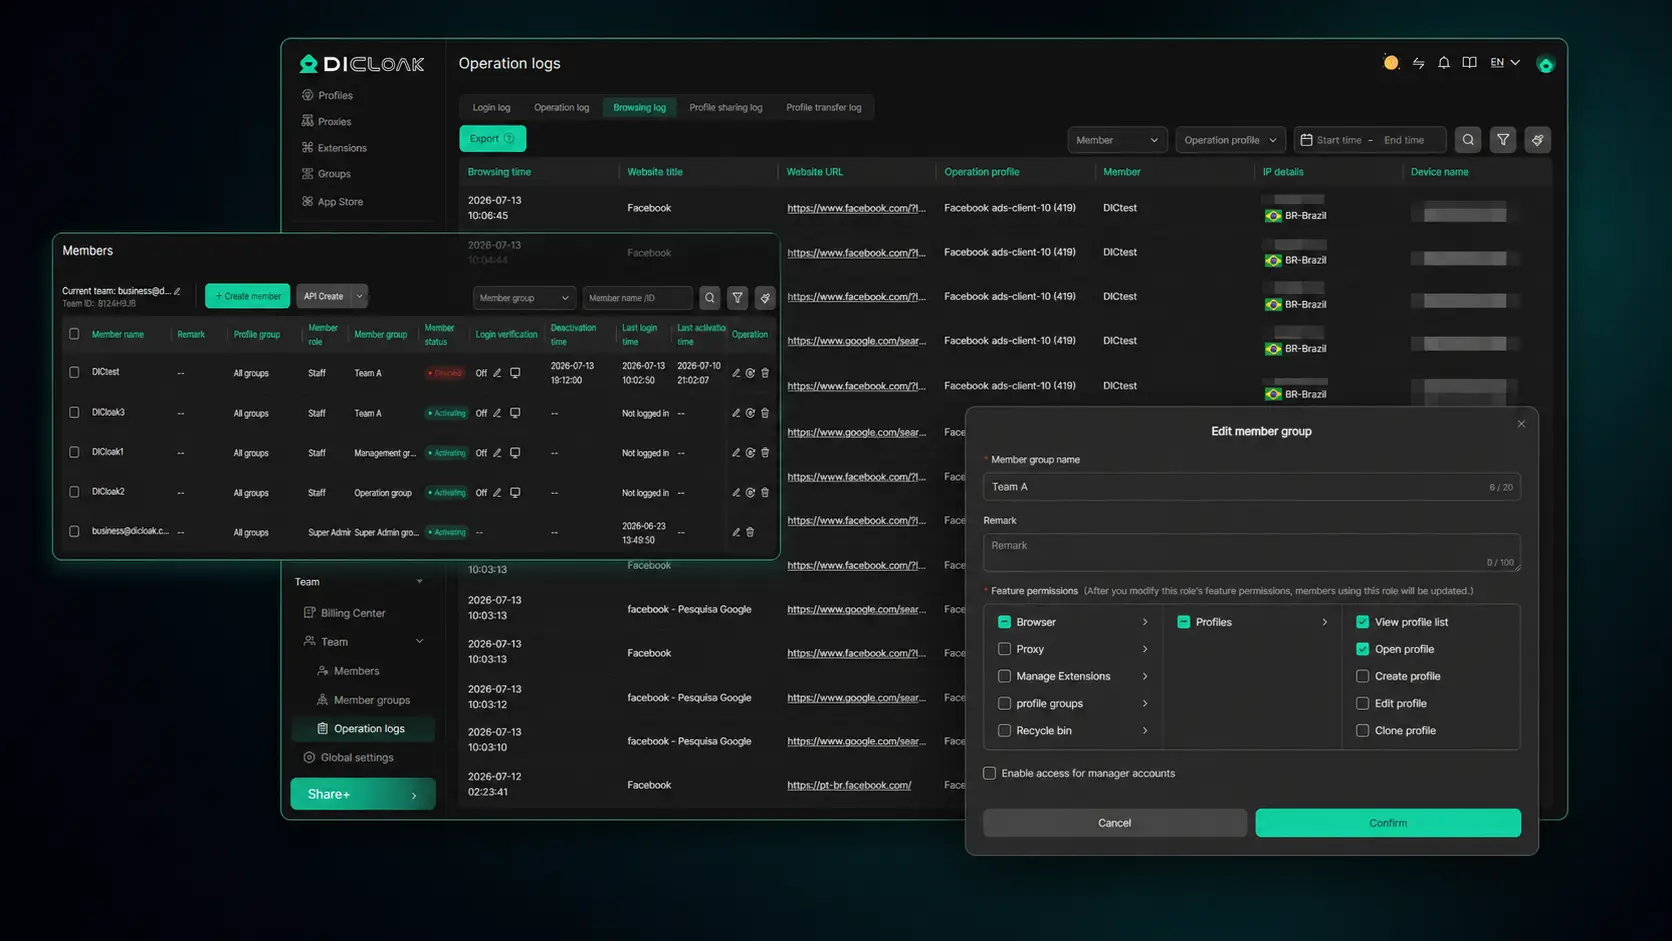
Once access is organized, the next thing to check is the money side: fees, payouts, and your starting selling limits.
What fees, payouts, and selling limits should you understand before your first listing?
Once your account is approved, the next thing to get straight is money flow. Before you list anything, know what eBay may charge on the sale, where your payout lands, and whether your new account has low selling limits that can cap your first batch of listings.
The main fee types new sellers should expect
| Fee area |
What it covers |
What to watch before listing |
| Insertion fee |
The cost to create a listing in some cases |
Check whether your listing format or volume triggers a charge on eBay's selling fees page |
| Final value fee |
A fee charged when your item sells |
This usually takes a percentage of the total sale amount, so price, shipping, and category can change your margin |
| Category-based differences |
Different item types can carry different fee rules |
Do not assume one product category has the same fee rate as another; check the category before you price the item |
If you skip the category check, a listing that looked profitable can turn thin after the sale closes.
How payouts work after a sale
Your payout settings connect to the bank account you added during verification. Watch timing, not just the amount: if your item ships fast but the payout lands later than you expected, your cash can get tight on postage, supplies, or refunds.
What selling limits can affect new accounts
New sellers often start with lower selling limits, which can restrict how many items you list or the total value you can post. If you plan inventory too aggressively during eBay US seller account setup, you can hit that cap on day one and have unsold stock waiting while the account builds history.
That is why the next step after approval is not “list everything.” It is to check the live account settings and work from the limits you actually have.
What should you do right after your eBay US seller account is approved?
Once approval comes through, do not rush into listing. Your next job is to check the few settings that affect real orders, then publish one clean listing you can actually fulfill.
Review your seller profile, payout settings, and return preferences
- Check your seller name, address, phone, and payout details against the records you used during signup. If one field is old or mismatched, holds or review requests can show up later.
- Open your return settings and handling time. Pick terms you can follow on a normal week, not your fastest possible week. If your first order ships late, that is an avoidable bad start.
- Send yourself a test view of your public profile. If a buyer would see missing policy details, fix that before listing.
Create your first listing with clear shipping and item details
- Start with one item you already have in hand. Do not test your new account with preorders, bundles, or anything with unclear condition.
- Fill in condition, photos, shipping method, handling time, and return terms completely. If buyers need to message you just to understand the item, the listing is not ready.
- Price it simply. A clean first sale beats a complicated listing that sits or creates a return.
Set a simple routine for messages, orders, and account health
- Check messages and order status at the same two times each day. New sellers get into trouble by replying late, not by replying too briefly.
- Watch for alerts in Seller Hub after your listing goes live. A missing policy warning or payout notice is easier to fix before you have 5 active orders.
- Keep notes on what you changed during your eBay US seller account setup, so you can trace problems fast if a listing gets blocked.
Frequently Asked Questions About set up an eBay US seller account
Can I set up an eBay US seller account without a business?
Yes. Many new sellers begin with a personal account and list items under their own name. This works well for casual reselling or testing a niche. If you run a registered company, use a business account instead. It can better match your legal name, tax details, and payout records.
How long does it take to set up an eBay US seller account?
Basic signup usually takes only a few minutes. You enter contact details, create login information, and start account setup. Extra checks can take longer. Identity review, tax forms, and bank verification may add hours or several business days, especially if documents are blurry, names do not match, or manual review is required.
Do I need a US bank account to receive eBay payouts?
Payout rules follow the account and region you use during registration. For a US seller profile, eBay will ask for payout details that meet its current payment rules. Follow the latest payout steps shown in your seller dashboard. Use account information that matches your legal and tax details to avoid delays.
Can I change a personal eBay account to a business seller account later?
Yes. eBay allows many sellers to switch from personal to business later. This is useful when a side project becomes a registered company. During eBay US seller account setup changes, you may need to update your legal business name, tax information, address, and payout details, then complete new verification steps.
Can two people work on the same eBay seller account?
Yes, but the team needs clear rules. Decide who handles listings, orders, messages, and returns. Use separate browser profiles or dedicated work sessions so saved logins, drafts, and messages do not get mixed up. This helps reduce shipping mistakes, duplicate replies, and account setting changes made by accident.
Once your account details are verified, the smartest next step is to list one or two low-risk products and test your pricing, shipping, and handling workflow before scaling up. That small trial run helps you spot issues early, build seller history, and move into the US marketplace with more confidence. Try DICloak For Free
 Web Proxy Tools
 Free Tools
 Cookie Plugin
 UA Generator
 MAC Address Generator
 IP Generator
 IP Address List
 2FA Code Generator
 World Clock
 Anonymous Check
 WebRTC Leak Test
 UUID Generator
 Free Web Proxy Site
 Proxy Checker
 FB Ad Checker
 AI Web Scraping
 Free SMM Tools
 Twitter Shadowban Checker
 Instagram Name Checker
 UTM Generator
 Username Generator
 AI Hashtag Generator
 LinkedIn Headline Generator
 Social Media Image Resizer