You want to start selling, but the hard part is not clicking “Open shop.” It is figuring out the real order: account setup, shop details, listings, payments, and policies without missing a step that slows approval or confuses buyers. That is where How to Open an Etsy Shop usually gets messy for beginners.
A lot of new sellers spend too much time on logos and banners before the shop basics are ready. The bigger risk is simpler: weak listing details, missing payment info, unclear shipping settings, or shop policies that make the store look unfinished.
A good Etsy shop setup guide should do more than list buttons to click. You need to know what to prepare before signup, what Etsy asks for during setup, and which choices are hard to change later. If you are searching for how to start an Etsy shop or how to set up an Etsy shop, the useful answer is a clean workflow you can follow from draft idea to live storefront, with the common mistakes called out before they cost you time.
Start with the prep work first. That is the part that makes the rest of the setup go smoothly.
What should you prepare before opening an Etsy shop?
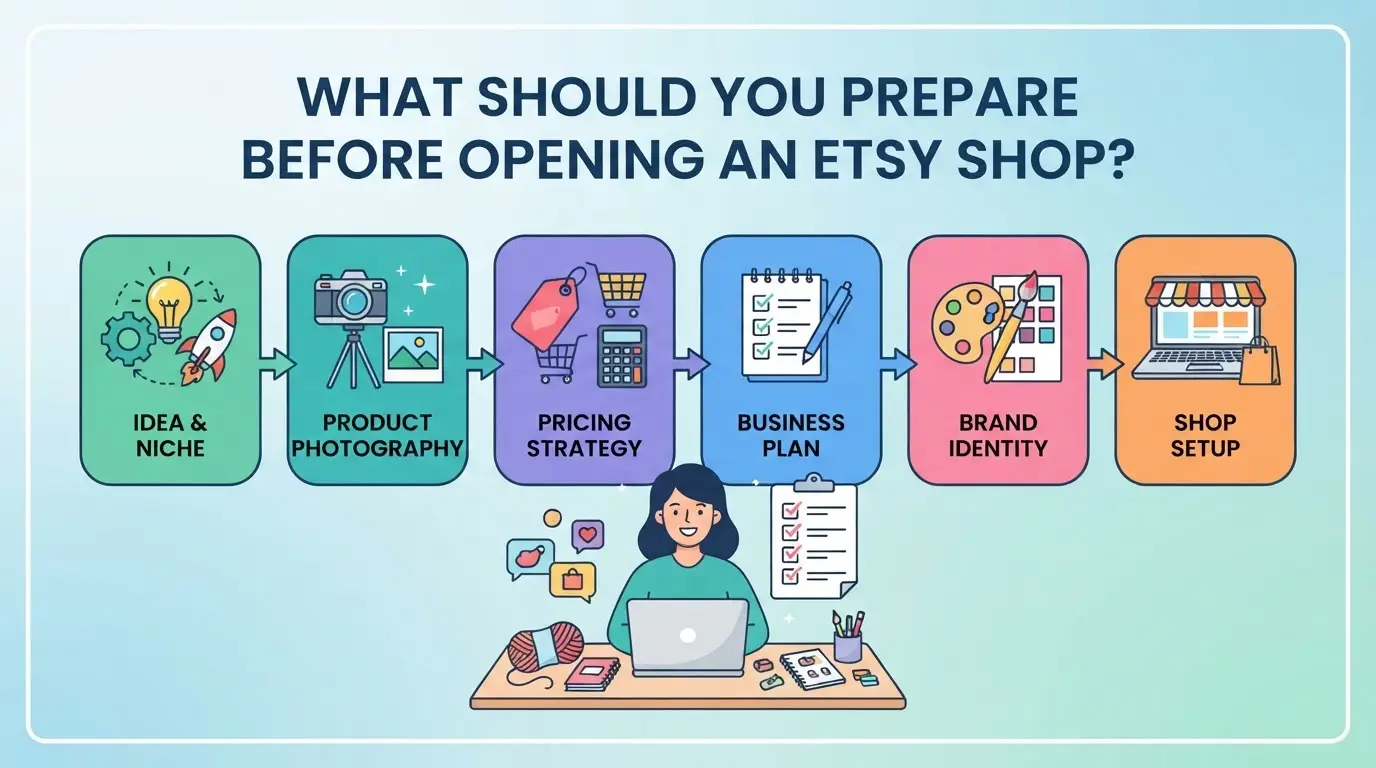
Before you click into Etsy’s setup flow, get three things straight: what you will sell, who it is for, and the account details Etsy will ask for. The hard part is not opening the shop. It is avoiding weak choices that force rewrites later.
Choose what you will sell and make sure it fits Etsy's marketplace
Pick a product that clearly fits Etsy’s core categories: handmade items, vintage goods that are at least 20 years old, or craft supplies, based on Etsy’s seller policy. If your item sits in a gray area, sort that out now, not during setup. A printable planner, handmade candle, or bead kit is easy to place. A generic drop-shipped phone case is where new shops run into trouble, because the listing may not match what Etsy expects from sellers.
Pick a niche, target buyer, and simple product range
Keep the opening range tight.
- Write one buyer line, like “gift buyers looking for custom pet mugs.”
- Start with 3 to 10 related products, not five unrelated categories.
- Check that your titles, photos, and pricing all make sense for the same buyer.
Gather the basics Etsy will ask for during setup
You do not need every future detail ready, but you do need the setup basics in one place. This is where beginners lose time.
- Prepare an email address, 3 to 5 shop name ideas, and a short shop description.
- Save product photos, draft titles, prices, sizes, and shipping weights in one folder or sheet.
- Keep your bank details, ID, tax info, and billing card nearby so setup does not stall halfway.
If that checklist is ready, the actual shop creation steps become much easier to finish cleanly. The next part is the click-by-click setup inside Etsy.
How do you open an Etsy shop step by step?
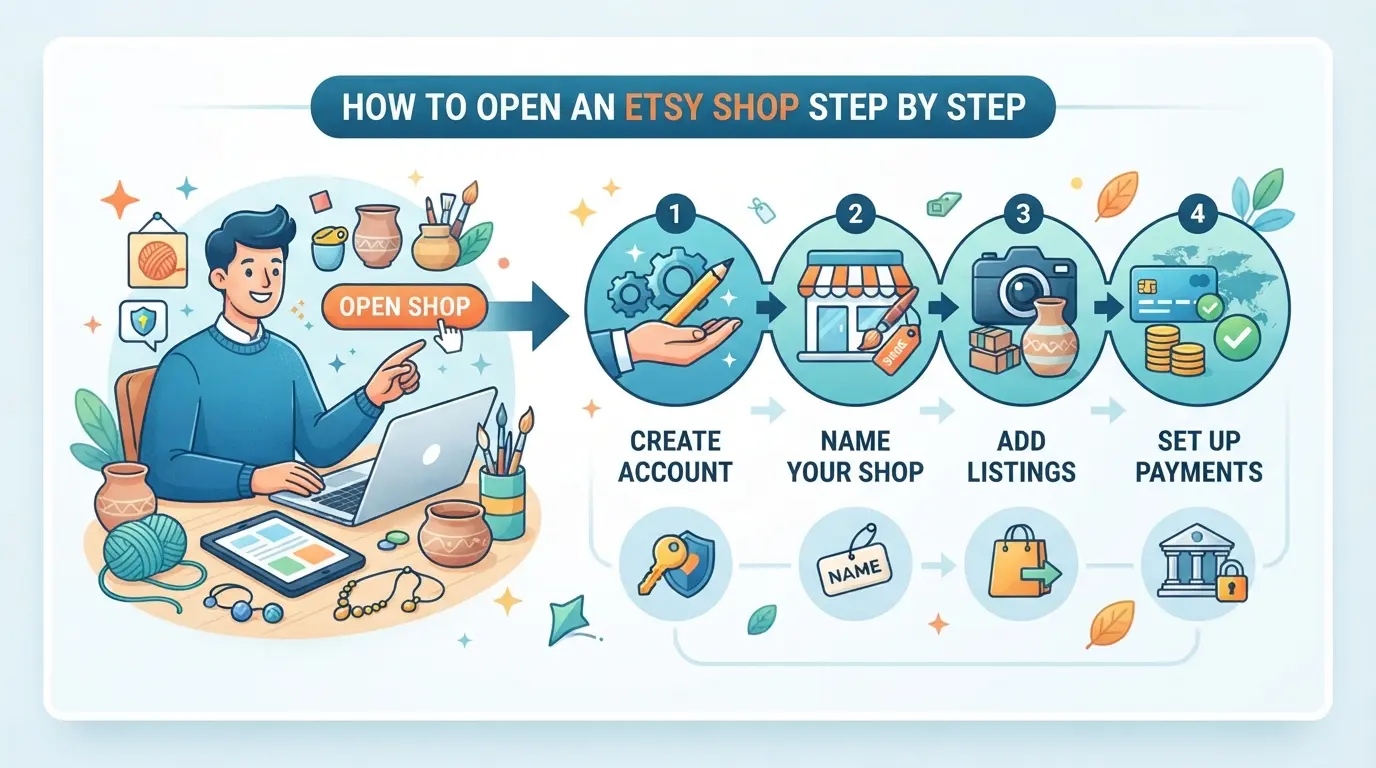
If you already prepared your product details, photos, and payment info, the setup itself is a short sequence: create an account, set shop basics, publish a strong first listing, then finish billing and identity checks. The part that trips people up is not the clicking. It is choosing details that are awkward to change later.
Create an Etsy account and start the shop setup flow
- Go to Etsy and sign up or log in. Use an email you control long term, because Etsy may send security and verification requests there.
- Open the Sell on Etsy entry point and start your shop setup. If you land back on the buyer homepage, you are in the wrong menu.
- Turn on 2-step sign-in if Etsy prompts you. Skip it now, and you may have to stop mid-setup later.
Set your shop preferences and choose a memorable shop name
- Pick your shop language, country, and default currency. Your country affects payment setup and what seller options you see, so do not guess here.
- Enter a short shop name that matches what you sell and is easy to spell. Buyers should be able to type it after hearing it once.
- If the name is unavailable, do not add random numbers. Try a cleaner variation tied to your product type or brand wording.
Create your first listing with photos, titles, and descriptions
- Add your strongest product first. Etsy usually needs at least one listing before the shop can go live, so do not use a weak draft just to get through setup.
- Upload clear photos, then write a plain title and description that match the item exactly. If the photos show one thing and the title says another, buyers bounce fast.
- Set price, quantity, category, and shipping details carefully. A wrong category or missing shipping field can block progress or create bad search placement.
Add payment, billing, and verification details
- Connect your bank account for payouts and enter billing details for fees. Double-check account numbers before submitting.
- Complete identity checks if Etsy asks for them. Name mismatches between your ID, bank account, and tax details often trigger delays.
- Publish the shop only after reviewing every field once. Next up, look at the actual startup costs in 2026 so you know what will be charged right away.
How much does it cost to start an Etsy shop in 2026?
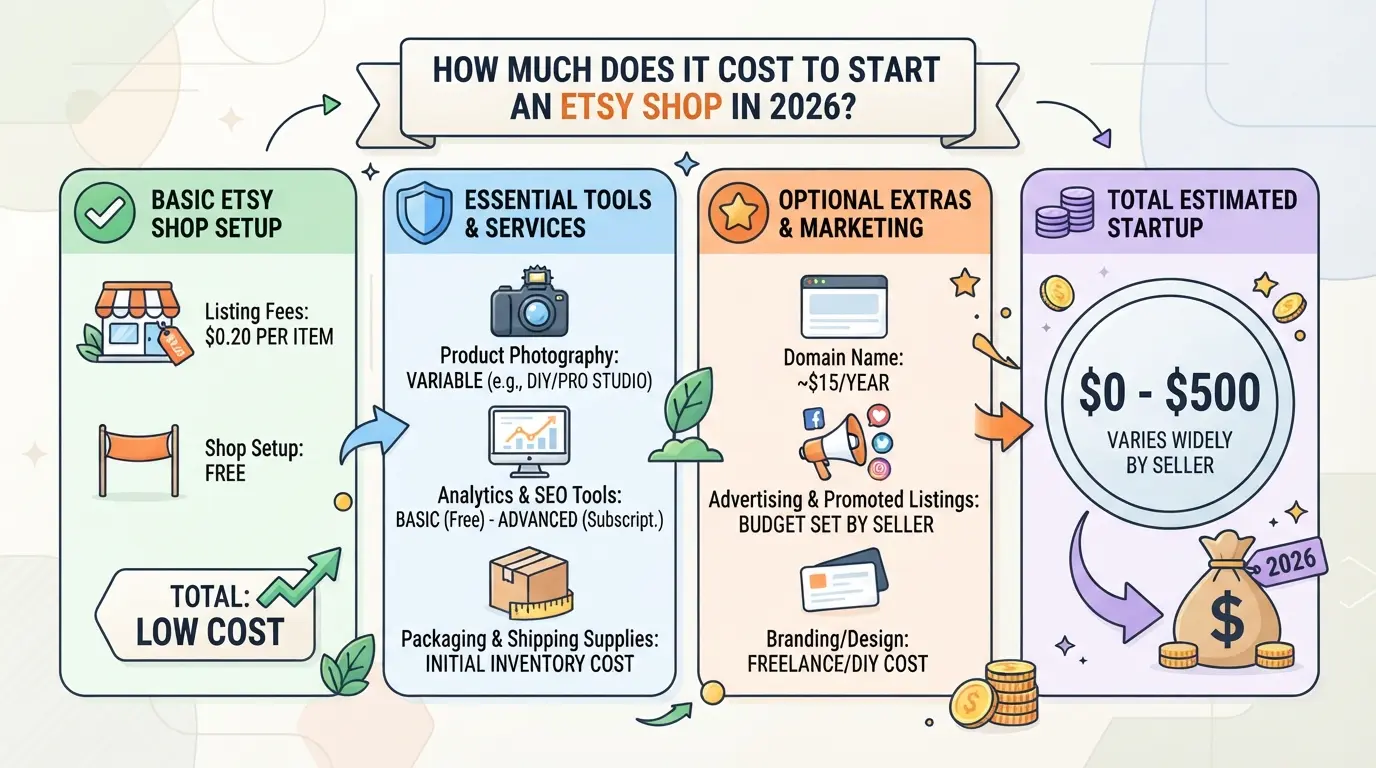
After your shop setup is done, the next real question is cost. You can start small, but Etsy charges begin as soon as you publish listings and continue when you make a sale, so your launch budget should cover both upfront and per-order fees.
The one-time setup fee, listing fee, transaction fee, and payment processing fee
| Fee |
What triggers it |
What to expect |
| One-time shop setup fee |
Opening a new shop |
Etsy may charge a one-time setup fee for new shops. The amount can vary. Check Etsy Fees and Taxes before you publish. |
| Listing fee |
Publishing a listing |
Etsy charges $0.20 per listing, and the listing stays active for 4 months unless it sells first, per Etsy's fee policy. |
| Sale fees |
After an order is placed |
Etsy charges a 6.5% transaction fee, and Etsy Payments adds payment processing fees that vary by country. |
The easy mistake is budgeting only for listing fees and forgetting that payment processing changes by country, which can cut into low-priced items fast.
Optional costs that new sellers often forget
Packaging, shipping labels, sample orders, and basic inserts usually show up before your shop feels "live." Offsite Ads can also add fees on attributed sales, and currency conversion can apply if your bank and shop currencies do not match.
A simple starter budget for a low-risk launch
A safer test is 5 to 10 listings, not 50. That keeps your upfront listing cost around $1 to $2 while you check if your photos, titles, and pricing can get clicks before you spend more on inventory or packaging. The next step is making each listing ready to sell.
What makes an Etsy listing ready to sell?
After you budget for fees, the next thing that decides whether a new shop gets traction is the listing itself. A listing is ready to sell when a buyer can understand the item, trust what they see, and know exactly what happens after they click Buy.
Use product photos that answer buyer questions fast
Use a main photo that reads clearly at small size, then add the photos buyers would ask for if they were standing in front of you: scale, close-up detail, back or side view, and one real-use shot. Weak photos do not just lower clicks; they also create doubt after the click, which is where new listings stall. If you sell a mug, show the handle, inside glaze, bottom mark, and one hand holding it so size is obvious. If buyers cannot judge size, texture, or finish in 5 seconds, expect fewer favorites and more drop-offs.
Write titles, descriptions, and tags around real search terms
Buyers search with plain phrases, not clever product names. Match that language without making the listing sound stuffed.
- Put the clearest search phrase near the start of the title, then add material, style, or use case.
- Open the description with what the item is, who it fits, and the key size or material detail.
- Fill tags with real buyer phrases such as color, recipient, room, or occasion; do not repeat the same wording three times.
Set clear pricing, variations, and processing times
Confusion kills carts fast. If options, price, or timing feel fuzzy, buyers leave instead of asking.
- Make each variation label specific: “11 oz white mug” works better than “Option A.”
- Check that the price shown matches the selected variation before publishing.
- Set processing time to what you can actually hit on a busy week; a late dispatch often hurts reviews more than a slower but honest estimate.
The next step is making those expectations official through shipping, returns, and shop policies.
How should you set shipping, returns, and shop policies?
Once your listings look ready, these settings are what make the shop feel finished. Buyers need clear delivery dates, return rules, and simple answers before they pay. If these are vague, you get more messages, more disputes, and slower order handling.
Choose shipping profiles that match your products and fulfillment speed
- Set separate shipping profiles for items with different sizes or packing needs. If one mug ships in 2 days and a framed print takes 5, do not lump them together.
- Pick domestic-only shipping if you are not ready for customs forms, longer delivery windows, or lost-package claims. Turning on international shipping too early is a common beginner mistake.
- Decide if you will build shipping into the item price or charge it at checkout. If your margins are thin, test the math twice before offering free shipping. Failure usually shows up after the first heavy order.
Write return, exchange, and cancellation policies buyers can understand
- State the return window in plain language, such as 14 or 30 days after delivery. If the clock start is unclear, buyers will ask.
- Say who pays return shipping and whether custom or personalized items are excluded. That is where disputes usually start.
- Set a cancellation cutoff, like within 2 hours of purchase. If you make to order, say that once production starts, cancellation is closed.
Add processing times, FAQs, and shop announcements that set expectations
- Set realistic processing times for each listing. If you promise 1 to 2 days and ship in 5, your reviews will show it.
- Add FAQs for gift wrap, tracking, custom orders, and damaged items. That cuts repeat messages fast.
- Use the shop announcement for short updates only. After this, your account workflow setup starts to matter.
When Etsy account access gets more complex: a DICloak workflow for separate browser profiles
Once your shipping, returns, and policy setup is done, most new Etsy sellers can stop here. A separate browser-profile workflow only starts to make sense when one person handles multiple marketplace logins, or a small team shares access to Etsy accounts and related store sessions. The scope is limited to browser-profile access and session handling; it does not change Etsy shop settings, listings, or orders.
How operators can separate Etsy accounts with isolated browser profiles and fingerprint settings
An operator using DICloak can create one browser profile for an Etsy account and another for a different marketplace account, then set the language, time zone, geolocation, user agent, and other browser signals for each profile. This keeps work sessions cleaner than using one shared browser with mixed cookies and history. The point here is separation and consistent setup, not any promise about platform outcomes. 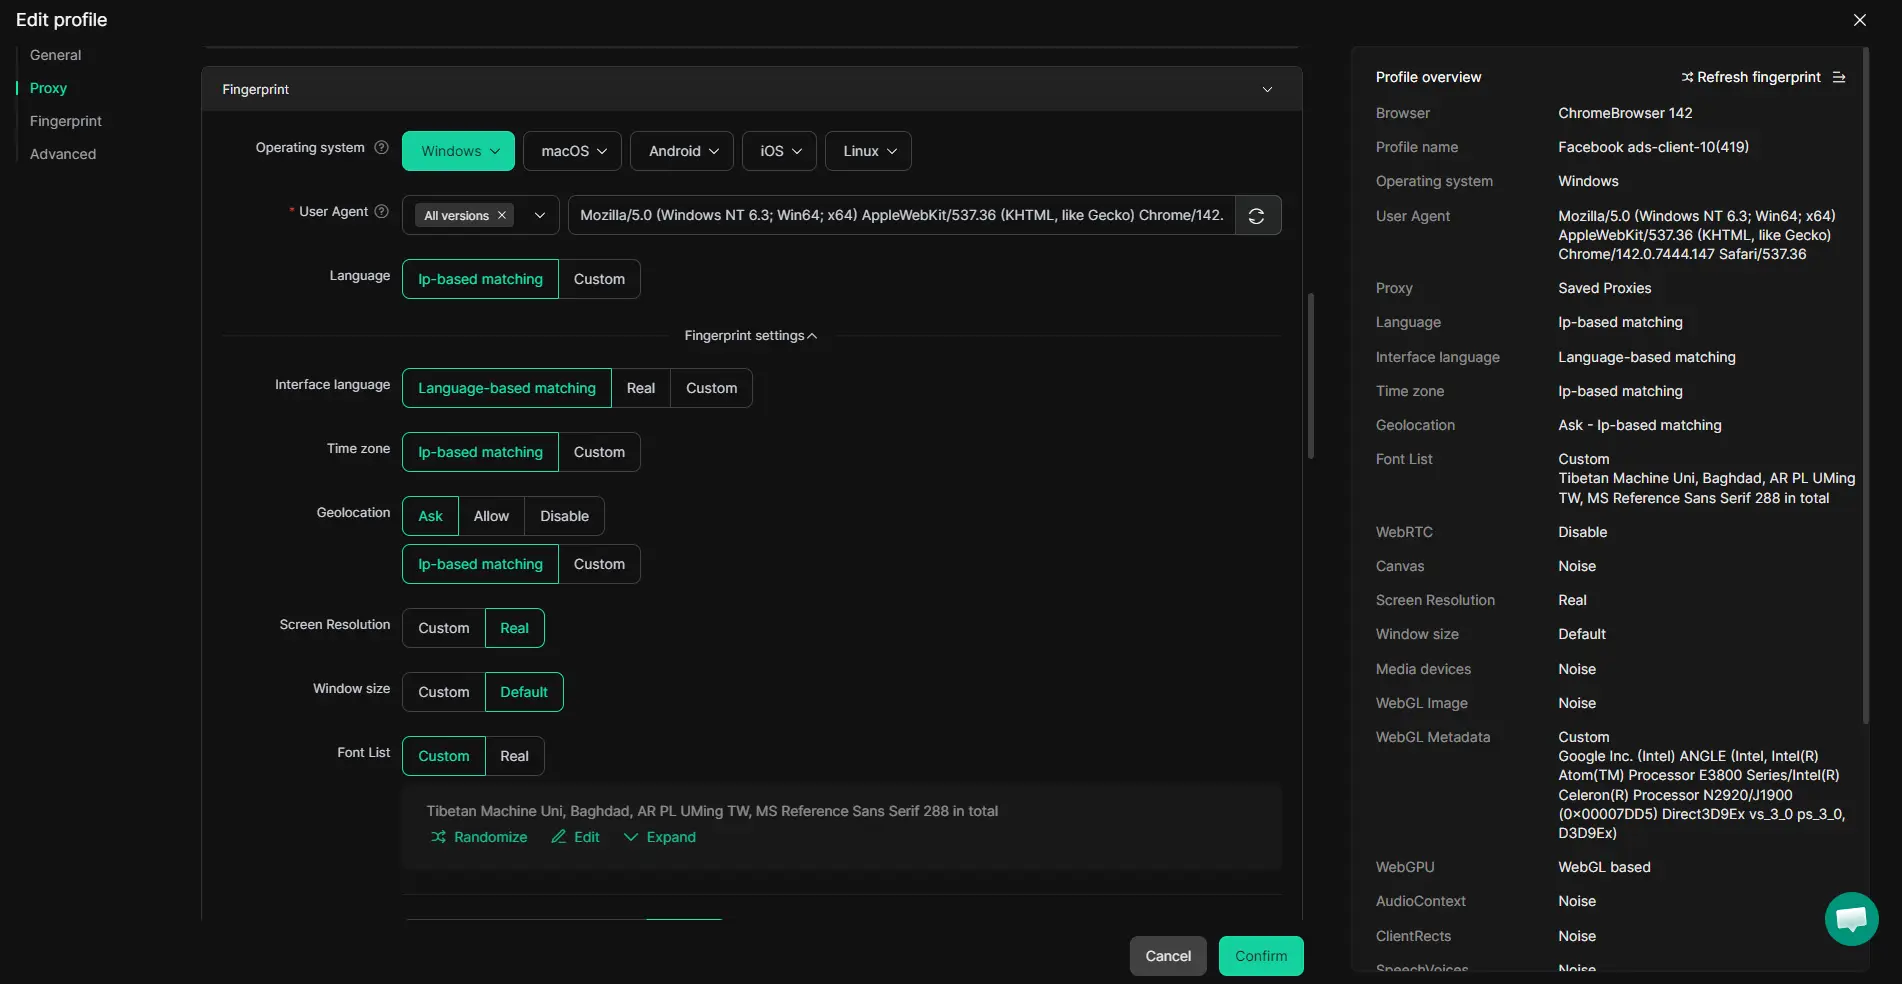
How users can add a user-provided proxy to each profile when different account sessions need different network setups
If that same operator needs a different network setup for a specific account session, they can add their own proxy inside the assigned profile and run the built-in connection check before opening the account. In practice, this is useful when one Etsy workflow and one non-Etsy workflow should not share the same local connection details. DICloak stores and applies the user-provided proxy per profile; proxy choice and suitability stay with the user. 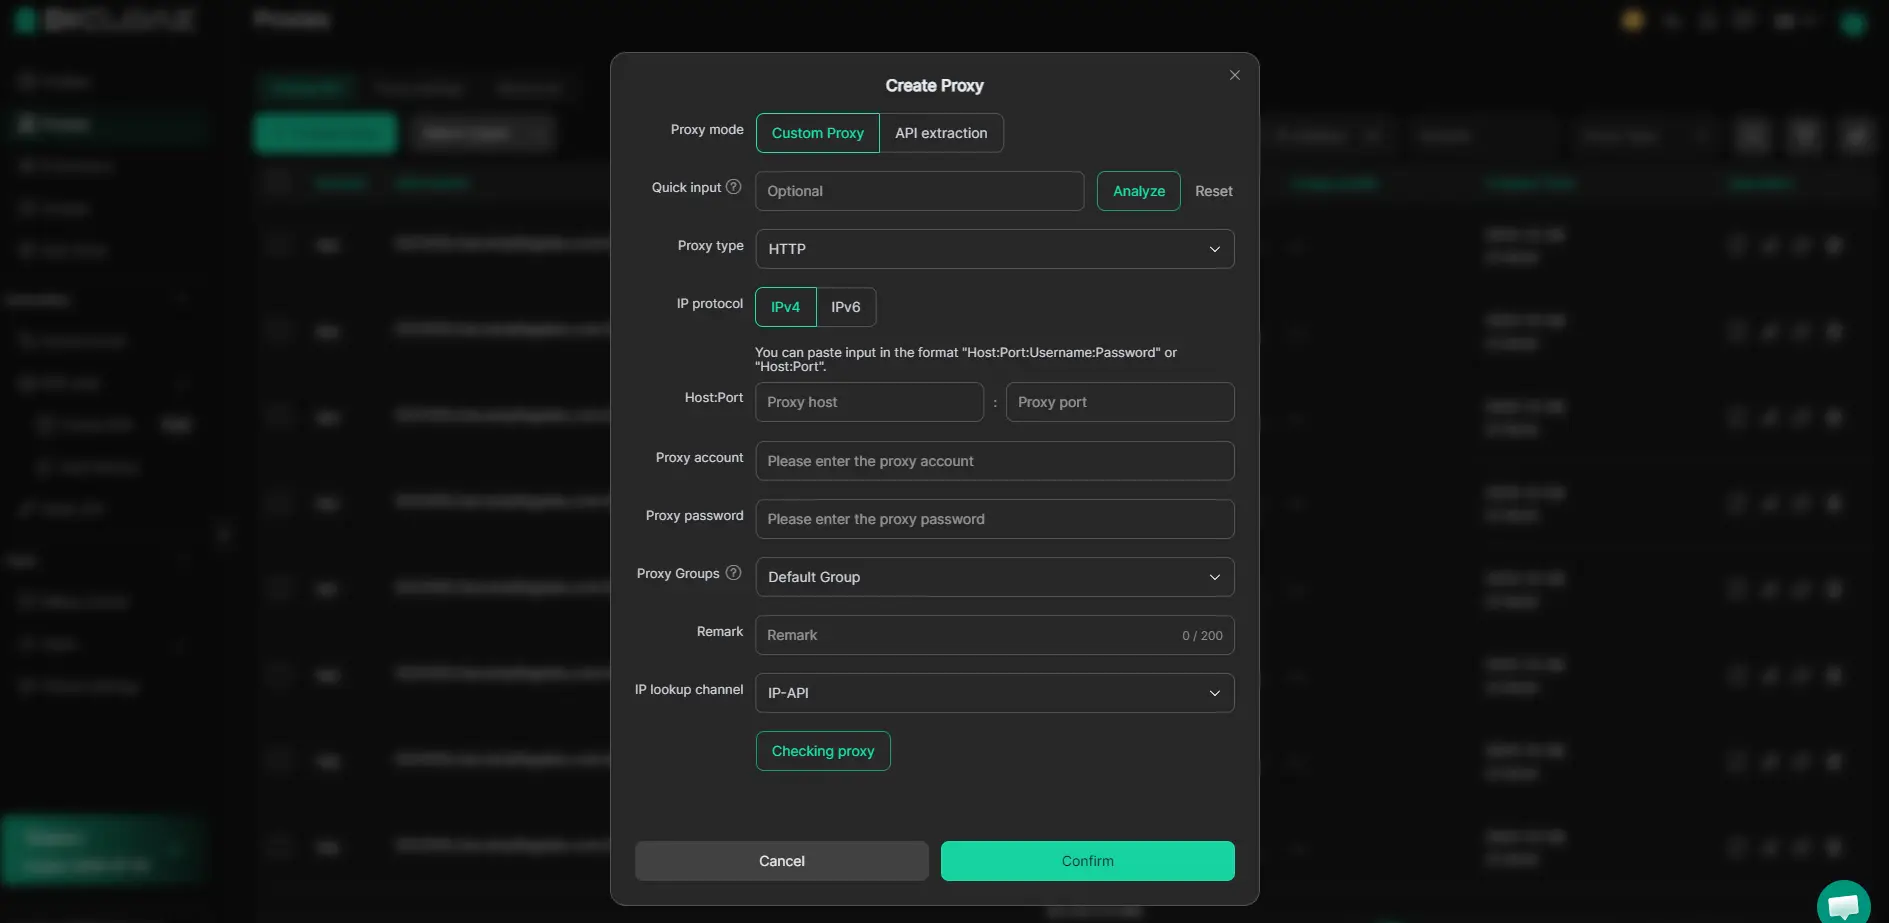
How admins can assign profile access and permissions when a team helps manage e-commerce accounts
For a small support team, admins can use DICloak to create member groups, give access only to the needed profile groups, and limit which profile fields regular members can see. A common setup is one group for operators who open assigned profiles and another for support staff who should not edit profile details. These controls apply inside DICloak, not inside Etsy itself. 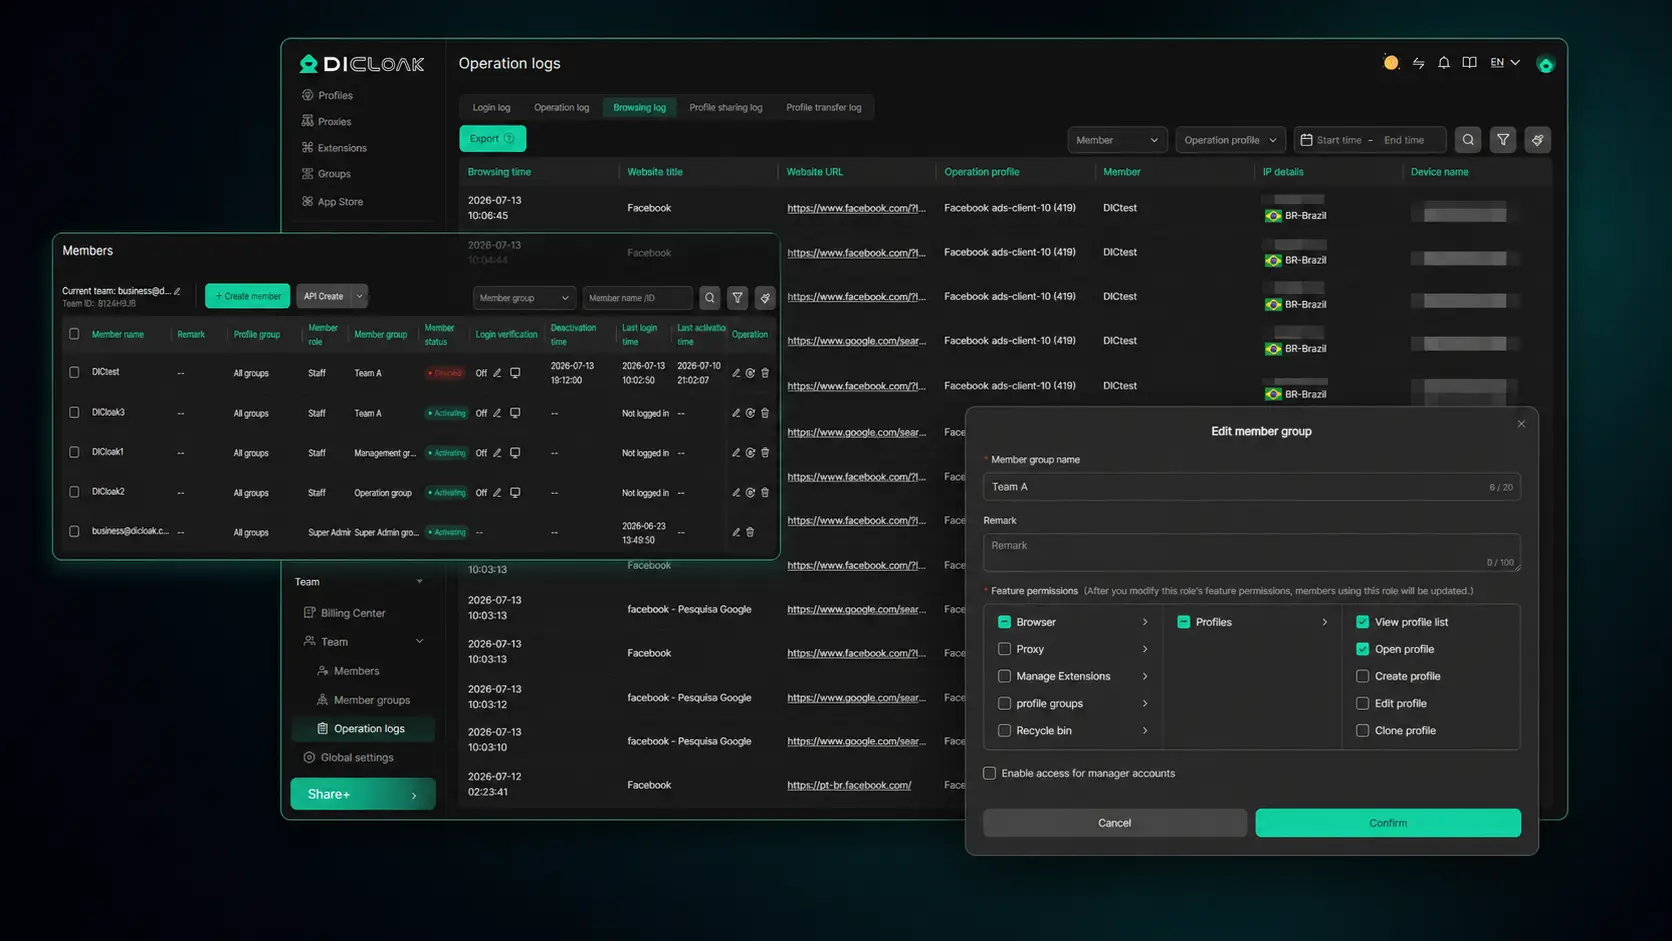
If your setup is still one shop and one login, keep it simple. If operations grow, cleaner access control makes the next stage easier: getting traffic and converting visits into sales.
How do you get your first traffic and sales after launch?
If your shop just went live, don’t chase advanced marketing yet. Your early traffic usually comes from Etsy search, a small amount of social traffic, and the trust signals that help a shopper place that first order.
Start with Etsy SEO basics that help your listings get indexed
Start with the listing, not Instagram. Etsy can only surface what it can clearly read, so use a title that matches the product, fill all 13 tags, choose the right category, and add every relevant attribute. Relevance beats keyword stuffing. If you cram repeated phrases into the title, the listing reads badly and usually ranks worse than a clear, specific match like “linen bookmark with tassel” for the exact item being sold.
Use social media and content to send qualified traffic
Keep this simple:
- Post one short video showing the product in use, not just the finished item.
- Pin product photos to Pinterest with the same search phrase used in the listing.
- Share one behind-the-scenes post only if it helps buyers picture size, texture, or packaging.
Build trust with reviews, fast replies, and a strong first customer experience
Early sales often come from buyers who almost clicked away but stayed because the shop looked responsive and complete.
- Reply to messages within 24 hours, even if the full answer comes later.
- Pack the order neatly and match the photos; mismatches are where early reviews go bad.
- After the item arrives, send one short follow-up through Etsy messages if the buyer had asked questions before purchase.
That early momentum is fragile, which is why the next step is avoiding the mistakes that kill it fast.
What mistakes should you avoid when opening an Etsy shop?
After launch, the usual problems are simple: sellers go live too early, name the shop badly, or guess at pricing and shipping. Most early Etsy problems come from unfinished setup, not lack of traffic.
Launching before your photos, policies, and pricing are ready
Do not promote an empty-looking shop. If your photos look inconsistent, your returns policy is thin, or pricing does not cover fees and shipping, visitors click away fast. Fix the basics before you send any traffic.
Choosing a shop name or niche that is too broad or confusing
- Say what you sell in plain words.
- Check that your shop name is easy to spell and search.
- Narrow the niche enough that listings match one buyer type.
Ignoring fees, shipping math, and processing time realities
Underpricing hurts twice: low margins now, bad reviews later when delays start.
- Price after adding fees, packaging, and shipping.
- Set processing time based on your slowest normal week.
- Test one real order cost before listing 20 products.
Frequently Asked Questions About How to Open an Etsy Shop
Can you open an Etsy shop without inventory?
Yes. You can sell made-to-order items or use print-on-demand, so you do not need shelves of stock before launch. For both models, quality still matters. Order samples, check shipping times, and price carefully because fees and production costs can shrink margins fast. You must also follow Etsy’s handmade and production partner rules.
Do you need a business license to open an Etsy shop?
Etsy does not require every seller to have a business license before opening, but your city, state, or country might. Rules vary by location and product type. Check local tax registration, sales tax or VAT rules, and home business permits. If you are learning How to Open an Etsy Shop, verify legal requirements before you list.
How many listings should I have before I open an Etsy shop?
A good starter range is 10 to 20 listings. That gives shoppers more than one option and helps Etsy understand what your shop sells. One weak listing rarely gives you enough data or visibility. Start small but focused, with clear photos, strong titles, and products that fit the same niche.
How long does it take to open an Etsy shop?
The basic Etsy shop setup can take under an hour if you already have your name, banner, payment details, and first product ready. Most beginners need several more hours or a few days for photos, descriptions, tags, shop policies, and identity verification. Good prep matters more than rushing the launch.
Is Etsy worth it for beginners in 2026?
Etsy can still be worth it for beginners in 2026 if you choose a clear niche, protect your margins, and keep improving your listings. It is harder to win with generic products or low-profit items. If you are serious about how to start an Etsy shop, expect testing, better photos, and steady updates over time.
The best next step is to set up your listings, payment details, and shop policies so you can launch with clarity and confidence. Once your storefront is live, focus on strong product photos, clear descriptions, and a simple promotion plan to start attracting your first customers. Try DICloak For Free
 Web Proxy Tools
 Free Tools
 Cookie Plugin
 UA Generator
 MAC Address Generator
 IP Generator
 IP Address List
 2FA Code Generator
 World Clock
 Anonymous Check
 WebRTC Leak Test
 UUID Generator
 Free Web Proxy Site
 Proxy Checker
 FB Ad Checker
 AI Web Scraping
 Free SMM Tools
 Twitter Shadowban Checker
 Instagram Name Checker
 UTM Generator
 Username Generator
 AI Hashtag Generator
 LinkedIn Headline Generator
 Social Media Image Resizer