Trying to create ticketmaster account for the first time is rarely as quick as it looks. Many people get stuck when their email verification doesn’t show up, the sign up form rejects a phone number, or the system says “account already exists” even though you’ve never registered. If you’re planning to buy tickets the minute they go on sale, these delays can mean missing out on the seats you want.
But the bigger problem is what happens next, Ticketmaster’s filters are strict about duplicate details, reused phone numbers, and mismatched payment methods. If you try to set up Ticketmaster profiles for multiple people (or for work and personal use), it’s easy to trigger extra verification or even get your new account locked before checkout. Even a simple mistake, like using a recycled email, can block you from completing the Ticketmaster sign up process.
The good news is, most of these problems have clear workarounds. You’ll need to prep a few details before you start, check for hidden restrictions, and know what to do if your registration stalls or you get flagged for “unusual activity.” This guide covers each step, from how to register a Ticketmaster account without common errors, to what to watch for if you run more than one account on the same device.
Start with the basics below, avoid the mistakes that cost people their tickets every week.
What You Need Before Creating a Ticketmaster Account in 2026
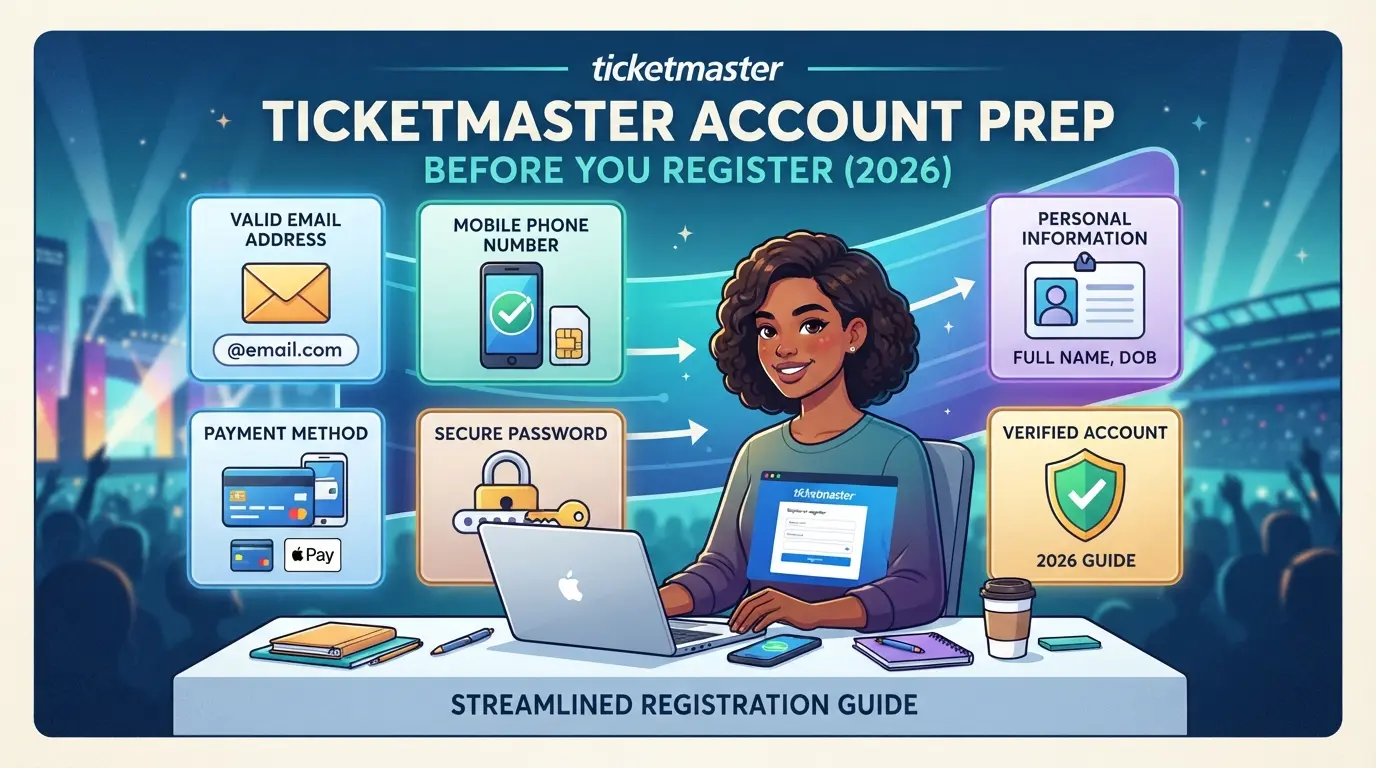
Jumping into the Ticketmaster sign up process without prep is the fastest way to get blocked or stuck in verification loops. Here’s what you need in hand before starting, one missed detail can cost your spot for high-demand events.
Valid Email and Phone Number Requirements
Ticketmaster only accepts emails and phone numbers that haven’t been used for another account. If you try to reuse details, you’ll get instant errors or may need to wait days for support. They’ll verify your email with a code and may text a one-time password to your phone. Using a virtual number or a shared email? That almost always fails, real, unique contact details are required.
Device, Browser, and Network Considerations
- Check you’re on a recent browser: Chrome, Edge, or Safari (2024 or newer).
- Avoid public Wi-Fi; shared IPs often trigger extra challenges.
- Use a device that hasn’t recently created or managed another Ticketmaster profile.
Personal Information and Payment Prep
You’ll need your legal name and birth date for account creation. For buying tickets right away, have a working credit or debit card ready, sometimes Ticketmaster asks for payment details even on your first login.
- Confirm your ID matches the info you’ll provide, mismatches can block ticket pickup or transfer.
- Double-check your address; Ticketmaster may require postal validation for some events.
- Have your payment card in front of you, photo uploads or manual entry mistakes can stall checkout.
Missing any of these can mean an instant failure or a delay that loses you access to tickets. The easiest way to avoid trouble is to use fresh, unused contact details and a device with a clean history. If you’re ready, move on to the step-by-step process for a smooth registration.
Step-by-Step: How to Create a Ticketmaster Account Without Common Mistakes
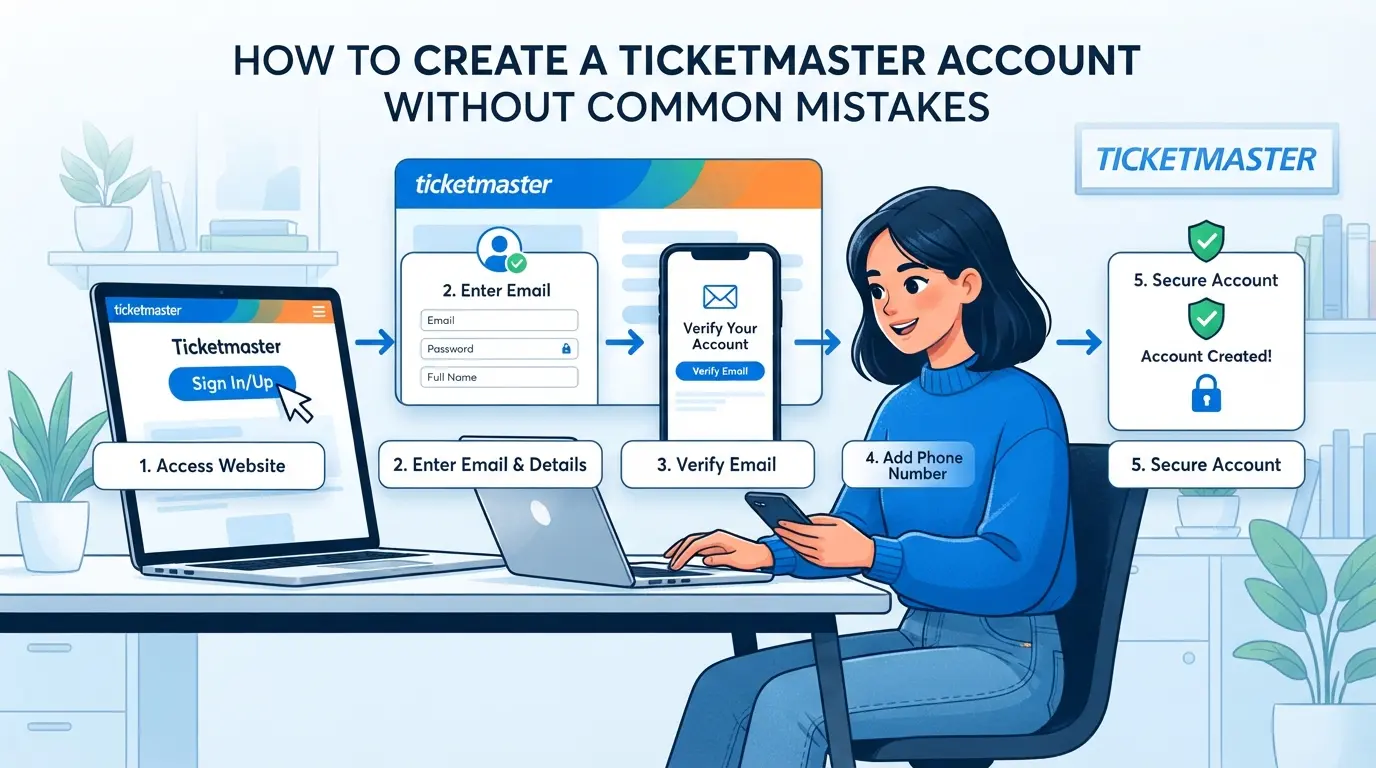
Anyone can start the Ticketmaster sign up flow, but small errors, like picking the wrong registration page or missing a verification code, can block you before you even see your tickets. Use the steps below to set up your Ticketmaster profile correctly the first time.
Starting the Signup: Navigating to the Right Page
- Go to the official Ticketmaster registration page. Do not search through ads, some lookalike sites collect your info and never send real tickets.
- Check the web address starts with “https://www.ticketmaster.com/”. Fake pages often miss the “s” or use odd subdomains.
- Use a private browser window if you’ve tried before. This avoids cookie issues that can trigger duplicate account errors.
Filling Out the Registration Form
- Enter your real name and a new email never used with Ticketmaster. Recycled emails are a top reason for instant blocks.
- Pick a password with at least one capital letter, one number, and one symbol, otherwise, you’ll see “password too weak.”
- Skip optional marketing checkboxes unless you want promotions. Only the name, email, password, country, and phone are required.
Email and Phone Verification Steps
- After submitting the form, Ticketmaster sends a code to your email. Open it within 5 minutes, codes expire fast.
- Enter the code exactly. Typo in the code? You’ll see “invalid or expired”, try “Resend code” before refreshing the page.
- Some countries require phone verification. If you don’t get the SMS, check spam folders for email and try a different mobile number if you hit a wall.
- If the verification loop repeats, clear browser cookies or switch devices, this often breaks the stuck state.
Finalizing Your Account and First Login
- Log in with your email and password right away. If you get a “profile incomplete” warning, double-check your fields, Ticketmaster sometimes drops phone numbers.
- Go straight to “Account” and add a backup email or two-factor authentication if available. This protects you from easy lockouts later.
- Make sure you can see “My Tickets” or “Orders” after login. If not, log out, clear cookies, and try again, missing menus usually mean a partial registration.
Understanding these steps sharply reduces the odds of getting flagged or stalled, the real trouble starts when you don’t notice a failed verification or forget a security step. Next, it’s worth seeing why some Ticketmaster registrations fail even when you follow every obvious rule.
Why Some Ticketmaster Account Creations Fail or Get Flagged in 2026
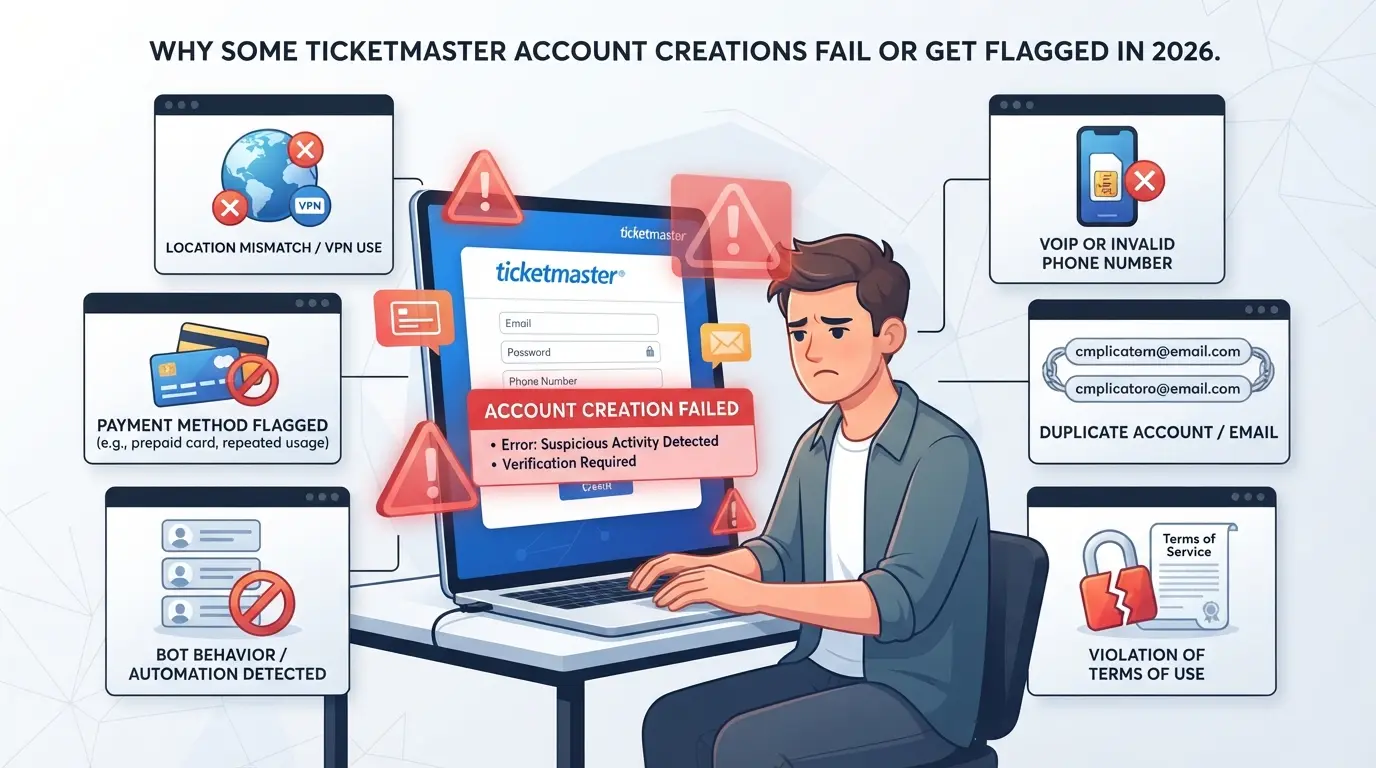
Many people hit a wall trying to register a Ticketmaster account, not because of a single typo, but due to invisible checks running in the background. If your details, device, or behavior look off, the system can block you before you ever reach checkout.
Duplicate Information or Suspicious Patterns
Trying to sign up with an email or phone that’s already linked to another Ticketmaster profile almost always triggers a hard block. Even if you swap out a letter or number, the system can still detect recycled info. Using the same password or personal details across multiple signups gets flagged as “bot-like” behavior, especially when several accounts pop up from the same family of names or addresses.
Device, Browser, or IP Reputation Issues
Most failed signups trace back to device or network signals that match known spam or automation sources. If you’re behind a public Wi-Fi, shared office network, or using an IP that’s on Ticketmaster’s blacklist, you’re much more likely to get stopped at registration. The browser fingerprint matters, too: details like language settings, plugins, and even screen size get checked for patterns that match mass account creation tools.
Here’s what this looks like in practice, imagine you try to set up five accounts in a row from the same laptop. Even if you clear cookies, the combination of device ID, timezone, and network tells the system it’s all coming from one place. Add in a flagged IP and you might get auto-blocked before finishing the first profile. The hardest part: switching browsers or devices with the same network often isn’t enough. Ticketmaster cross-checks for overlaps, so a “clean” browser on a dirty network still gets flagged.
Unusual Activity or Automation Signals
- Filling out forms at superhuman speed, or clicking “Next” before pages load, raises instant suspicion.
- Missing or failing the CAPTCHA challenge signals an automated script instead of a real person.
- Registering accounts back-to-back or in the middle of the night (when normal users sleep) gets flagged for review.
The next thing to focus on is what you do right after signup, because most flags don’t show up until your first login or ticket purchase attempt.
How to Secure Your New Ticketmaster Account from Day One
Getting through the Ticketmaster sign up process is only half the job, most account losses happen after registration, not during it. To avoid losing access or falling for common scams, lock down your account from day one with a few quick steps.
Setting Up Two-Factor Authentication
Turn on 2FA in your Ticketmaster account settings right after registration. You’ll get a one-time code by text or app each time you log in, which stops most account takeovers even if someone guesses your password. Don’t skip this, attackers target new accounts because people rarely set up strong protection on day one.
Managing Passwords and Recovery Options
- Use a unique password, not one you’ve used on any other site.
- Save your password in a manager, not just your browser.
- Enter a recovery email and phone number you control, double check for typos before saving.
Recognizing and Avoiding Phishing or Scam Attempts
Most Ticketmaster account thefts in 2026 start with a fake email or SMS. These often look real, but always double-check before clicking. If you’re not sure, log in directly at ticketmaster.com instead of following links.
- Ignore emails that ask for your password or payment info, they’re scams.
- Check the sender’s address: real Ticketmaster emails end in “@ticketmaster.com.”
- If you see a suspicious login alert, don’t click, go to your account page yourself and review sessions.
If you get locked out or see signs of tampering, move fast to reset your password and update recovery info. The next section explains what to do if your Ticketmaster account creation is blocked or you lose access.
What to Do If Your Ticketmaster Account Creation Is Blocked or You’re Locked Out
If you get blocked or locked out during Ticketmaster registration, don’t keep clicking, each failed attempt can make things worse. Here’s the fastest way to figure out what went wrong and what to do next.
Common Error Messages and What They Mean
- “We could not create your account at this time.” This often means your email or phone was already used. Try a new one.
- “Unusual activity detected” or “Too many attempts.” You’ve triggered a rate limit. Stop for at least 30 minutes.
- “Suspicious activity” or “Temporarily unavailable.” This usually points to a flagged device or IP. Don’t keep retrying on the same setup.
How to Retry Safely Without Triggering More Blocks
- Wait at least 1 hour before your next try. Most temporary bans clear within 60 minutes.
- Switch to a different browser or device if possible, reuse can keep you locked out.
- Use a fresh email and phone. Recycled info almost always fails.
When and How to Contact Ticketmaster Support
- Gather: error message, email, phone number, and device used.
- Submit a support ticket with a short, clear summary, don’t write a long story.
- If your ticket isn’t answered in 2 days, call their hotline.
- Escalate only if you can’t solve it after two rounds, support queues move slow on weekends.
How Teams and Power Users Manage Multiple Ticketmaster Accounts More Safely with DICloak
Running several Ticketmaster accounts on the same computer, especially for group drops or agency work, hits a wall fast, shared browser data leaves a clear trail, and one mistake can connect accounts in ways you never meant. Teams that need to set up, maintain, and hand off multiple login environments use DICloak for one reason: each browser profile holds its own fingerprint, storage, and connection setup, so the daily workflow doesn’t get tripped up by accidental overlap. The scope here is browser profile and session management; DICloak does not touch Ticketmaster’s account-side decisions.
Creating Isolated Browser Profiles and Custom Fingerprint Settings
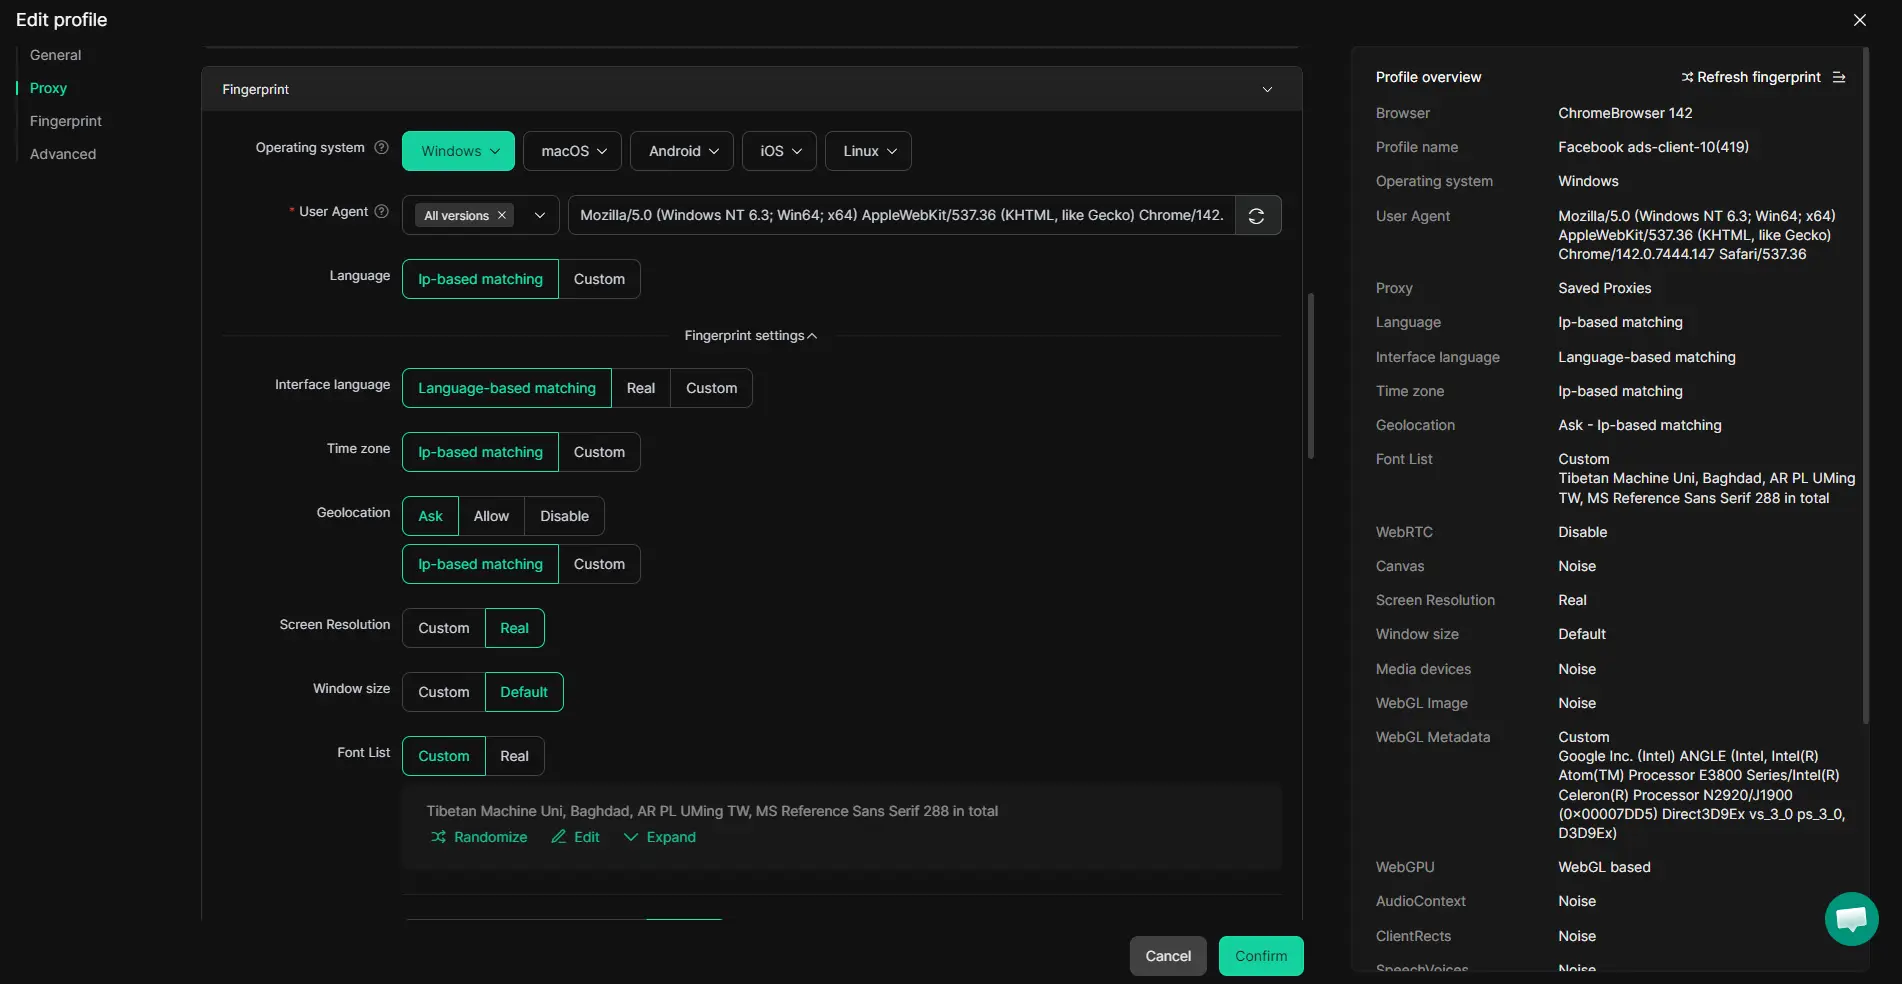
Operators can create a new browser profile in DICloak for every Ticketmaster account they handle. Each profile stores its own cookies, cache, and login data, keeping sessions from bleeding into each other. For each profile, teams set fingerprint signals like OS type, time zone, screen size, and WebRTC behavior, matching what a real device would report, and making it much harder for simple device checks to line up across accounts. This separation is what lets teams work in parallel without constant cross-session issues.
Assigning User-Owned Proxies to Each Profile
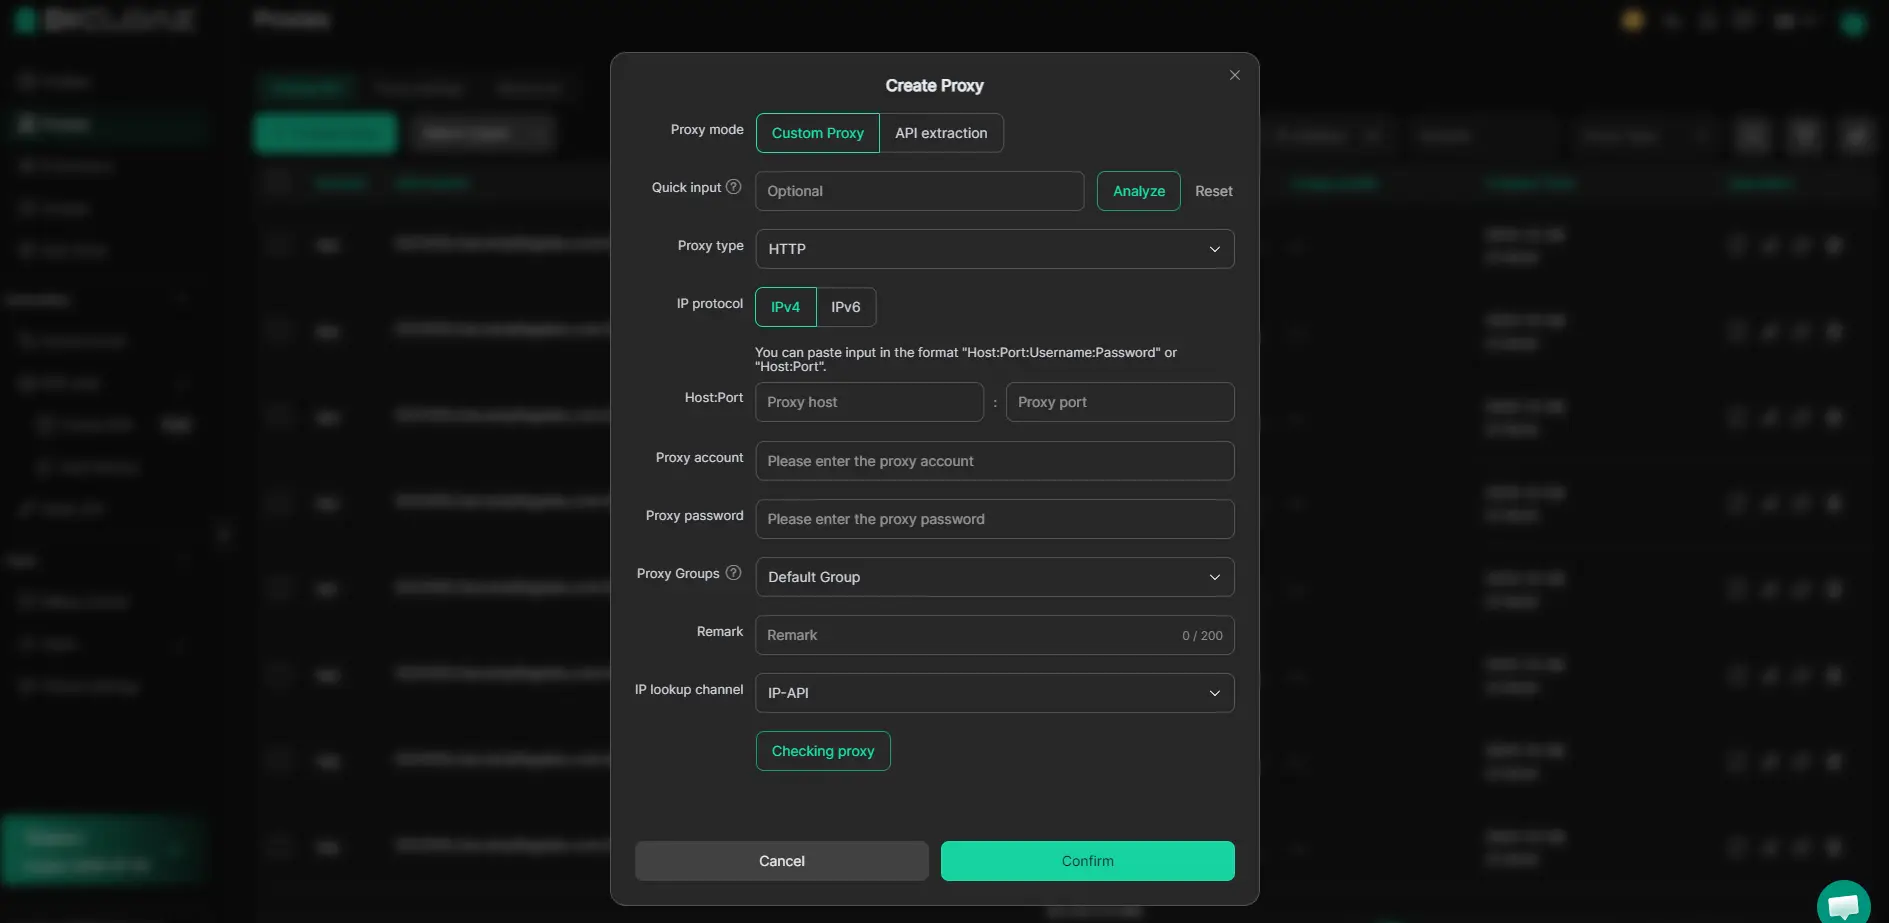
For every account environment, the operator can assign a proxy of their choice right in the profile settings. This means different profiles can appear to come from different networks, or match specific locations when needed. The built-in proxy test checks if the connection works and displays the exit IP before you even open the browser, helping catch typos or dead proxies before they cause a failed Ticketmaster sign up. DICloak only stores and applies your proxy settings; the proxy source, rotation, or legal use is up to you.
Using Bulk Operations to Set Up or Edit Multiple Profiles Efficiently
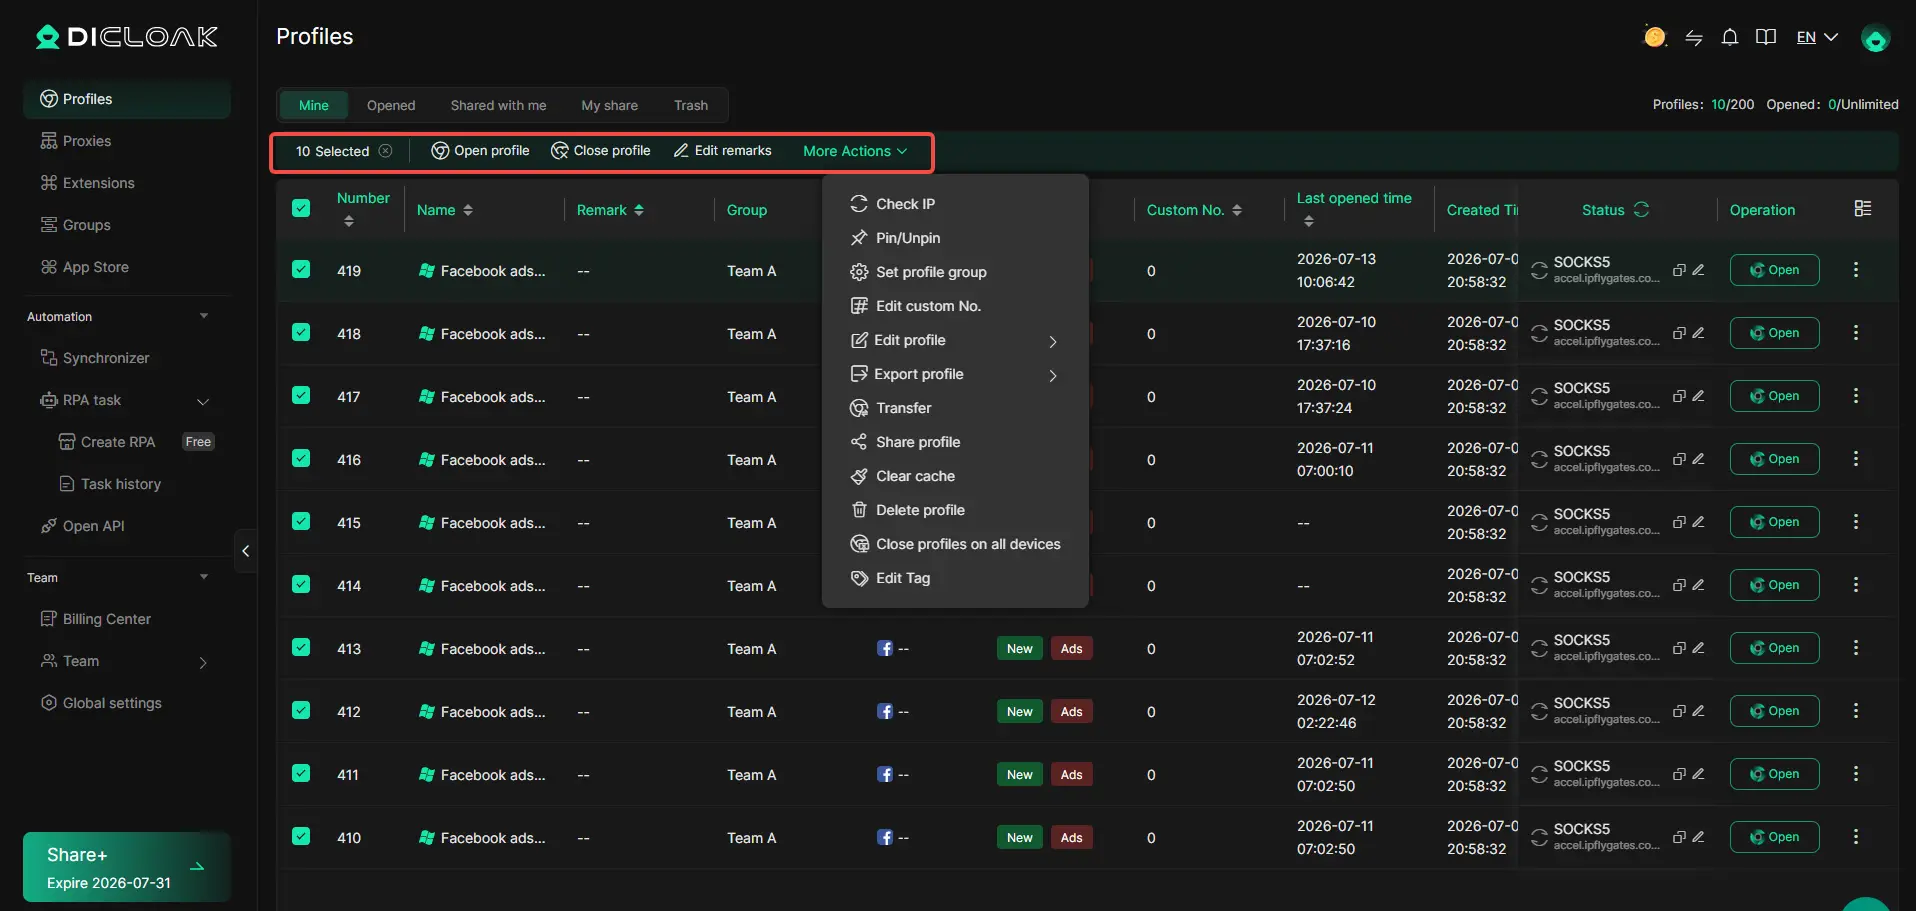
Bulk Operations let teams apply changes across dozens of profiles at once. For example, you can select 20 profiles and assign a new proxy group, or update fingerprint settings for all with one action, saving hours compared to manual edits. The real payoff is speed: scaling up for a large drop or rotating out old setups doesn’t get bogged down in repetitive clicks. Just double-check batch edits; a wrong setting copies to every selected profile.
Getting these basics right sets up the rest of your workflow. Next, it’s worth seeing where multi-account management still goes off the rails, even with tools like DICloak in place.
Common Mistakes and Risks When Creating or Managing Ticketmaster Accounts
The biggest failures when you create Ticketmaster account come from overlooked device signals, rushed security setup, and unsafe automation. These slip-ups can waste days, sometimes costing you access right before a ticket drop.
Reusing Devices, IPs, or Browser Environments
Platforms connect accounts through device fingerprints, shared IP addresses, and browser cookies. If you set up two Ticketmaster profiles on the same phone, or use a recycled laptop without wiping browser data, you risk linking accounts. The most common trigger for blocks is reusing the same device or internet connection for multiple signups. Even a browser extension can leave traces, so fresh environments matter.
Ignoring Verification or Security Steps
- Set up 2FA and recovery email before you buy tickets.
- Use a strong password, not a recycled one from another site.
- Confirm your phone number during registration, skipping this delays event access.
Automating Signups Without Proper Safeguards
Bulk automation without careful controls almost always triggers bans, especially if you skip fresh environments or unique proxies.
- Never run bulk signups from one IP or device.
- Space out registration times to avoid detection.
- Double-check each account has a unique email and phone, not reused credentials.
Next, see where creating extra accounts stops making sense, some risks just aren't worth the hassle.
When Creating Multiple Accounts Is Not Worth the Risk
Most people who try to create or manage several Ticketmaster accounts end up locked out or lose access to tickets. If you’re thinking about running more than one profile, check the event’s policies and what happens if you get flagged, sometimes the risk is just not worth it.
Strict Event Policies and Detection Improvements
| Scenario |
Risk Level |
Result if Caught |
| National tour with ID check |
High |
All linked accounts banned |
| Local event, email-only filter |
Medium |
Tickets voided, no refund |
| Group promo (official transfer) |
Low |
Tickets valid if transferred |
Venues now tie tickets to personal IDs or device fingerprints. Get flagged, and you often lose every ticket tied to your details.
Better Alternatives for Group Access
When buying for friends or a team, use Ticketmaster’s group sales or official ticket transfer options instead of making extra accounts. Sharing tickets through the platform is safer than risking a ban for duplicate registrations, official transfer is almost always the smarter move for group events.
Frequently Asked Questions About create ticketmaster account
Can I create a Ticketmaster account without a phone number in 2026?
Ticketmaster usually requires phone verification to create an account. This helps prevent bots and duplicate accounts. If you don’t have a phone number, you may not be able to finish the sign up process. Some users try using VoIP numbers or temporary services, but these are often blocked or unreliable.
How many Ticketmaster accounts can I have with one device or IP?
Ticketmaster limits multiple accounts from the same device or IP address. If you try to register several profiles, you risk triggering security checks or bans. For best results, use unique devices, emails, and phone numbers for each account. Avoid creating more than one account per device to keep your access safe.
What should I do if I never receive the Ticketmaster verification code?
First, check your spam folder or message app. Make sure your phone number is entered correctly. If you still don’t get the code, try restarting your device or switching networks. If the code doesn’t arrive after several tries, contact Ticketmaster support for help. They can troubleshoot and resend codes.
Is it safe to use proxies when creating Ticketmaster accounts?
Using proxies can help mask your IP, but Ticketmaster detects many proxy types. Unsafe proxies or poor setup may lead to account suspension. If you must use a proxy, pick a reliable, private one and avoid sharing it with others. Always follow Ticketmaster’s rules to reduce risks.
Can I delete or change my Ticketmaster account details after signup?
You can update your email, phone number, and password from your account settings. If you need to delete your account, use Ticketmaster’s help page or contact support. Some information, like purchase history, stays in their system even after deletion. Always check their policies before making changes.
Once your account is set up, you can immediately start browsing events and managing your preferences for tickets and notifications. Take a moment to review your profile details and security settings to ensure smooth and secure access when you’re ready to make a purchase. Try DICloak For Free
 Web Proxy Tools
 Free Tools
 Cookie Plugin
 UA Generator
 MAC Address Generator
 IP Generator
 IP Address List
 2FA Code Generator
 World Clock
 Anonymous Check
 WebRTC Leak Test
 UUID Generator
 Free Web Proxy Site
 Proxy Checker
 FB Ad Checker
 AI Web Scraping
 Free SMM Tools
 Twitter Shadowban Checker
 Instagram Name Checker
 UTM Generator
 Username Generator
 AI Hashtag Generator
 LinkedIn Headline Generator
 Social Media Image Resizer