Deciding on the right steps for creating Facebook page for business can get messy fast. You want a page that looks professional, but Facebook’s options and settings keep changing. If you’ve tried to fill in all the details only to find the “Create” button grayed out, or if you keep getting stuck on verification, you’re not alone.
What trips most people up isn’t the basic setup, it’s missing the small settings that affect how your page shows up in search, who can message you, or what business info is visible. Skip these, and you could end up with a page that never gets found or looks incomplete to customers. That’s why just following Facebook’s basic prompts rarely covers what actually helps your business stand out or avoid common mistakes.
A smart approach is to map out the entire process before clicking anything: from picking the right page type for your company, to handling admin roles, to checking privacy and messaging settings. This guide walks through every step in clear order, showing where people usually get stuck and what details make the difference between a generic page and one ready for real business.
Start with choosing the right page type, everything else builds on that choice.
What to Prepare Before Creating a Facebook Page for Your Business
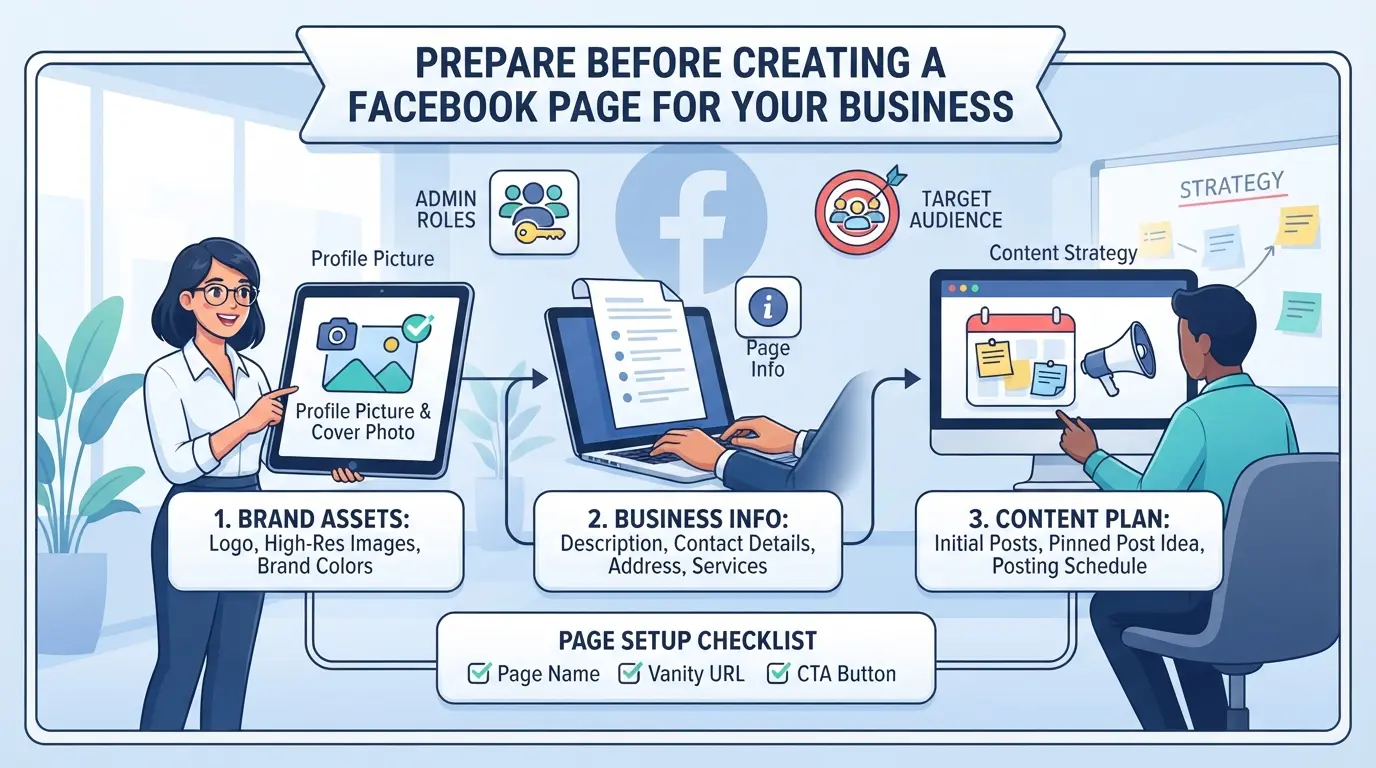
Jumping in and hitting “Create Page” without a plan often leads to mistakes you’ll regret, like picking a page name you can’t change, or missing data that puts your page under review. The one thing you cannot fix later is a bad page setup that confuses customers or triggers Facebook’s restrictions. Before you start, lock down every detail below so you’re not scrambling mid-process.
Choosing the Right Page Name and Category
Your page name must match your business branding, no extra symbols, all caps, or misleading terms. If you pick something generic or off-brand, you risk being flagged or losing trust. Facebook’s rules only let you change the name twice, and each change triggers a review that can take days or even block edits. Choose a category that is as close as possible to your real business activities. For example, use “Bakery” instead of just “Local Business” if you sell bread and cakes. Picking the wrong category makes it harder for the right customers to find you and can limit some business features.
Short answer: Pick your business’s exact name and the most specific category. Double-check for typos or mismatches before moving on.
Gathering Business Information and Visual Assets
- Gather your business contact email, phone, and physical address (if public-facing).
- Prepare a square logo image (at least 180x180px) and a cover photo with clear branding (at least 820x312px).
- Have a short business description (255 characters or less) ready to paste.
Understanding Facebook’s Page Policies and Eligibility
If you skip the policy check, you risk getting your page restricted or unpublished before you even finish setup. Only real people, not bots or fake profiles, can create a Facebook business page. You must follow Facebook’s rules about real identity, no copyright-infringing logos, and no misleading info.
- Make sure you’re logged in with a real, authentic personal account (not a shared or fake login).
- Double-check Facebook’s Page Guidelines for restricted words, images, and business types.
- If your business is in a regulated industry (like financial services or supplements), check for extra requirements before creating the page.
Once you’ve checked off each item, you’re ready to start the actual setup. The next section walks through the full step-by-step process, so you don’t miss any small but important steps that can trip up new business pages.
Step-by-Step: How to Create a Facebook Page for Business in 2026
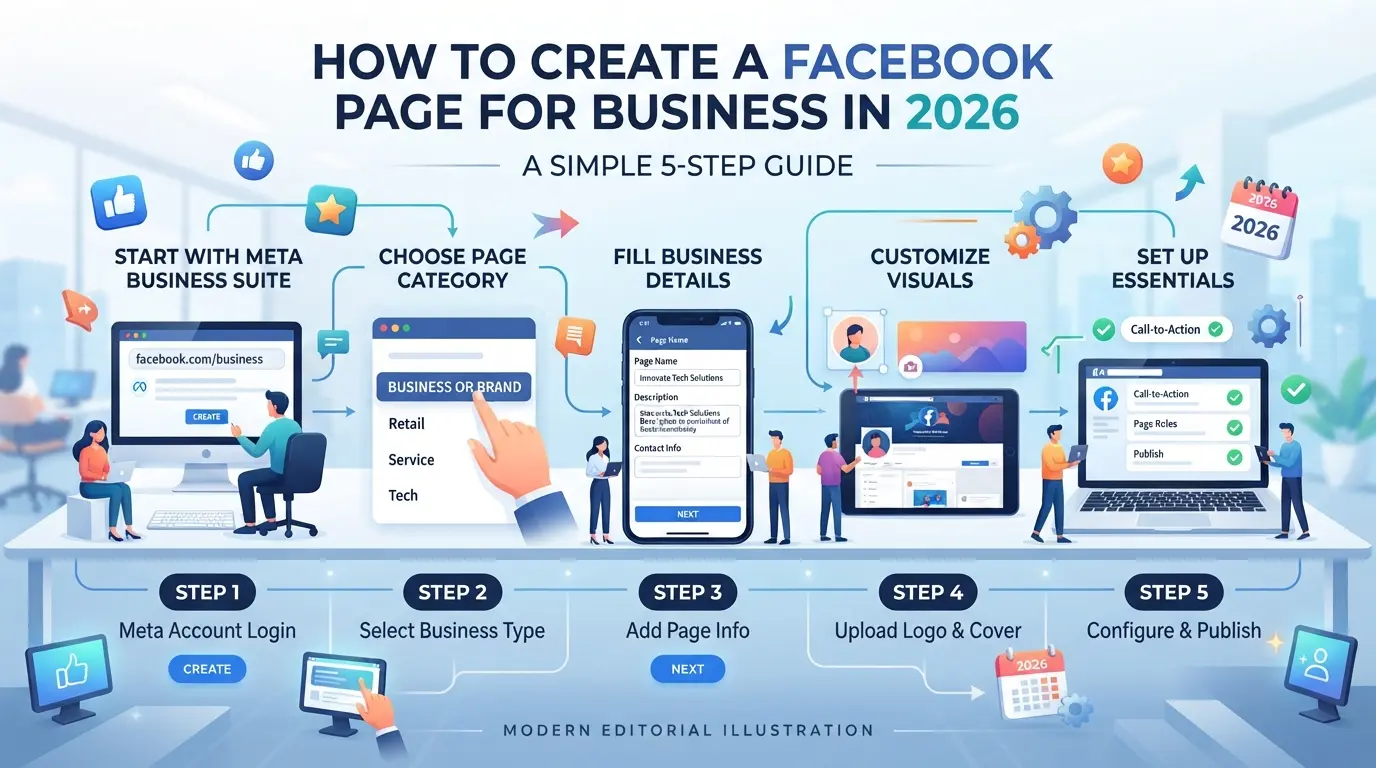
For anyone starting from scratch, getting your Facebook business page right means following a clear order, skip a step or rush a detail, and you’ll notice later that customers can’t find you, or your page looks half-baked. Here’s exactly how to set up a business page in 2026, from the first click to your public launch.
Starting the Page Creation Process
- Log in to your personal Facebook account. You’ll need this to create and manage a page.
- Click the “Pages” tab in the left sidebar, then select “Create New Page.”
- Choose “Business or Brand” as your page type. If you select “Community,” you won’t get access to commerce tools or ad features.
- If the “Create Page” button is grayed out, check if you’ve already reached the maximum allowed pages under your account or if your account has restrictions.
Filling Out Business Details and Contact Information
- Enter your business name exactly as you want it to appear. Changing it later can trigger review delays.
- Fill in your address and phone number. For local businesses, make sure the address matches what’s on Google Maps, this helps with local search rankings.
- Add your website. If you don’t have one, leave it blank for now instead of risking a broken link. Matching your business info across platforms is the fastest way to build trust and avoid confusion.
Uploading Profile and Cover Photos
- Upload your logo as the profile picture, minimum 170x170 pixels, PNG or JPG. Avoid text-only images, since they blur at small sizes.
- Use a cover photo sized at 1200x628 pixels. Pick an image that fits your brand colors and shows what you offer, not just a generic stock photo.
- If your image won’t upload, check for file size (under 5MB) or format issues.
Customizing Page Settings and Adding a Call-to-Action
- Open “Settings” and review privacy, messaging, and notification options. Set who can post, who can message, and what info is visible.
- Add a call-to-action button, like “Contact,” “Shop,” or “Book Now”, based on what you want visitors to do first.
- Test your CTA button from a logged-out browser. If it doesn’t work, try re-adding it or check for browser extension conflicts.
Missing a detail here can mean you lose out on leads or look unprofessional. The next section shows where businesses most often slip up, and how to avoid those mistakes before your page goes live.
What Mistakes Do New Businesses Make When Creating a Facebook Page?
Most new companies miss details that end up limiting their page’s reach or hurting credibility. Fixing these issues up front is usually easier than trying to recover later.
Using Incomplete or Inaccurate Business Information
Missing or wrong info on your page leads to poor search results and turns away customers who double-check details. Before launch, read every field twice, your business name, address, hours, and contact must match what’s on your website and Google listing.
Neglecting Page Verification and Security Settings
Unverified pages look less trustworthy and are more likely to get flagged or copied.
- If you skip verification, people may see “Unofficial Page” or get warnings when they visit.
- Set up two-factor authentication and request verification as soon as you’ve added all core details, the process can take days, so waiting until later costs you time and trust.
Overlooking Admin Roles and Access Controls
Giving everyone full admin rights or using personal accounts for business access is a common misstep. That move risks accidental lockouts or ex-staff keeping control. Assign only the needed roles and review who has access after every staffing change, one mistake here can cost you the whole page.
How to improve Your Facebook Business Page for Visibility and Trust
If you want your business page to actually show up in search and look credible, you need to go further than Facebook’s default setup. The biggest gains come from filling in details that real customers check , not just what Facebook recommends.
Completing Your Page Profile and About Section
Finish every key field: profile photo, cover image, contact info, business hours, and About description. Adding keywords that match what customers search for (like “pet grooming in Dallas” or “24/7 locksmith”) makes your page easier to find. Leave these blank, and your page will sink to the bottom of local results.
Enabling Reviews, Messaging, and Response Tools
- Turn on reviews , they impact both trust and search visibility.
- Enable messaging so customers can contact you directly.
- Set up automated replies for common questions or after-hours messages.
Publishing High-Quality, Consistent Content
Post updates, offers, or behind-the-scenes content at least once a week. Pages that sit silent for 30+ days lose reach, and customers often skip profiles with outdated posts. Use simple photos or short videos , real business activity gets more attention than generic stock images.
Promoting Your Page and Growing Your Audience
Even with a strong setup, you have to get your page in front of real people. Invite contacts and link your page on your website and email signatures.
- Run targeted Facebook ads to reach new local or interest-based audiences.
- Share your page link in partner posts or business directories.
- Host a giveaway or promo to encourage shares and reviews.
Keeping your page active and easy to contact is what makes it ready for team management and scaling later.
How to Manage Multiple Facebook Business Pages or Team Access Safely
If you’re running more than one Facebook business page or sharing access with a team, the biggest mistake is treating all accounts the same or skipping access controls. Even a single slip, like giving someone full admin when they only need editor rights, can leave your page open to accidental posts, lost access, or even a takeover. Here’s how to keep your business pages organized and your team access tight.
Each person should only get the permissions they need. Use Facebook Business Manager to assign roles, admin, editor, advertiser, and analyst, based on actual job tasks. To add or remove someone, go to Business Settings, choose People, and adjust their role on each page. Always double-check before granting admin status.
Best Practices for Account Security and Audit Trails
The real risk is not just outside hackers, it’s missing a change that someone on your own team made by accident or in a hurry. Set up alerts in Business Manager so you get notified when roles change, someone adds a new device, or page settings get updated. If you miss these notifications, you could find out too late that an ex-employee still has access or that someone posted as your business without approval.
For agencies, keeping a detailed log of who did what makes it easier to trace issues if something goes wrong. One missed log-out on a shared device or an unreviewed access request can turn into a security headache fast. If your workflow involves multiple people logging in from home or on the road, require two-factor authentication for every account. If you see a login from an unfamiliar location or a change you didn’t expect, act fast, lock down access, review the log, and reset permissions for everyone, not just the suspected account. The fastest way to catch and fix mistakes is to check your audit trail every week, not just when there’s a problem.
When to Use External Tools for Safer Multi-Account Management
- Facebook’s built-in roles don’t separate browser profiles, so logins can get mixed up on shared devices.
- If your team manages client pages, use a separate browser or profile manager for each client to avoid cross-account issues.
- For agency-scale work, look for tools that let you automate permission audits, assign roles in bulk, and keep login cookies isolated for each account.
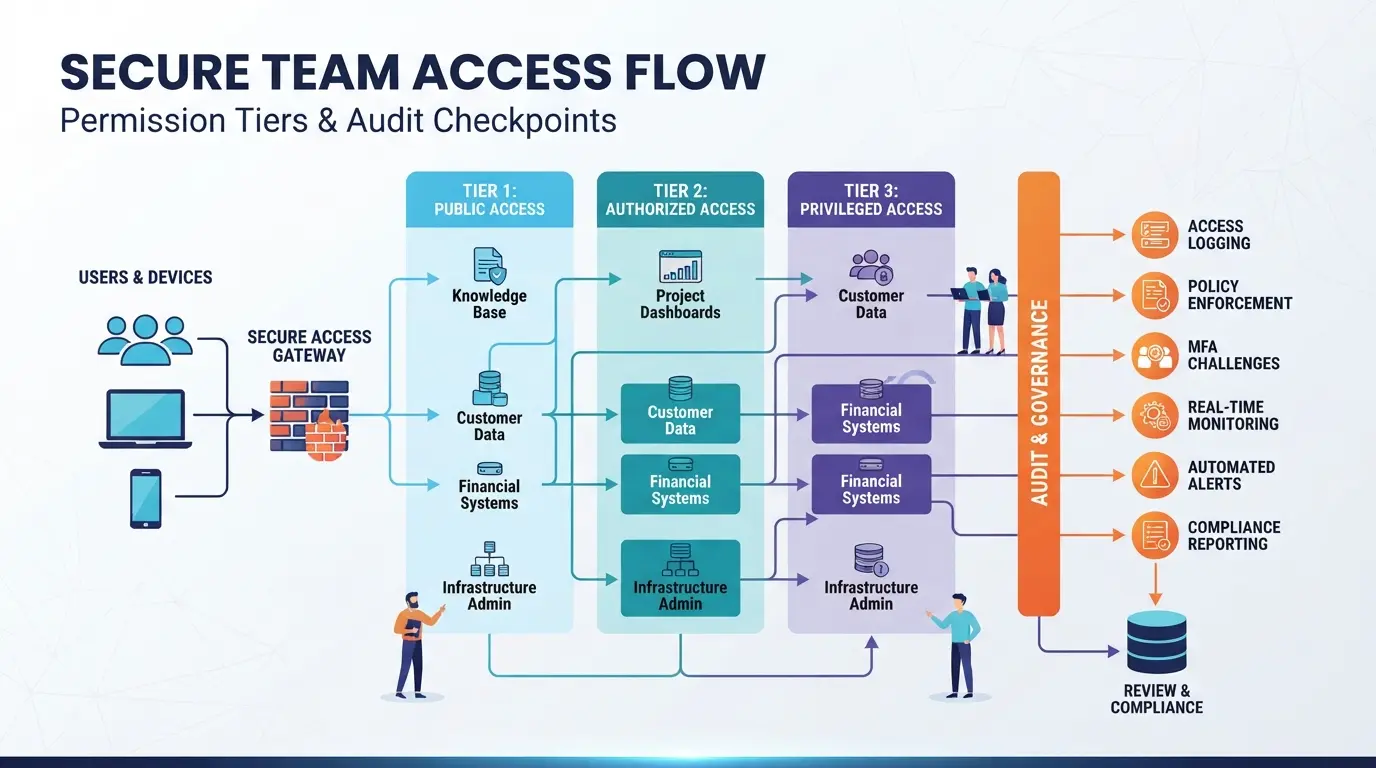
How to Separate and Secure Facebook Account Workflows with DICloak
Agencies and teams managing several Facebook accounts often run into conflicts with browser sessions, shared storage, or accidental cross-login. For those handling multiple accounts, especially when creating facebook page for business is part of the workflow, tools that offer true session isolation and permission control become necessary. DICloak steps in at the browser profile layer, helping operators set up separated environments, network connections, and team access controls without touching Facebook’s native roles or page settings.
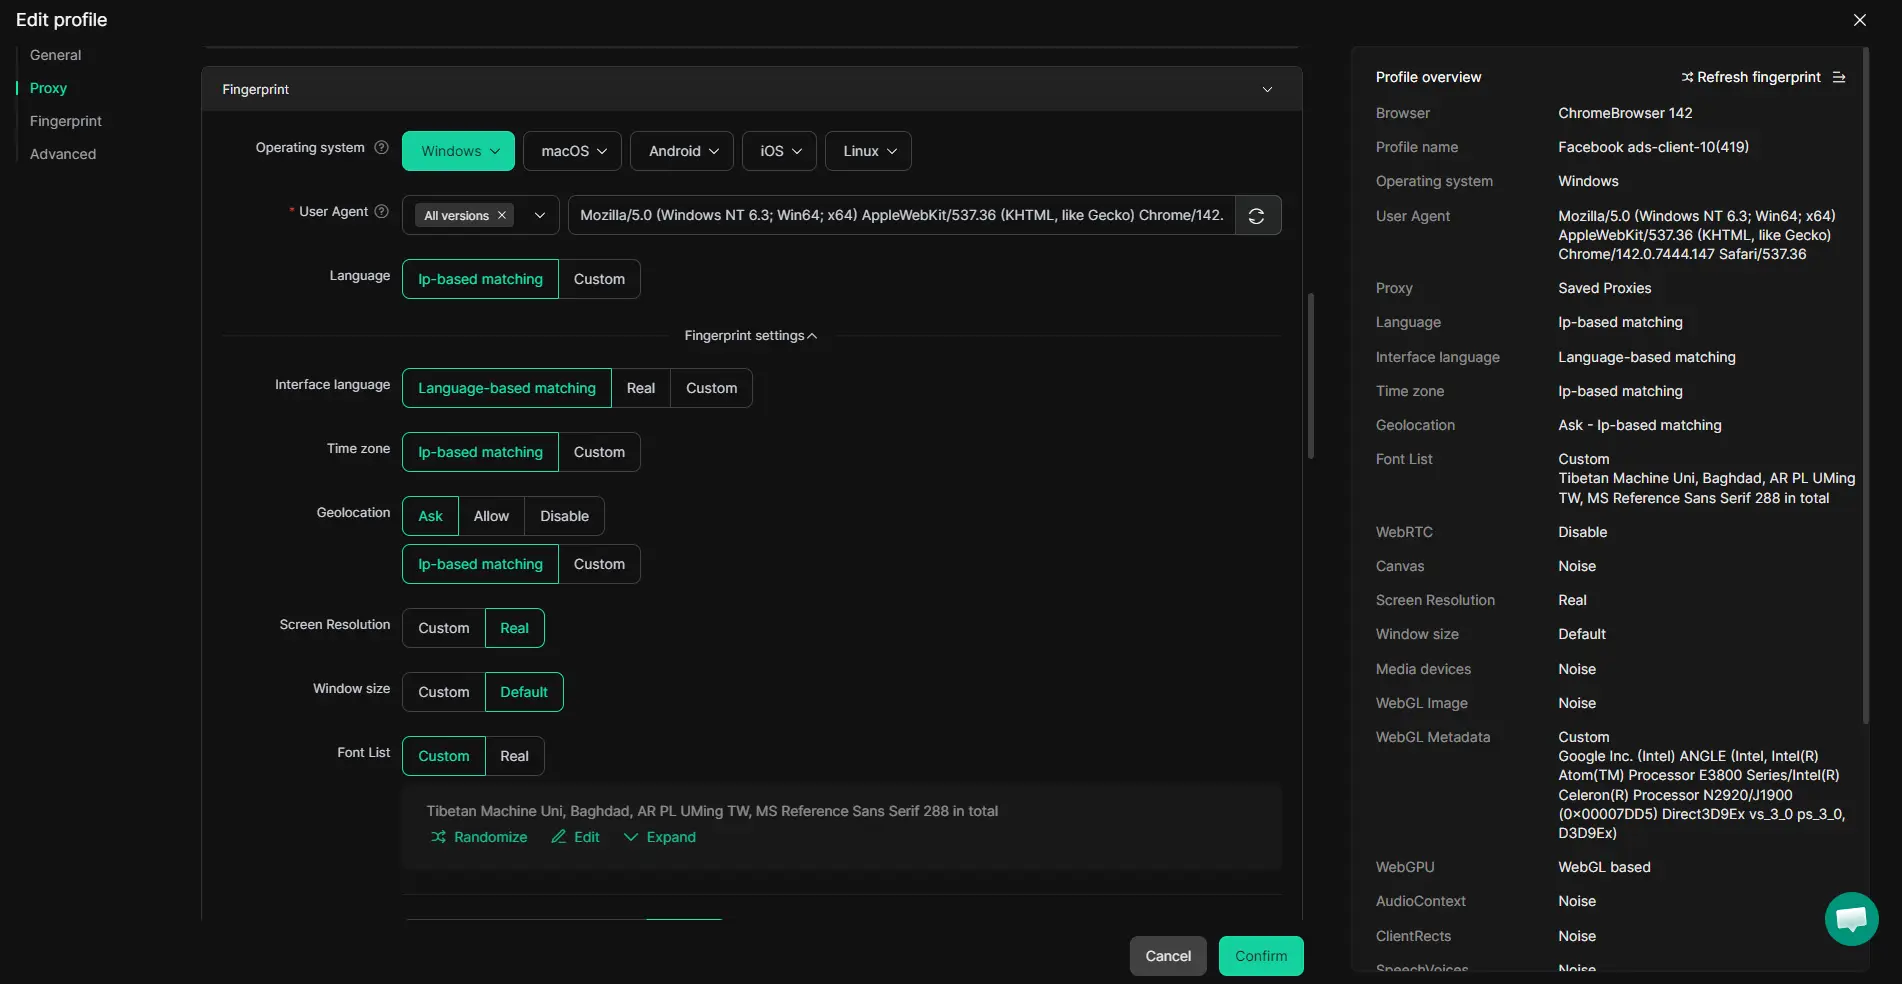
Creating Isolated Browser Profiles and Configuring Fingerprints
Operators can create a new DICloak profile for each Facebook account, setting the operating system, user agent, geolocation, content language, and time zone to match the intended user. This keeps login sessions separate and prevents browser storage from overlapping, critical for agencies where multiple team members run different accounts on one device. The scope is limited to browser-profile access; it does not affect platform settings or page objects.
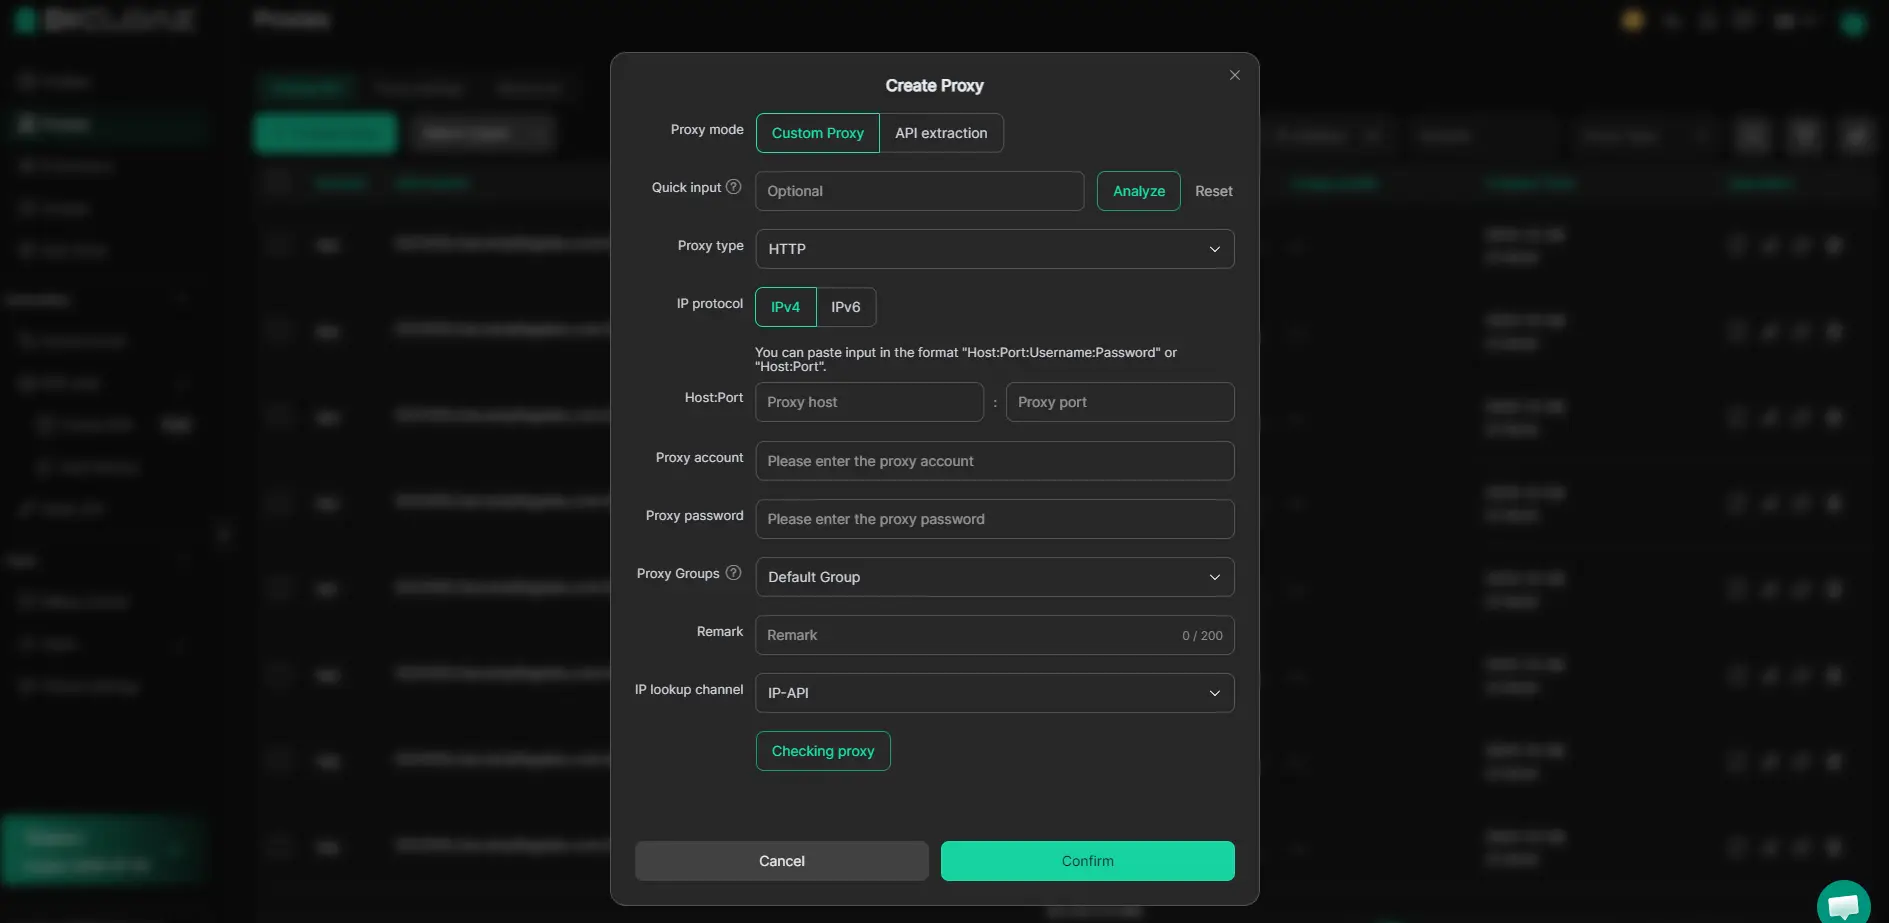
Assigning User-Owned Proxies to Each Profile
Each browser profile can be linked to a custom proxy. Operators enter their own proxy details (HTTP, HTTPS, or SOCKS5) and use DICloak’s built-in connectivity check to verify exit IP and location before starting the session. This setup is key for teams that need distinct network connections per account, but the responsibility for proxy quality, compliance, and rotation stays with the user. DICloak does not supply proxies or decide which IP is suitable.
Controlling Team Access and Permissions for Facebook Account Profiles
Admins can build member groups and assign access only to the browser profiles needed for each role. Permission controls let you restrict which team members can view, open, or edit specific profiles, minimizing mistakes and limiting exposure. These permissions apply strictly inside DICloak, Facebook’s own role and page controls are not affected.
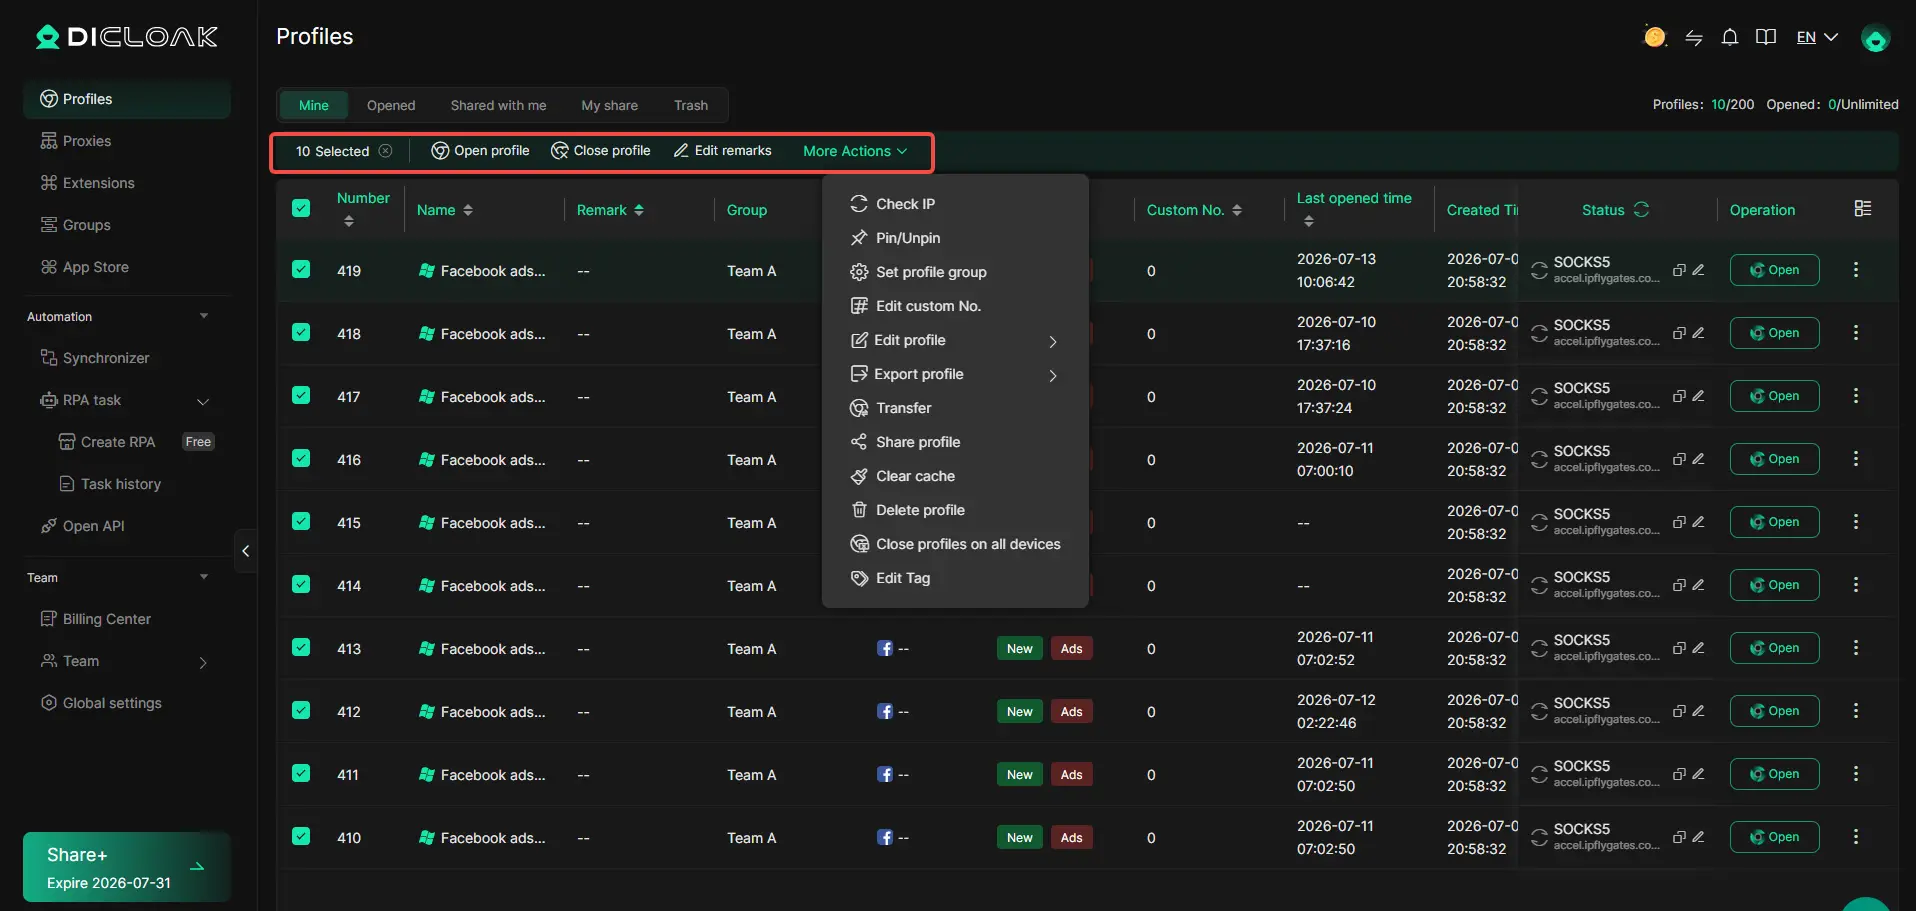
For teams ready to separate account environments and manage access tightly, these controls help keep workflows organized and secure, especially as privacy and compliance risks grow.
Privacy, Security, and Compliance Tips for Facebook Business Pages in 2026
If you’re creating a Facebook page for business in 2026, skipping privacy and compliance steps can get your page flagged or even suspended, so check these items before launch.
Understanding Facebook’s Latest Privacy and Data Policies
The 2026 updates mean business pages now display more public-facing info by default, like admin names for transparency. Custom audience and messaging data are logged longer, and users can see more of your page’s interaction history. Missing these new exposure rules can lead to unintentional data leaks.
Setting Up Page and Account Security Features
- Turn on two-factor authentication for all admins
- Set up Facebook login alerts for new devices
- Update recovery emails and remove unused admin accounts
Staying Compliant with Regional and Industry Regulations
Most regions apply GDPR-style standards now. U.S. states like California require extra data controls.
- Post a clear privacy policy link on your page
- Respond to data removal requests within 30 days
- Log all data-handling actions for audit trails
When Should You Consider Advanced Facebook Page Management Tools?
If you’re only creating a Facebook page for business and running one or two pages, Facebook’s built-in tools cover the basics. You need advanced management tools once your workflow breaks down, like when you juggle many pages, handle several admins, or face compliance checks that native tools can’t support.
Signs You’ve Outgrown Facebook’s Native Management Tools
| Trigger |
What Happens |
What You Need Next |
| More than 3 pages |
Logging in/out slows you down |
Multi-account dashboard |
| Multiple admins/teams |
Hard to track who did what |
Permission controls, audit logs |
| Legal or compliance reviews |
No export or change history |
Workflow & log tracking |
When team size or regulatory rules push you past “one person, one page,” the built-in tools start to limit you.
Comparing Third-Party Solutions for Multi-Account and Team Workflows
Most teams turn to browser profile managers, social media dashboards, or permission tools. The best fit gives you clear role separation, safe page access, and logging, without extra risk or complex set-up.
Frequently Asked Questions About creating facebook page for business
Can I create a Facebook business page without a personal account?
No, Facebook requires you to have a personal account before creating facebook page for business. Your profile acts as the administrator, but your personal information stays private. Visitors and customers only see your business details, not your own profile. You can add other admins later to help manage the page.
How do I transfer ownership of a Facebook business page?
To transfer ownership, assign a new person as an admin in Page Roles. Once they accept, remove your own admin access. Facebook does not use the term "owner" but the main admin controls the page. Make sure the new admin has a personal account linked to the page.
What are the image size requirements for Facebook business page profile and cover photos in 2026?
For profile photos, use 170 x 170 pixels in JPG or PNG format. For cover photos, use 820 x 312 pixels in JPG or PNG. Images should be clear and not blurry. Avoid text-heavy images, as they may not display well on mobile devices.
How do I merge two Facebook business pages?
You can merge pages if they have similar names and represent the same thing. Go to your page settings, choose “Merge Pages,” and follow the prompts. Both pages must have admin access and similar content. After merging, likes and check-ins combine, but posts and photos from the old page are lost.
Is it possible to manage multiple Facebook business pages from one account?
Yes, you can manage several business pages using Facebook Business Manager. This tool lets you switch between pages, assign team members, and track performance easily. Some third-party tools like Hootsuite or Buffer also support multi-page management for scheduling posts and monitoring activity.
Once your business profile is set up, consider how you’ll engage your audience with relevant posts, respond to inquiries, and monitor analytics for growth opportunities. Taking these steps will help you make the most of your online presence and build lasting customer relationships. Try DICloak For Free
 Web Proxy Tools
 Free Tools
 Cookie Plugin
 UA Generator
 MAC Address Generator
 IP Generator
 IP Address List
 2FA Code Generator
 World Clock
 Anonymous Check
 WebRTC Leak Test
 UUID Generator
 Free Web Proxy Site
 Proxy Checker
 FB Ad Checker
 AI Web Scraping
 Free SMM Tools
 Twitter Shadowban Checker
 Instagram Name Checker
 UTM Generator
 Username Generator
 AI Hashtag Generator
 LinkedIn Headline Generator
 Social Media Image Resizer