Many people use a proxy to visit websites from other countries, scrape data, or manage multiple accounts at once. Some just want extra privacy so others can’t easily track what they do online.
But there’s a risk. If a proxy isn’t set up right or starts leaking, someone’s real IP could show. That could lead to banned accounts or failed projects, especially for people working in cross-border marketing or handling sensitive data.
So it’s common to wonder, “How do I check proxy to see if it’s working right?” It’s not just about speed. It’s also about keeping location and device info hidden.
This article dives into these questions. It shows why a proxy checker matters and how to make sure a proxy is safe and truly works. With the right checks, it’s easier to stay secure and avoid costly mistakes.
How to manually check proxy settings (Windows / macOS / browser)
First, checking system-level proxy settings is very important. This helps me build a clear base before using any proxy checker tool to see if my proxy is active.
On Windows
1.I press Win + I to open the Settings window.
This quickly takes me to the network area where I see “Network & Internet.”
2.I click on “Network & Internet” on the left, then pick “Proxy.”
Here I find two main parts: “Automatic proxy setup” and “Manual proxy setup.”
3.I look to see if “Automatically detect settings” is turned on.
If it is, Windows will try to find any WPAD or PAC scripts on its own.
4.Under “Manual proxy setup,” I check if “Use a proxy server” is switched on.
If it is, I can see the proxy’s address and port and make sure they are filled in.
5.I can also open Command Prompt and type netsh winhttp show proxy to see proxy details.
This shows me the default HTTP proxy that Windows uses.
6.Sometimes I also run Win + R, type regedit, and look in the registry under HKCU\Software\Microsoft\Windows\CurrentVersion\Internet Settings.
There, I check values like ProxyServer or AutoConfigURL to see extra hidden settings.
With all these steps, I can be sure how my proxy is set up in Windows. Then I feel ready to use a proxy checker to see if it’s working
On macOS
- I click the Apple icon at the top left of the screen and pick “System Preferences.”
This is where I find all the network options for my Mac.
2.Inside System Preferences, I click “Network.”
I see all my connections here, like Wi‑Fi or Ethernet, and I pick the one I’m using.
3.After choosing the connection, I click the “Advanced” button in the bottom right.
This opens tabs that show TCP/IP, DNS, and also proxies.
4.I switch over to the “Proxies” tab.
Here I see checkboxes for HTTP, HTTPS, SOCKS, Auto Proxy Discovery, and more.
5.I check which boxes are ticked and look at the server addresses and ports.
For example, if HTTP Proxy is checked, I confirm the right IP and port are entered
6.When I’m done, I tick or untick the boxes as needed, then click “OK” and “Apply.”
This way my Mac saves all the proxy settings I’ve just reviewed.
By doing this, I clearly see how proxies are set up on my Mac. It also makes it easy to later check proxy behavior with online tools.
Sometimes old network cache files or leftover system settings can still interfere with proxy behavior. A quick cleanup helps avoid those conflicts. Tools like CleanMyMac can clear network caches and system junk, ensuring proxy settings apply correctly and consistently.
In browsers
Checking proxy settings in the browser helps me see if the browser uses system proxies or its own setup. Here’s how I do it in two popular browsers.
Chrome / Edge
1.I open the browser, click the three dots at the top right, and go to “Settings.”
Then I scroll down and click “Advanced” to open more options.
2.Under “System,” I click “Open your computer’s proxy settings.”
This sends me back to the Windows or macOS settings covered above.
3.By looking at the system proxy window, I know what the browser will use.
If my system doesn’t have a proxy set, Chrome or Edge won’t use one either.
4.For a deeper look, I sometimes type chrome://net-internals/proxy in the address bar.
This page shows how Chrome resolves proxy settings and any special rules.
Firefox
- In Firefox, I click the menu at the top right and pick “Settings.”
I scroll all the way down to the “Network Settings” section.
2.I click the “Settings…” button there, which opens a window for proxy choices.
It gives me four options: No Proxy, Auto-detect, Use system settings, or Manual.
3.If I pick “Manual,” I look closely at the HTTP, SSL, or SOCKS fields to see if addresses and ports are set.
I also check if “Use this proxy server for all protocols” is ticked, which covers all types at once.
4.After this, I know exactly what kind of proxy Firefox is using.
This helps me spot problems and decide if I need to tweak settings.
How to Use Third-Party Online Tools to See If a Proxy Works
After the system and browser checks, it’s time to go directly to online tools. These let me quickly compare how a proxy really performs, without installing any apps. They are the easiest way to check proxy status.
Here’s the English translation with detailed sections, each point having at least three sentences, clearly explaining the pros, cons, value, and usage scenarios of iplocation.net, suitable for SEO and a clear, logical structure:
iplocation.net — Free Online IP Geolocation Tool
iplocation.net is a fully free IP-to-location service that requires no account or payment. When users open the site, they immediately see key data like IP, ISP, country, and city. The tool cross-checks multiple databases, making its responses more reliable.
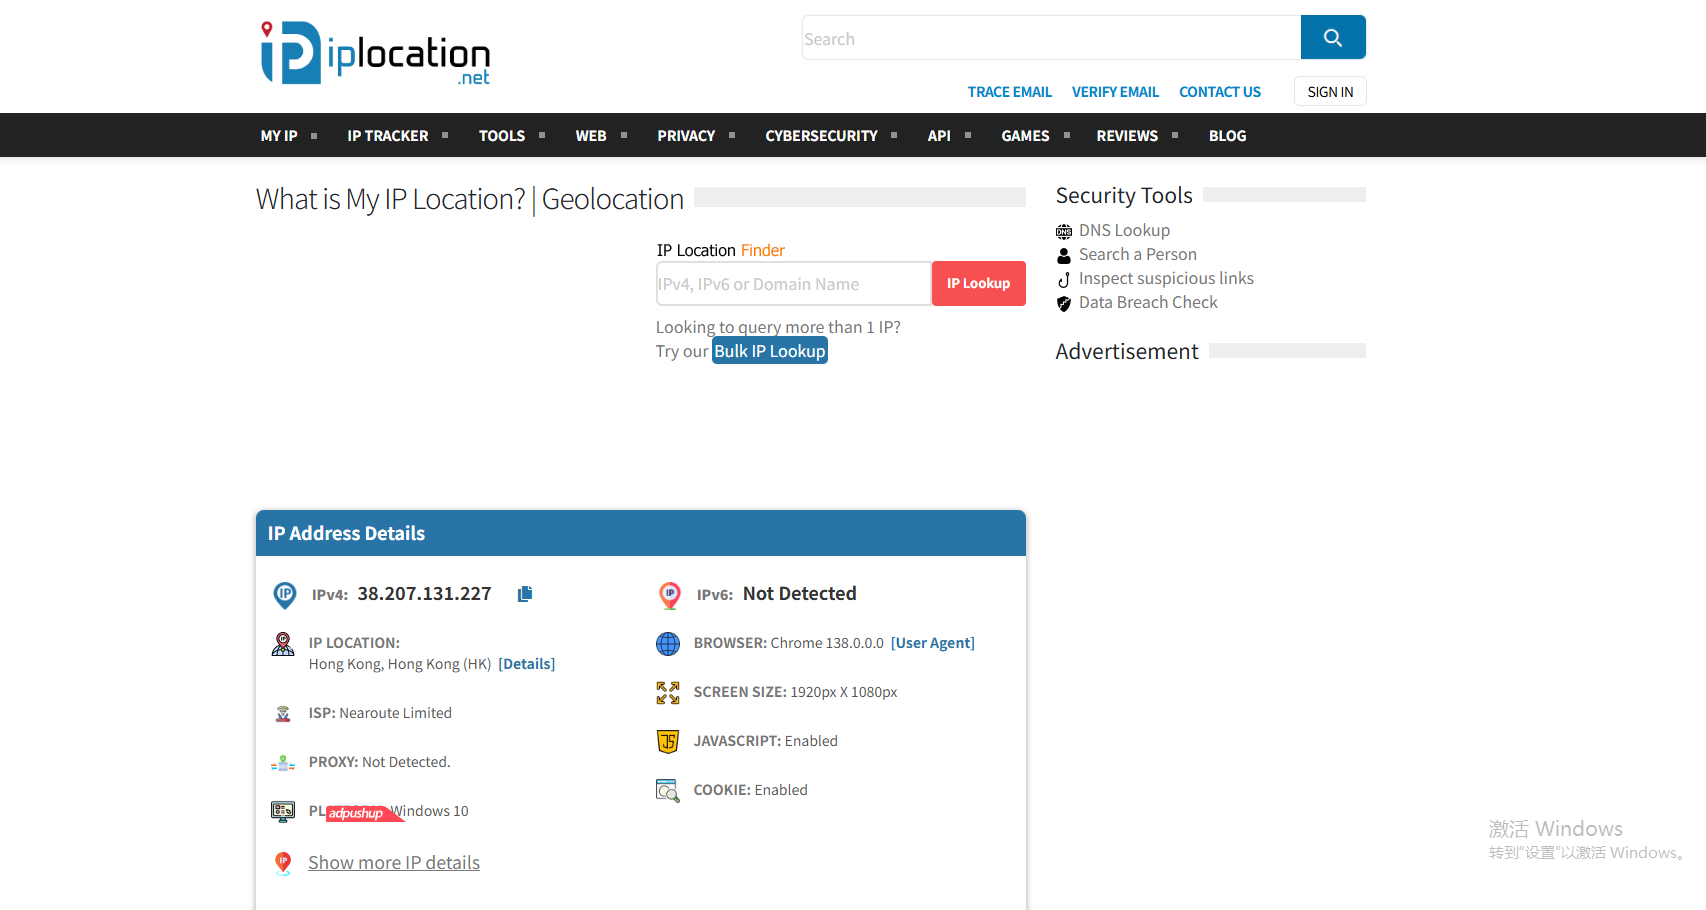
Pros
- Clean, fast-loading interface
The minimalistic design eliminates distractions—no pop-ups or overwhelming visuals. The page loads in just a few seconds, ideal for users who need quick feedback. Its simplicity ensures anyone can use it without instructions.
- High trust and reliable data sources
The site aggregates data from multiple credible IP databases, increasing result accuracy. Scamadviser gives it a high trust score, reassuring users about safety . This trust level makes it safe for people concerned about privacy.
- Excellent country-level accuracy
Country location accuracy reaches around 95–99% thanks to multiple geolocation providers.Even if city-level info varies, users can confidently verify country match. This accuracy makes it a dependable tool for basic location checks.
Cons
- City-level accuracy varies
Accuracy for city and region hovers between 50–75%, meaning users may see neighboring cities displayed. That can confuse users expecting pinpoint accuracy. For tasks requiring exact city location, this tool may fall short.
- CDN IPs may appear as proxy addresses
When using CDN services, the site might show a CDN node’s IP, not the actual proxy. That can mislead users into thinking the proxy isn’t working. Such misinterpretations can undermine trust in the testing process.
- Banner ads might be distracting
While the interface is clean, occasional banner ads may appear along the bottom or sides. These ads don’t block functionality, but some users may find them distracting. That slightly reduces the premium feel of the tool.
Cost-effectiveness
- Completely free without limits
Users can access it anytime without signing up or hitting paywalls. That makes it ideal for frequent use, such as checking multiple proxies or VPNs in one session. Compared to paid tools, its "always-free" model has unmatched value.
- No technical skills required
The straightforward interface shows results immediately upon page load. Users don’t need to understand networking or proxies to interpret results. It’s perfect for beginners or non-technical users.
- Browser-friendly and lightweight
The site’s lightweight design ensures fast performance, even on slow or public networks. It works seamlessly on desktops, laptops, and mobile devices. This makes it highly convenient for quick tests anywhere.
Ideal Users & Use Cases
Who benefits most:
- Proxy/VPN beginners: Want to verify whether their new proxy changes their IP.
- Digital marketers: Need to check if the proxy's country aligns with their campaign target.
- Support or QA personnel: Want to confirm that network changes reflect expected IP locations.
Common scenarios:
- After changing a proxy server, users verify if IP and location update.
- Differentiating between CDN, VPN, and proxy IPs quickly and easily.
- Needing a fast, on-the-fly check when installing new VPN or proxy services.
whoer.net— Comprehensive Online Proxy Testing Platform
whoer.net is a powerful online tool designed to test proxies and VPNs on multiple levels. It goes beyond simple IP checks by offering DNS leak tests, WebRTC leak detection, browser fingerprinting, and even blacklist checks. This makes it a go-to choice for users who demand layered privacy evaluation.
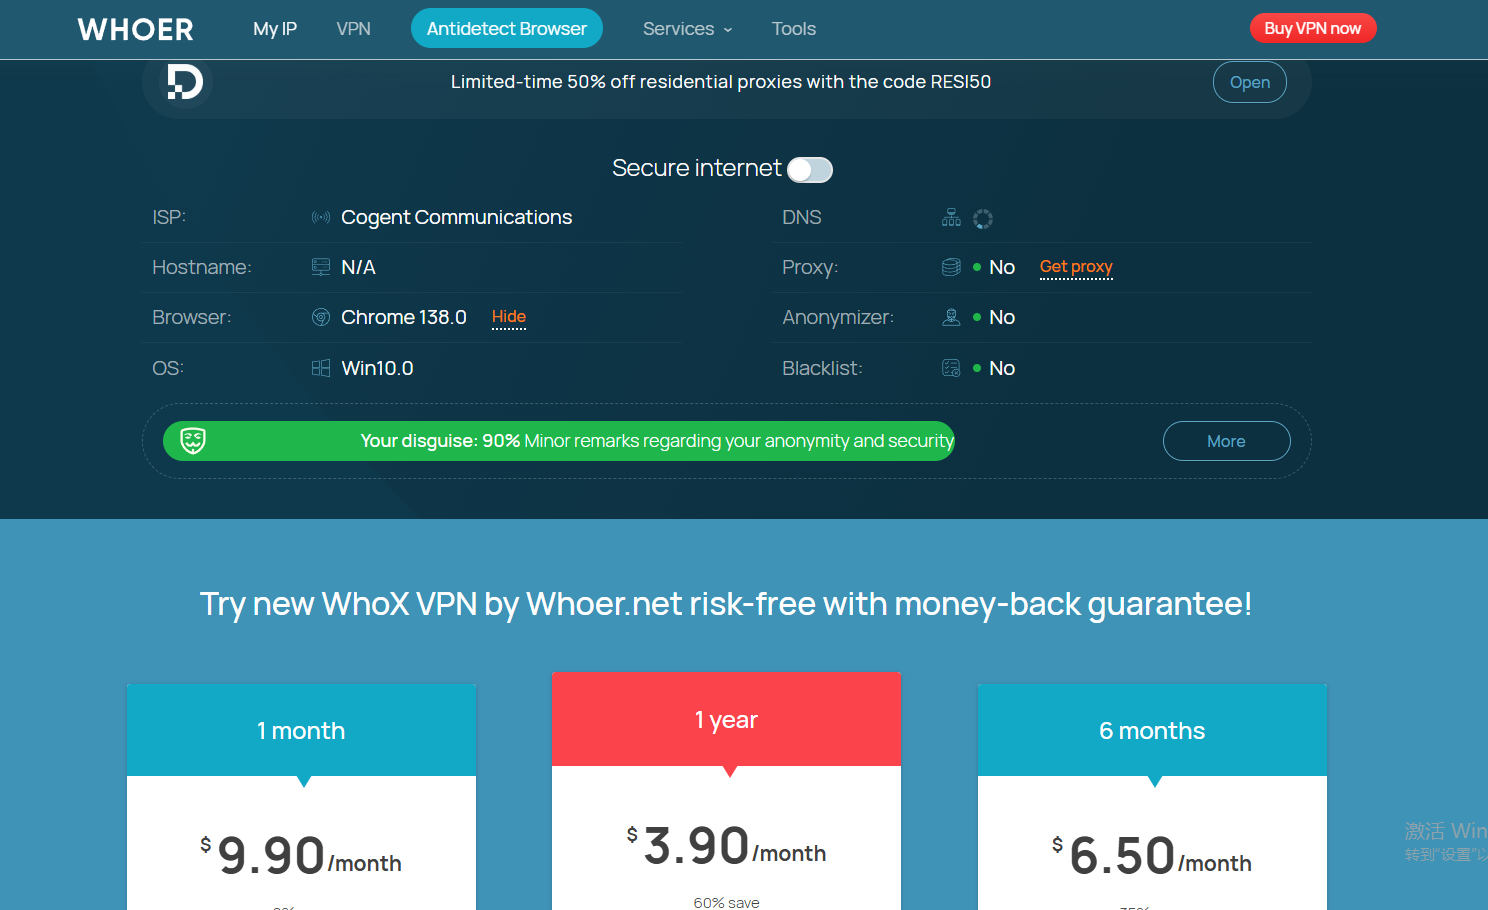
Pros
- Multi-layered leak detection whoer.net can detect IP, DNS, WebRTC, and browser fingerprint leaks all in one place. It even checks for blacklist status and browser plugins like Flash and Java. For users who want deep insight into anonymity, this breadth of checks is invaluable.
- Anonymity scoring system The platform gives users a percent-based anonymity score that shows how well their proxy hides their details. It also lists deduction reasons, explaining where leaks may occur — for instance mismatched DNS country or language. This transparency guides users on how to improve settings.
- Browser fingerprint check By analyzing toolbars, plugins, system fonts, and browser versions, whoer.net highlights fingerprint data that websites might use to identify users. This deep inspection helps detect if the proxy or VPN is masking enough metadata. For privacy-savvy users, this adds an essential layer of defense.
Cons
- Score system can be misleading Some users report that whoer.net rates proxies low simply because DNS country doesn’t match IP country . This can lead to confusion, since the proxy may actually work fine but fails the DNS country test. Users must interpret results carefully instead of trusting the score alone.
- False alarms from third-party blacklists whoer.net relies on external blacklisting services to flag proxy IPs. If a proxy appears on a third-party list, the tool labels it as “blacklisted” even if it’s harmless. This may unfairly penalize legitimate proxy services.
- Mimics but isn’t perfect antidetect While whoer.net offers fingerprint and WebRTC checks, it doesn’t fully mimic specialized anti-detect setups. Users managing multiple high-stakes accounts might need more robust solutions. Still, for most, whoer.net provides a strong baseline.
Value
- Free basic testing with premium options whoer.net offers most IP, DNS, WebRTC, and fingerprint checks for free. Premium features, like VPN services, are optional and targeted at users needing extra convenience. This makes it a great starting point before investing in paid solutions.
- Detailed feedback justifies premium Even without payment, users get detailed explanations for leaks — not just a score. This helps pinpoint exact weaknesses and guides adjustments. The value lies in actionable insight, not just raw data.
- Suitable for VPN and proxy confirmation It’s well-suited for users who just set up a proxy or VPN and want to confirm it works across all layers (IP, DNS, WebRTC, fingerprint). For users who rely on privacy for work or evading detection, this makes whoer.net a smart, cost-effective choice.
Best For
- Intermediate to advanced users People who manage privacy-sensitive tasks like multi-accounting, scraping, or geo-targeting find whoer.net essential. The layered test suite addresses more than simple location checks.
- Small businesses and digital marketers Professionals who need reliable proxy setups to appear in specific regions or avoid geo-blocks will benefit. The fingerprint checks help ensure they stay undetected by targeting algorithms.
- Privacy-conscious individuals Anyone serious about staying anonymous — such as journalists, activists, or researchers — will appreciate the depth. Even casual users get a strong sense of protection level.
Usage Scenarios
- After configuring a proxy, users can visit whoer.net to see IP, DNS, WebRTC, and fingerprint info in one session.
- Those seeing a low score due to DNS mismatch can use the report to fix their DNS settings.
- Users needing audit-ready reports for clients can rely on whoer.net’s breakdown to demonstrate proxy coverage.
Discover DICloak’s Proxy Checking Solution
Our user-friendly tool allows you to efficiently evaluate and compare proxies, ensuring optimal online privacy and security tailored to your specific needs. Explore the possibilities with our streamlined Proxy Checker and elevate your browsing experience today.
Why Our Proxy Checker Stands Out
1.Our proxy testing is designed to deliver rapid inspection speeds, so you never waste time waiting on large proxy lists.
2.Our proxy checker can quickly examine your proxies and consistently uses our advanced algorithms to identify the most effective proxies.
Proxies are verified based on several key criteria, such as type, anonymity, speed, and location, ensuring that each one fits your precise requirements.
3.Additionally, our online proxy checker features a user-friendly interface that clearly displays the inspection results. It also lets you customize the information you want to see, so you stay focused on what matters most.
Features of our proxy testing
Our Proxy Checker is loaded with features to help you fully understand the quality of your proxy servers:
Check the availability of IPv4 proxy servers:
Whether your proxies are on the older IPv4, our tool handles both seamlessly.
Country and city definitions:
It pinpoints the geographical location of the proxy so you can ensure alignment with your campaign or privacy needs.
Validate username and password, verify anonymous proxy authorization:
It checks authentication details to confirm the proxy is not just accessible but also properly authorized.
Inspect HTTP(-s) and SOCKS proxy servers:
It rigorously tests all major proxy types to confirm they’re up and running.
Summary & Recommendation
Readers can pick the right mix of tools based on their tech skills and privacy needs. This way, they make sure their proxy truly works as expected. Next, I’ll also share real examples to show how to use these tools to spot common issues.
FAQs
1. How can I tell if my proxy is really working?
I usually open tools like iplocation.net or whoer.net. I check if my IP, country, and DNS match what my proxy should show. If they do, my proxy works.
2. Why does whoer.net give me a low anonymity score?
Sometimes the DNS or browser language doesn’t match my proxy’s country. That can drop the score even if my IP is fine. I just use it as a hint to adjust settings, not a final judgment.
3. What’s a DNS leak, and why should I care?
A DNS leak means my device is still using my real ISP to look up websites, not my proxy. That can reveal my real location. Tools like dnsleaktest.com help me catch this problem fast.
4. Do I need to pay for proxy checking tools?
No. Most top tools like iplocation.net, whoer.net, and dnsleaktest.com are free. They’re enough for me to do a full basic check without spending anything.
5. What if my proxy looks fine but sites still block me?
It could be that the proxy’s IP is already flagged on some blacklist. I often try another IP or a different proxy provider. That usually solves it.
 Web Proxy Tools
 Free Tools
 Cookie Plugin
 UA Generator
 MAC Address Generator
 IP Generator
 IP Address List
 2FA Code Generator
 World Clock
 Anonymous Check
 WebRTC Leak Test
 UUID Generator
 Free Web Proxy Site
 Proxy Checker
 FB Ad Checker
 AI Web Scraping
 Free SMM Tools
 Twitter Shadowban Checker
 Instagram Name Checker
 UTM Generator
 Username Generator
 AI Hashtag Generator
 LinkedIn Headline Generator
 Social Media Image Resizer


